


The long-tail cast-on puts a row of tidy stitches on your needle using two lengths of the same yarn. One length comes from the ball; the other is the tail you measured before making your first loop.
This tutorial shows the slingshot hand position for right-handed knitting. You will learn how to estimate the tail, move the needle through each loop, count your stitches, and spot a cast-on edge that is too tight before you knit a full row.
What the long-tail cast-on does
As you add stitches, the tail makes the lower edge while the working yarn forms loops on the needle. The result is a firm, moderately elastic starting edge that suits many scarves, blankets, and practice swatches.
The motion looks complicated when you first see both strands moving at once. Break it into three needle movements—thumb, index finger, thumb—and a release. You can pause after each movement without losing your place.
If you are still choosing a first cast-on, our general guide to casting on knitting compares this method with knitted cast-on. This page stays with long-tail so you can see exactly where each strand belongs.
Use the method named in your pattern when the starting edge has a special job. An edge that must stretch widely, open later for live stitches, or match a decorative border may call for a different cast-on.
Gather yarn and a needle
For a first try, use smooth, light-colored medium-weight yarn. You will be able to see the two strands cross and count the loops without dark fibers hiding the stitch shape.
Choose a needle size that suits the yarn label or the pattern you are following. Straight and circular needles both work; with circulars, cast onto one tip and let the other tip hang free.
Keep scissors and a tape measure nearby. Neither tool is needed for every stitch, but the measure helps you plan the tail and the scissors are useful once you finish the project.
Try 20 stitches before casting on a long project. That small sample is enough to practice the hand motion, check the edge, and notice how much tail your own yarn and tension use.
Estimate the tail before you start
The tail supplies yarn to every cast-on stitch. If it ends before you reach the pattern’s stitch count, you cannot keep working this same long-tail cast-on from that short end.
One practical estimate is to wrap the yarn loosely around the needle once for each stitch you plan to cast on. Slide the wraps off while holding the measured length between your fingers, then mark where the slip knot should go.
For a 20-stitch practice row, make 20 wraps. Do not pull the wraps tight or stack them over the needle tip; use the needle’s full shaft so the estimate reflects the size of the loops you will actually make.
Add several extra inches after the measured wraps so you can hold the tail comfortably and weave it in later. An 8-inch allowance is a useful starting point, but thick yarn or a loose cast-on may use more.
For a large stitch count, cast on a short sample first and measure how much tail it consumes. Then multiply that amount for the full row and add a safety margin. This takes a little longer but accounts for your actual yarn and hand tension.
If your pattern gives the finished width instead of a stitch count, another rough starting estimate is about three to three-and-a-half times that width, plus a tail for finishing. Treat either estimate as a guide, not a guarantee.
Before tying the knot, identify the end that leads back to the ball. That is the working yarn you will knit with after casting on. The measured free end is the tail.
Put the first loop on the needle
Make an adjustable slip knot at the point you measured. Slide its loop onto the needle in your right hand, with the needle tip pointing left.
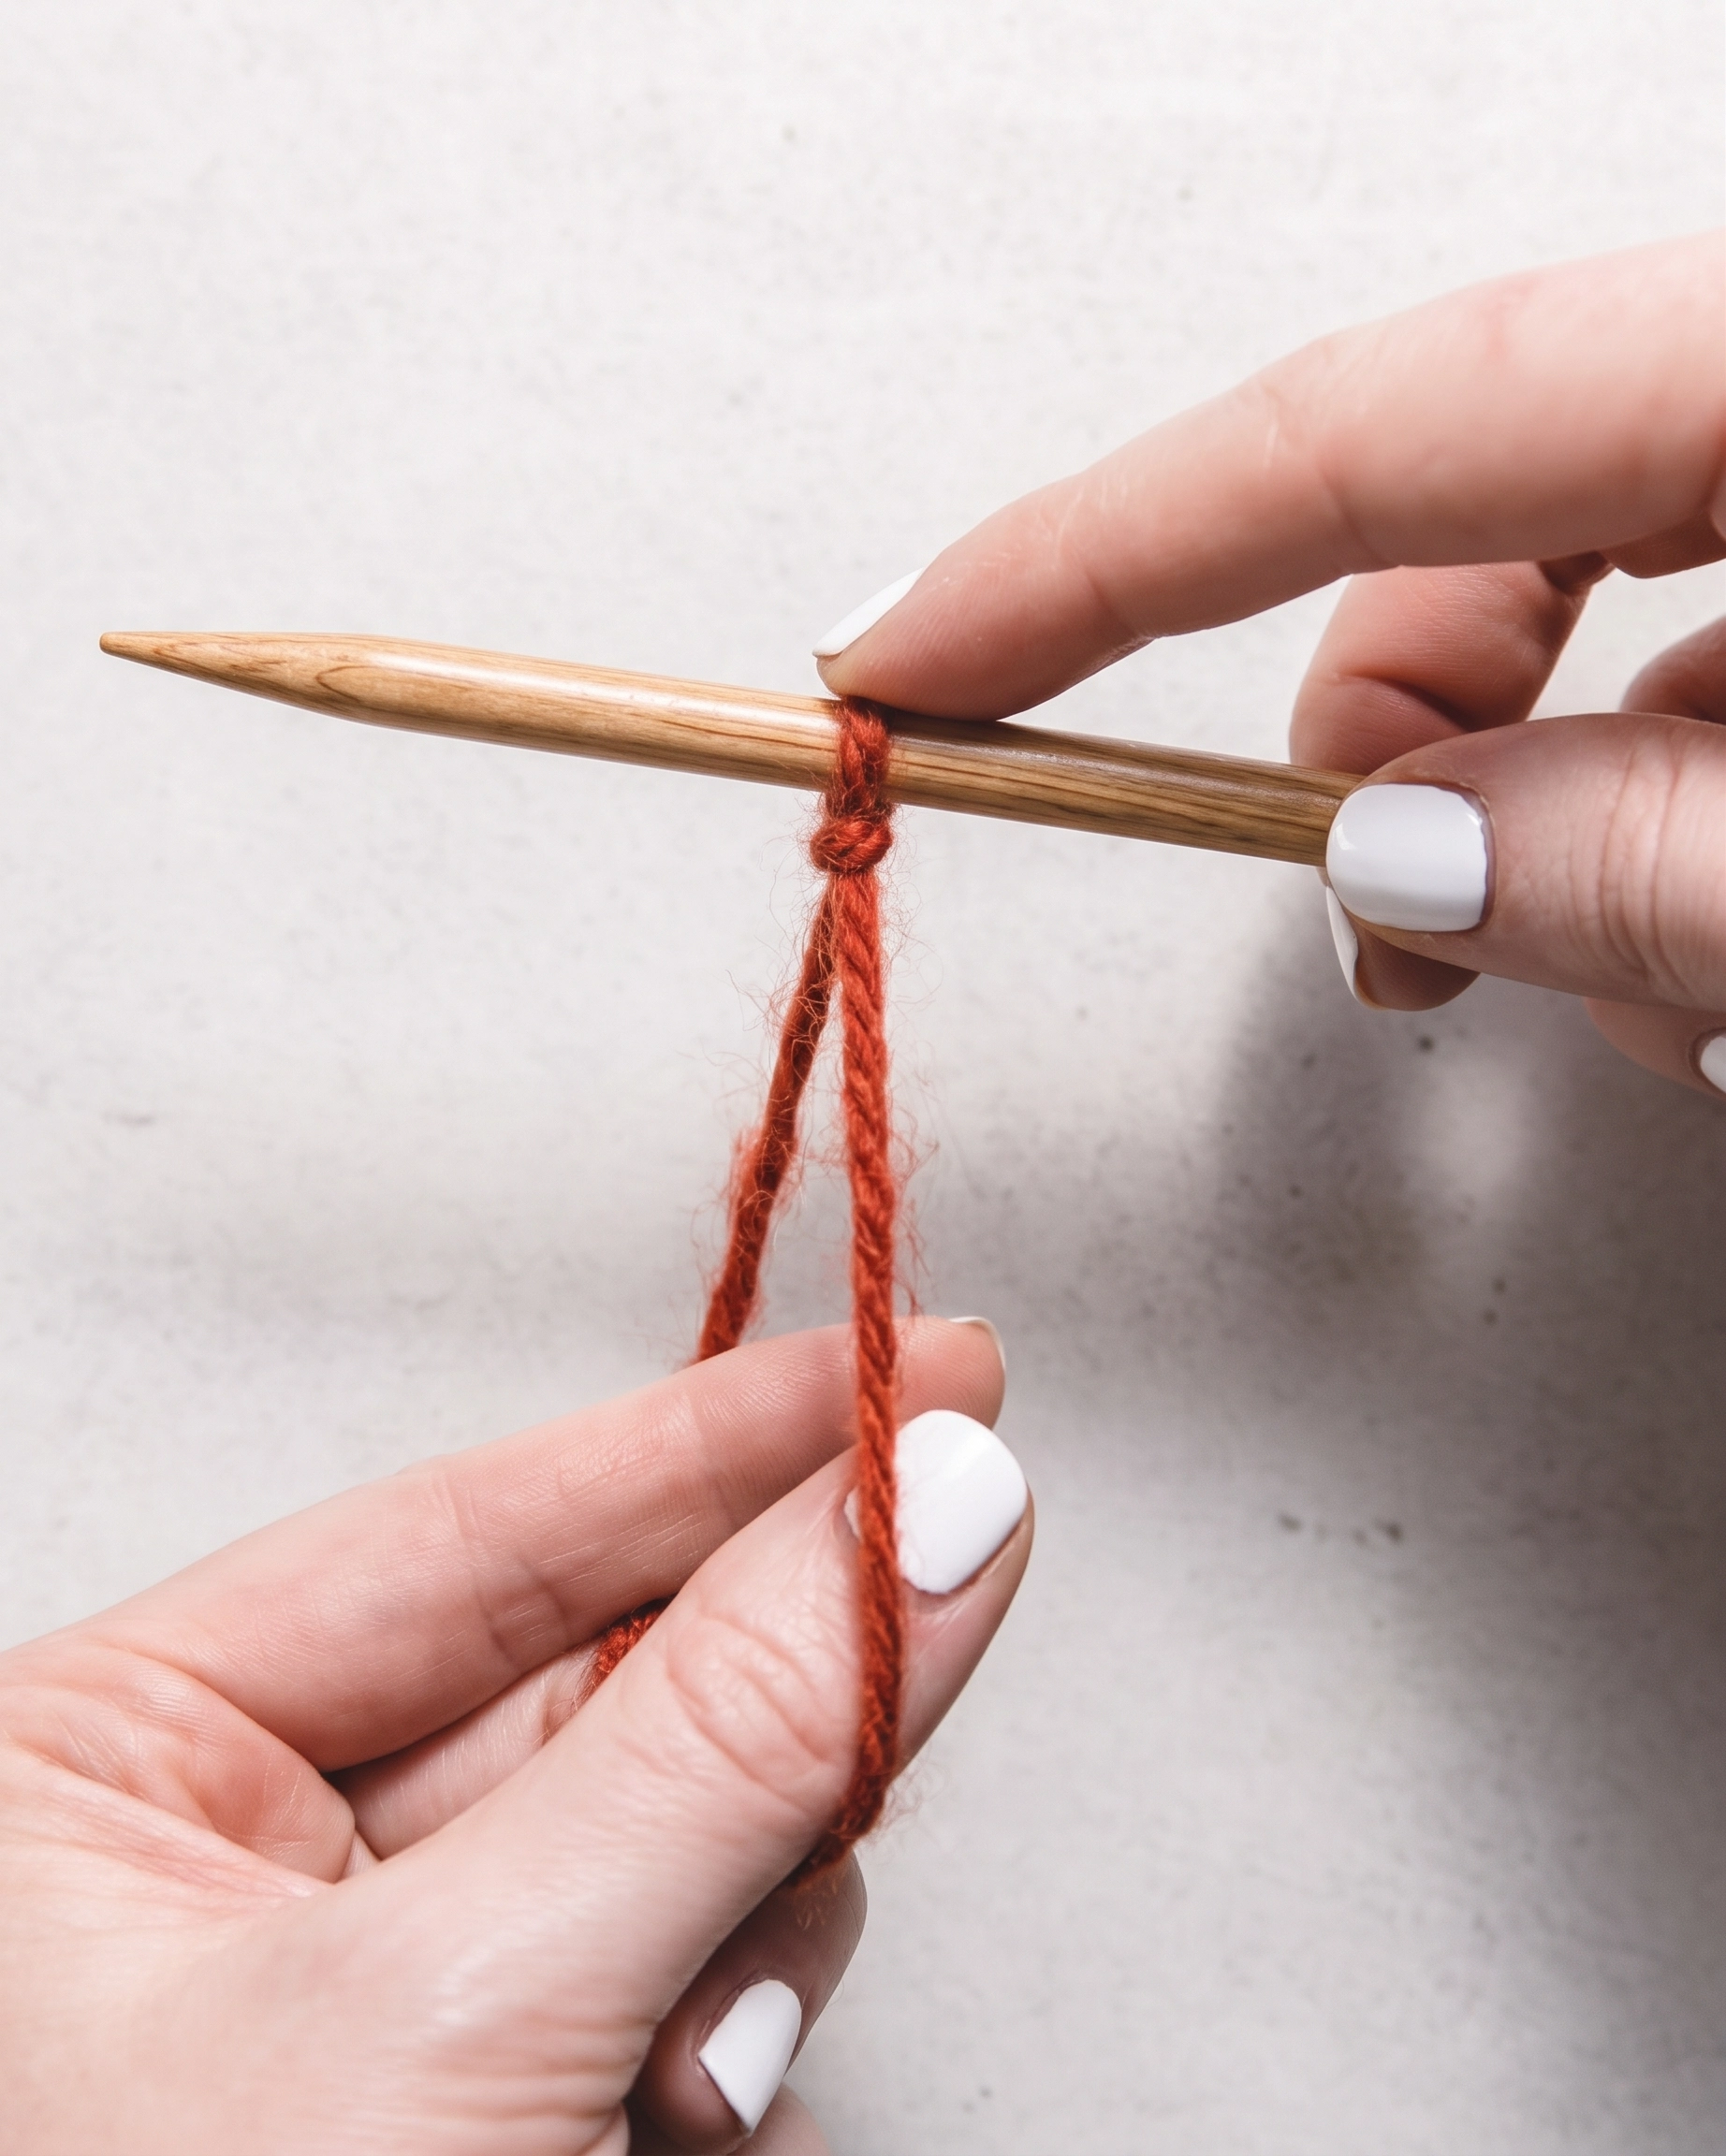
Gently tighten the knot around the thick part of the needle. The loop should stay in place while still sliding along the shaft; a knot cinched onto the tip is already too tight.
Let the tail hang toward you and the working yarn hang farther away. Keeping those strands in that order makes the thumb strand and index-finger strand easier to track.
In this slip-knot version of the method, the loop already on your needle is stitch one. If the pattern asks for 20 stitches, you will add 19 more long-tail stitches.
Hold the yarn in the slingshot position
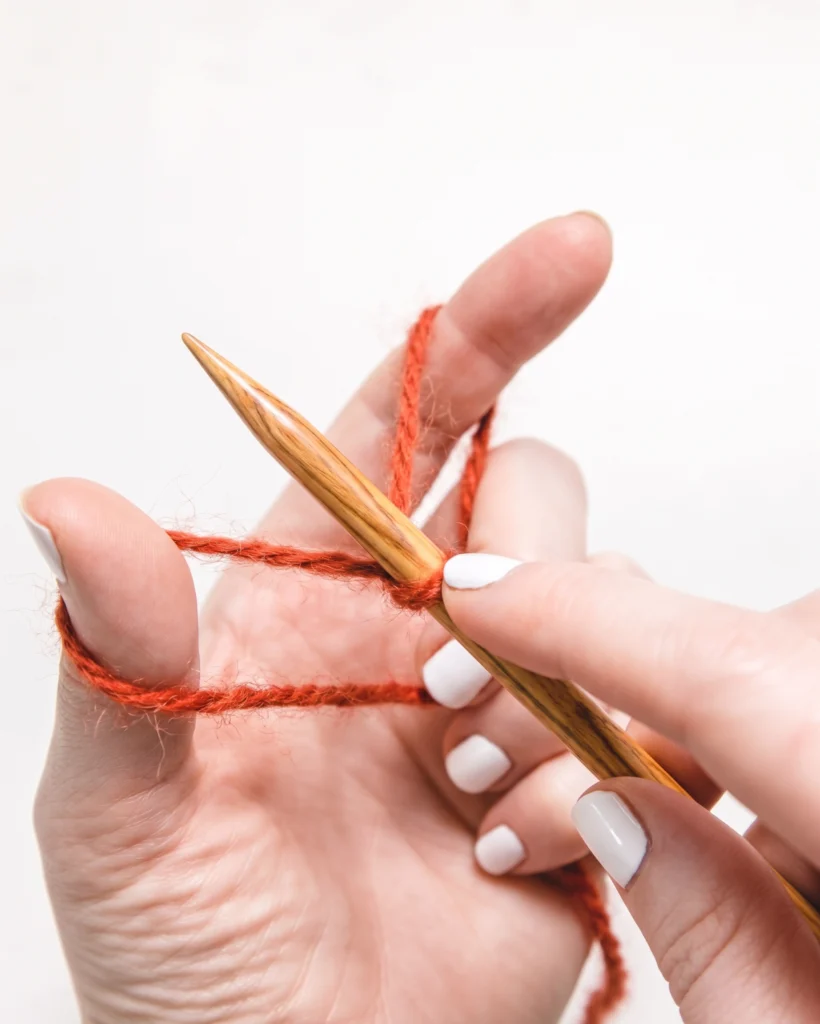
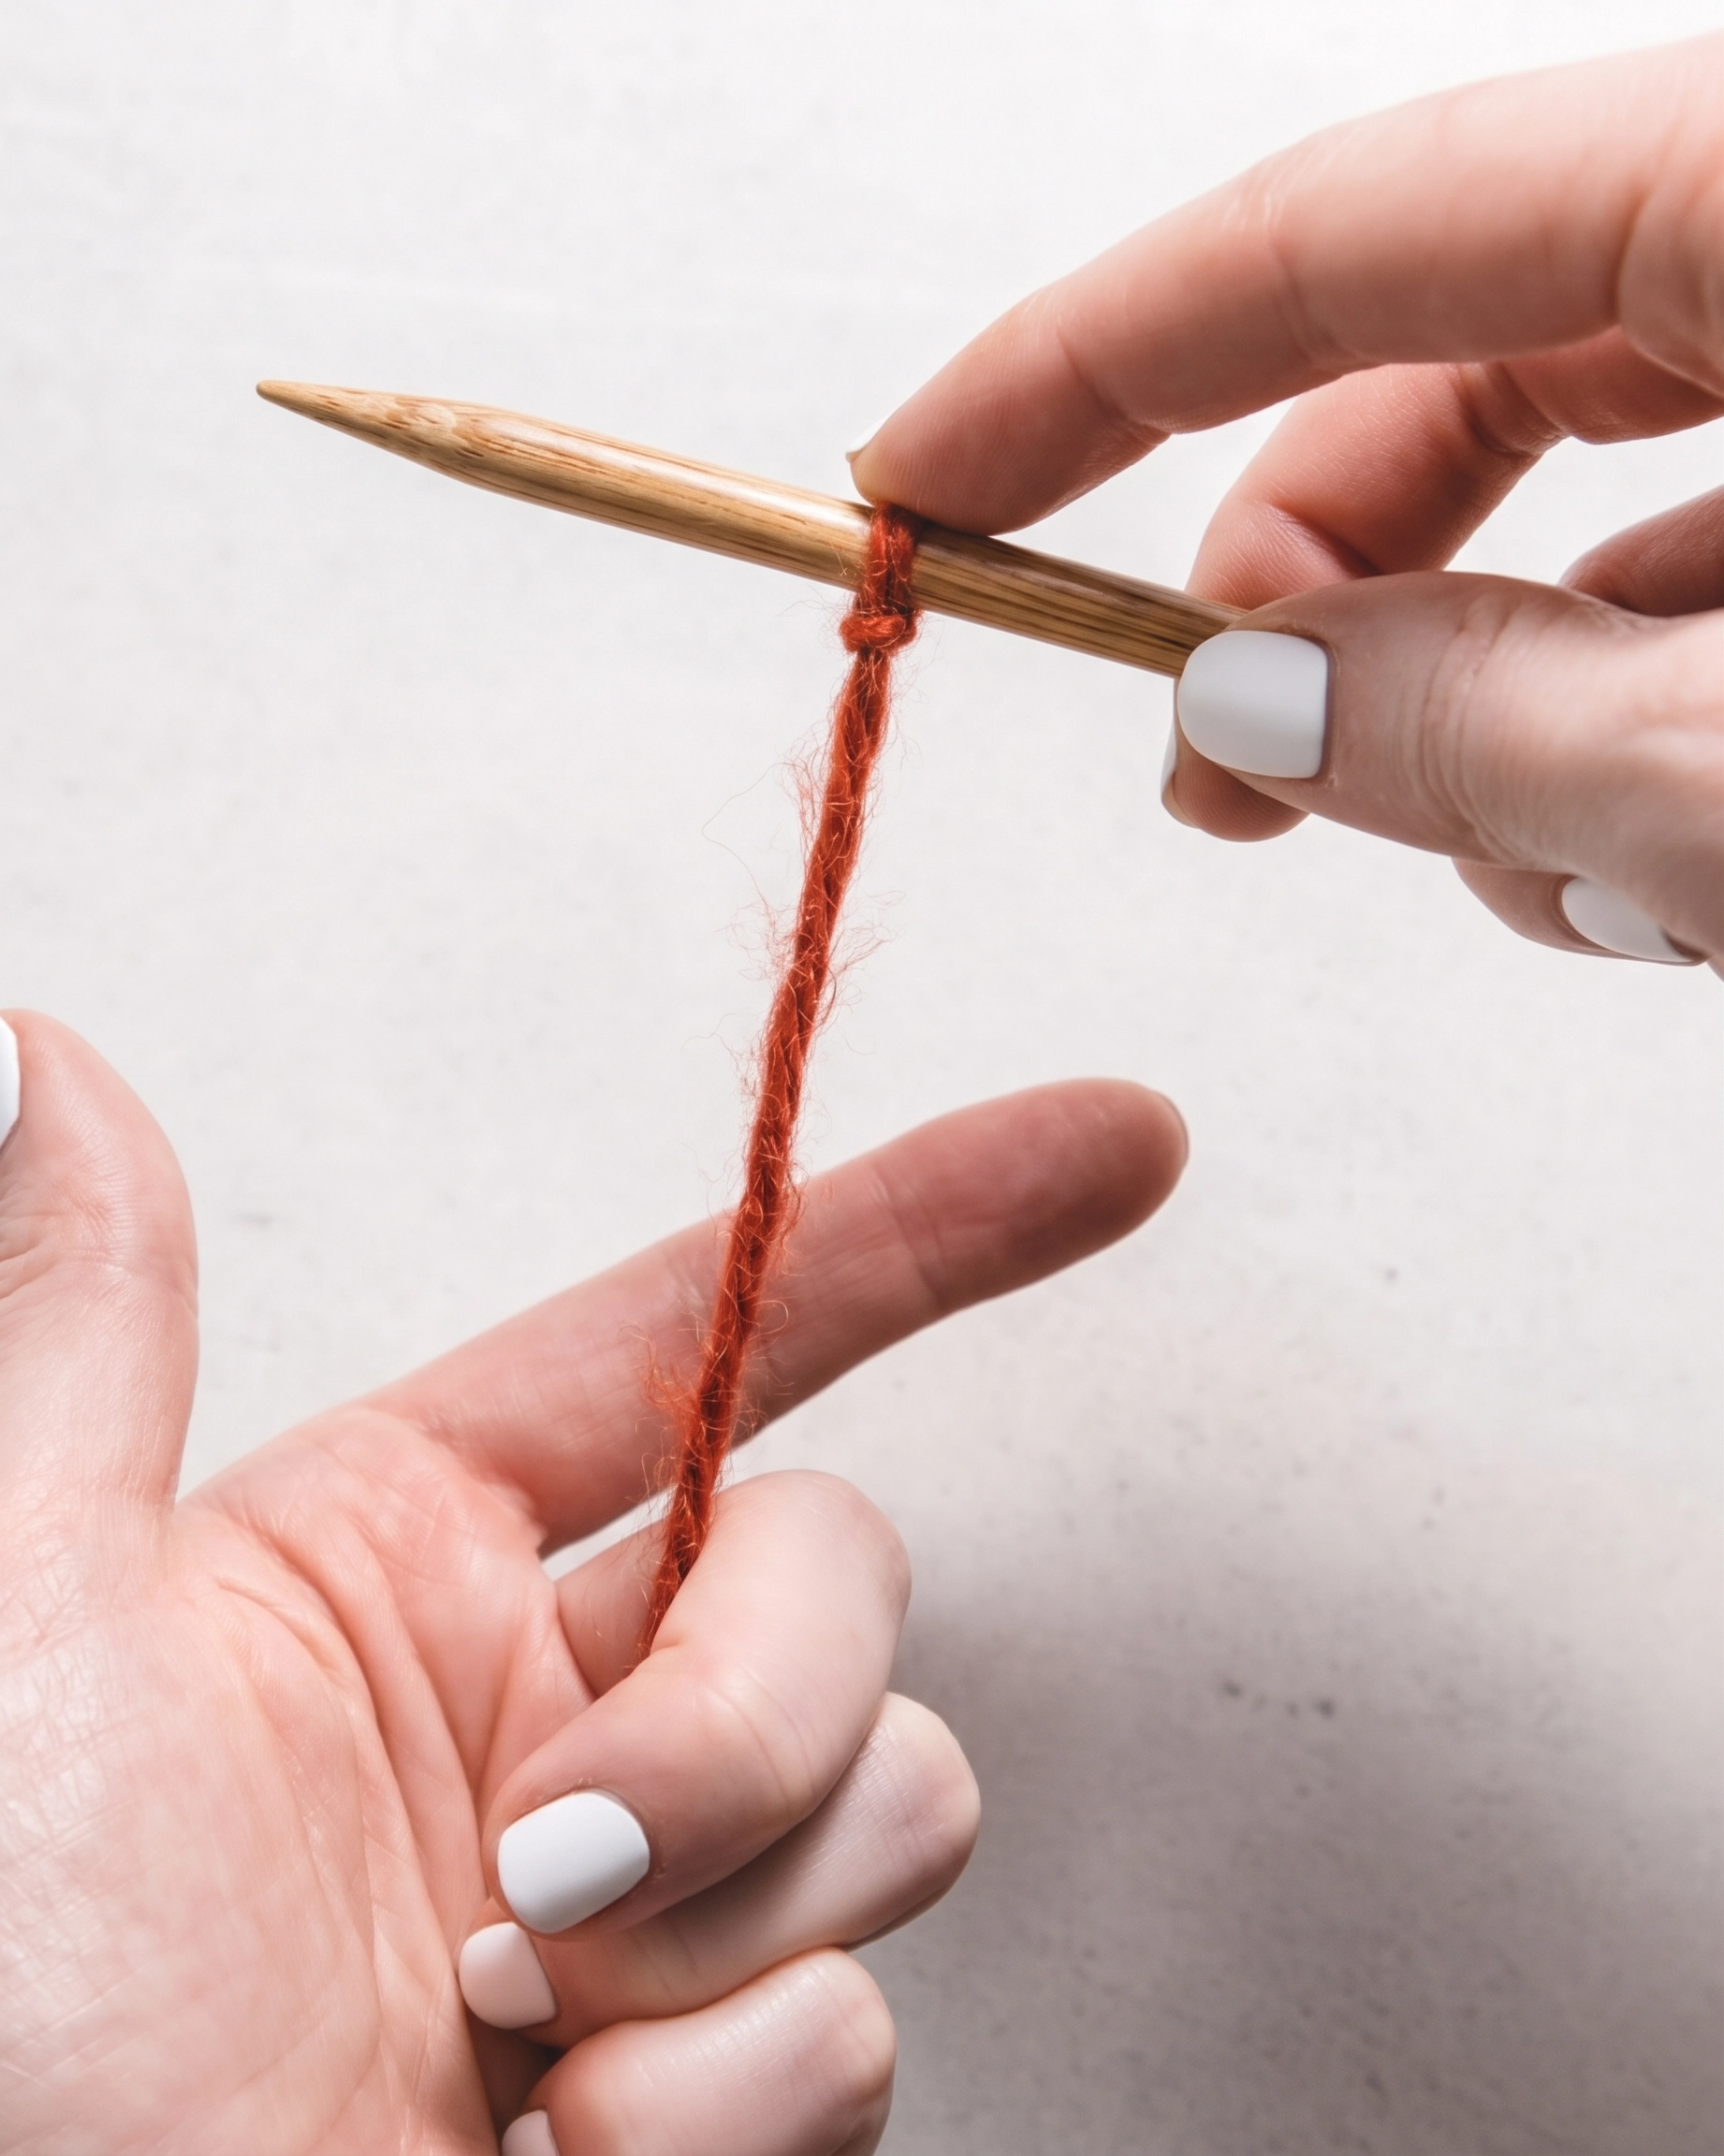
Pinch both hanging strands with the last three fingers of your left hand. Leave enough space above that grip for your thumb and index finger to move.
Put your left thumb and index finger between the two strands, then spread them apart. The yarn should form an open V from the needle to your fingers.
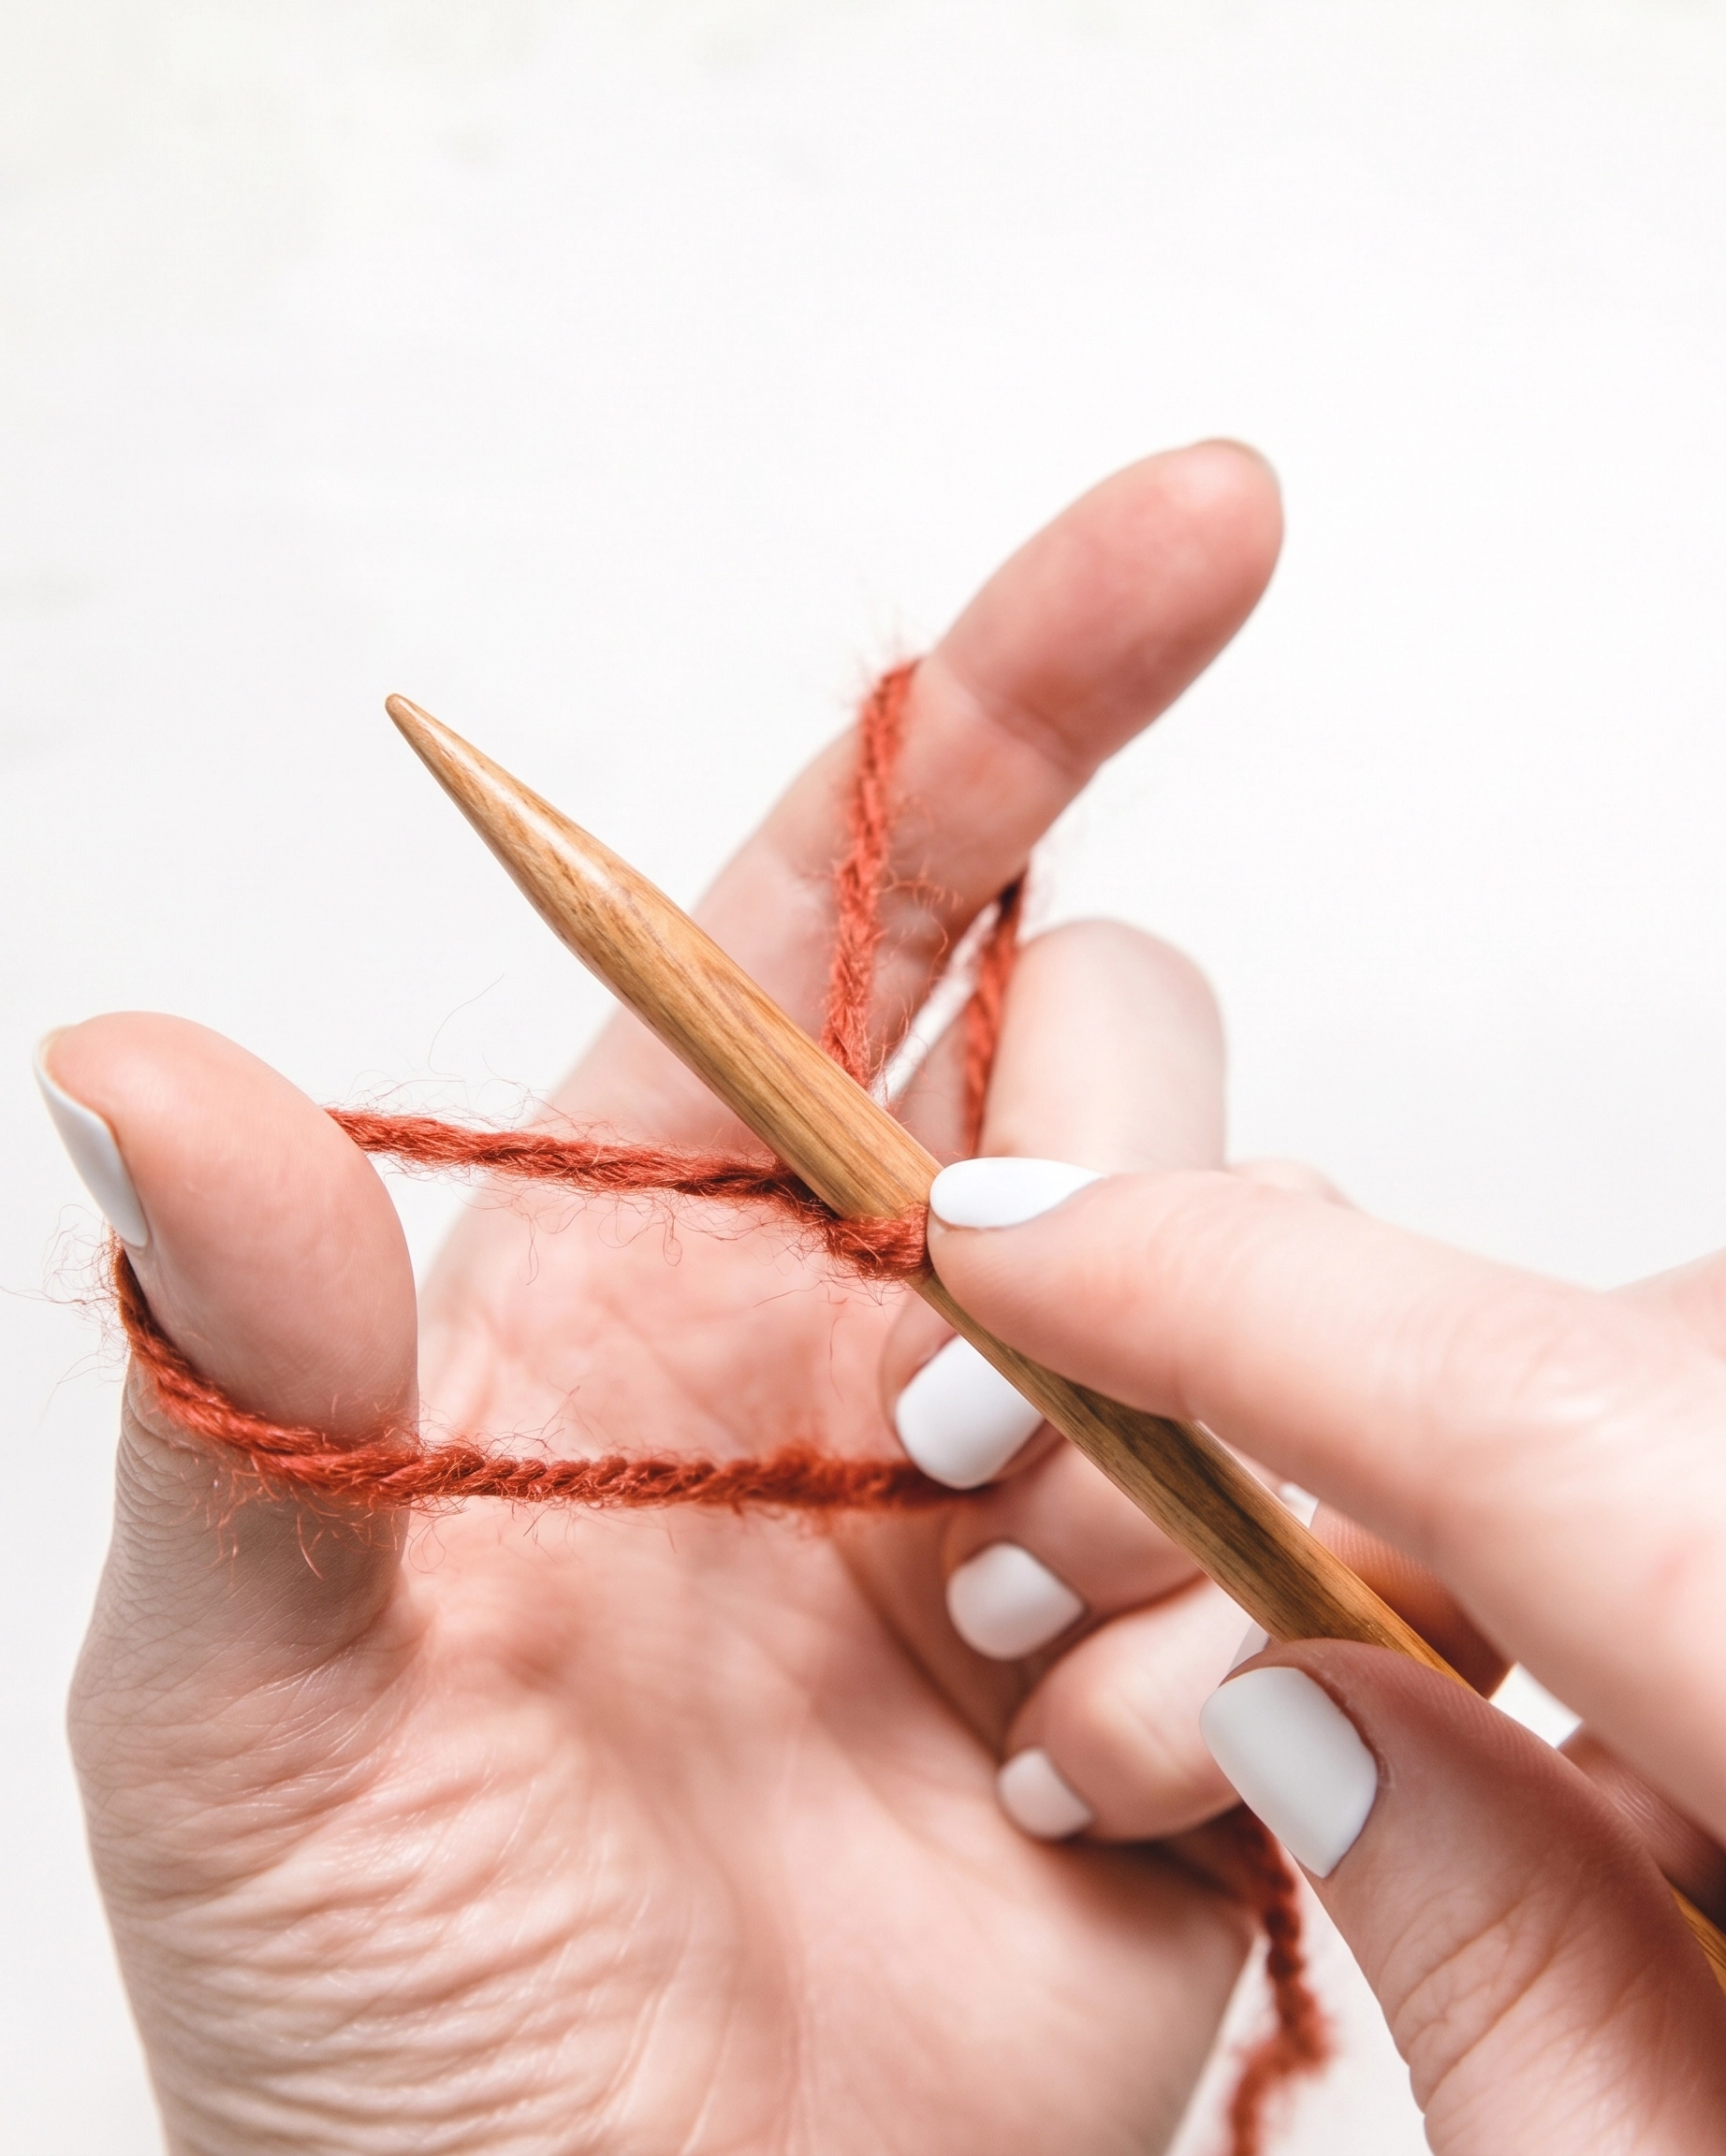
Check which strand touches each finger. The free tail runs around your thumb; the yarn connected to the ball runs around your index finger.
Turn your left palm slightly toward you and keep the needle above the V. You should see a loop around the thumb and another around the index finger, with the slip knot between them on the needle.
Hold the strands firmly enough to keep that shape, but let your hand relax. If your fingers ache or the yarn feels rigid, loosen your grip before making the next stitch.
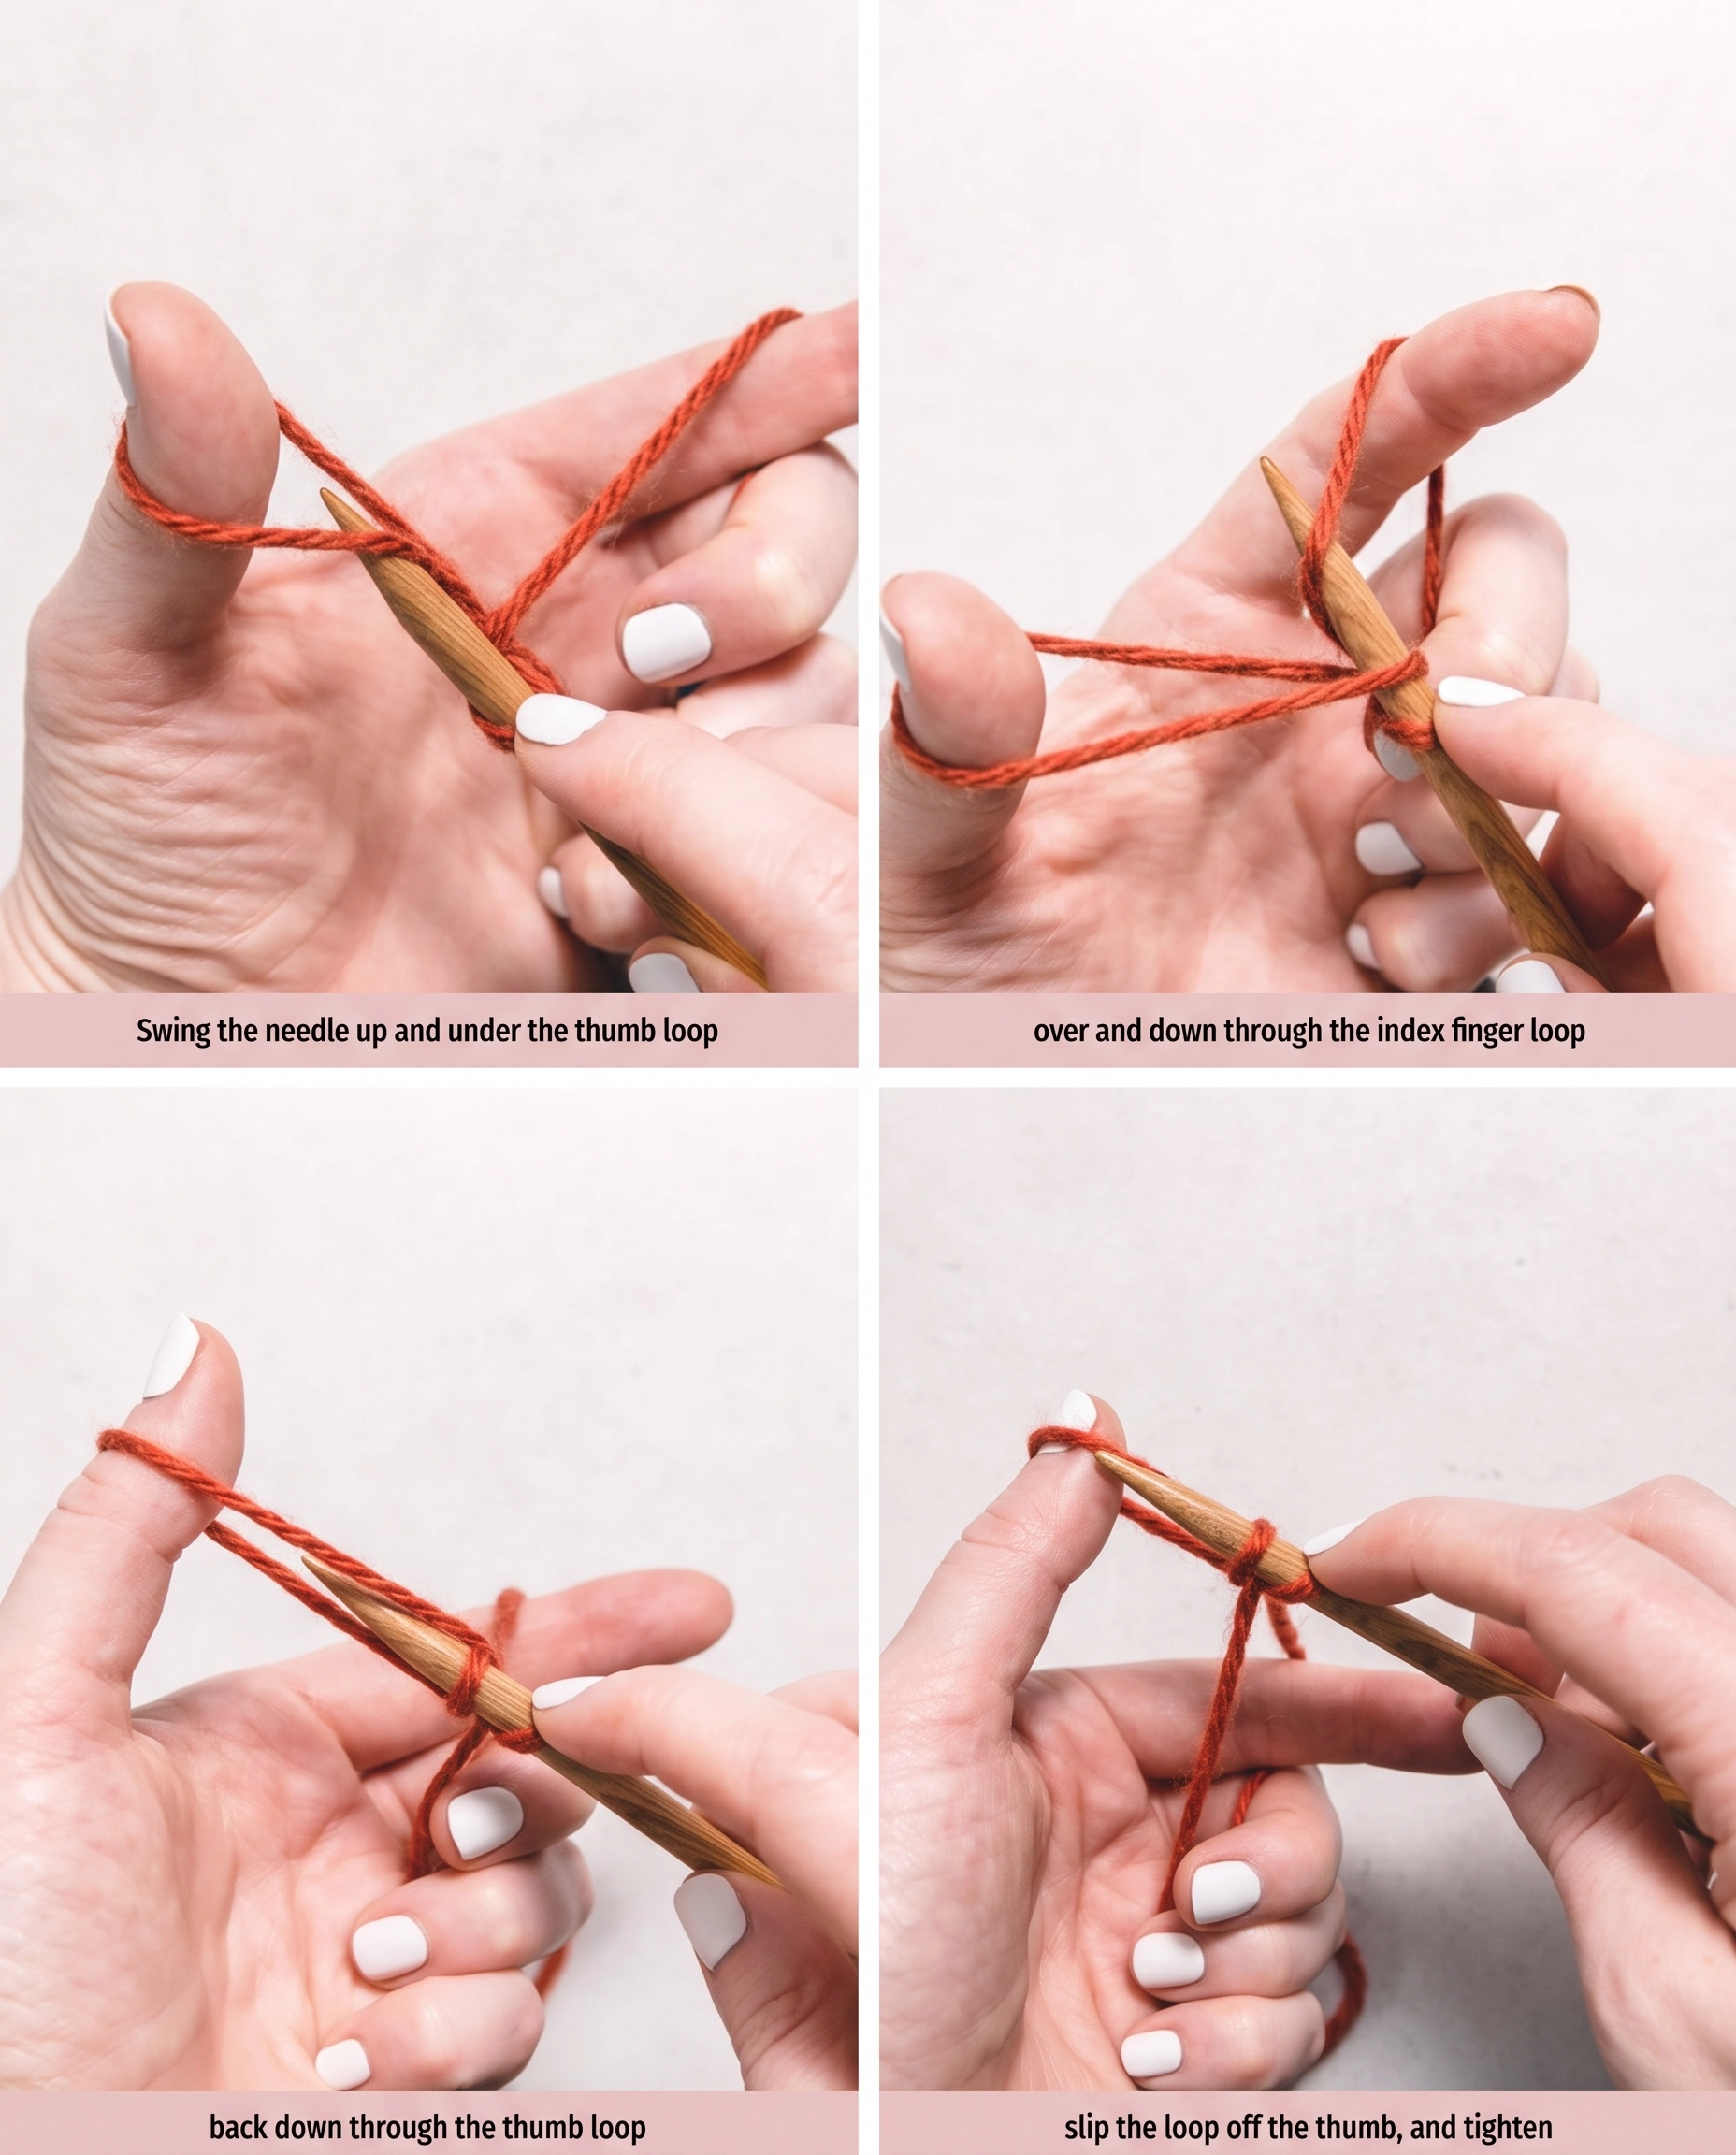
Make one long-tail stitch
1. Scoop up the thumb strand
Lower the needle tip toward the base of your left thumb. Move it upward through the thumb loop, going under the strand on the outside of the thumb.
2. Catch the index-finger strand
Carry the needle across to your index finger. Bring its tip over the strand nearest the thumb and down behind it so that the working yarn rests on the needle.
3. Return through the thumb loop
Bring the needle tip back toward you and through the opening around your thumb. Keep the strand you just caught on the needle while the thumb loop passes over its tip.
4. Release and reset
Slide your thumb out of its loop. The yarn left on the needle becomes the new stitch; pull gently on the tail only until the loop sits against the needle’s shaft.
Put your thumb back under the tail and spread your thumb and index finger again. You are back at the starting V, ready to repeat the same path.
Look at the needle before moving on: the slip knot and your new loop make two stitches. If you see only one loop, check whether the yarn slipped off the needle during the return through the thumb loop.
Repeat the four movements until you reach the number in your pattern. Count the loops on the needle rather than the bumps along the lower edge.
Keep the new loops near one another without packing them tightly. Sliding them away from the tip as the needle fills gives you more room to make the next stitch.
Check the edge and start knitting
After the final stitch, lay the needle down and count once more from the slip knot onward. A missed stitch is easier to correct now than after you have knitted several rows.
On one face of the cast-on, the lower edge looks like a neat series of small linked loops. The stitches above it should sit evenly on the needle, with enough room for a second needle tip to enter.
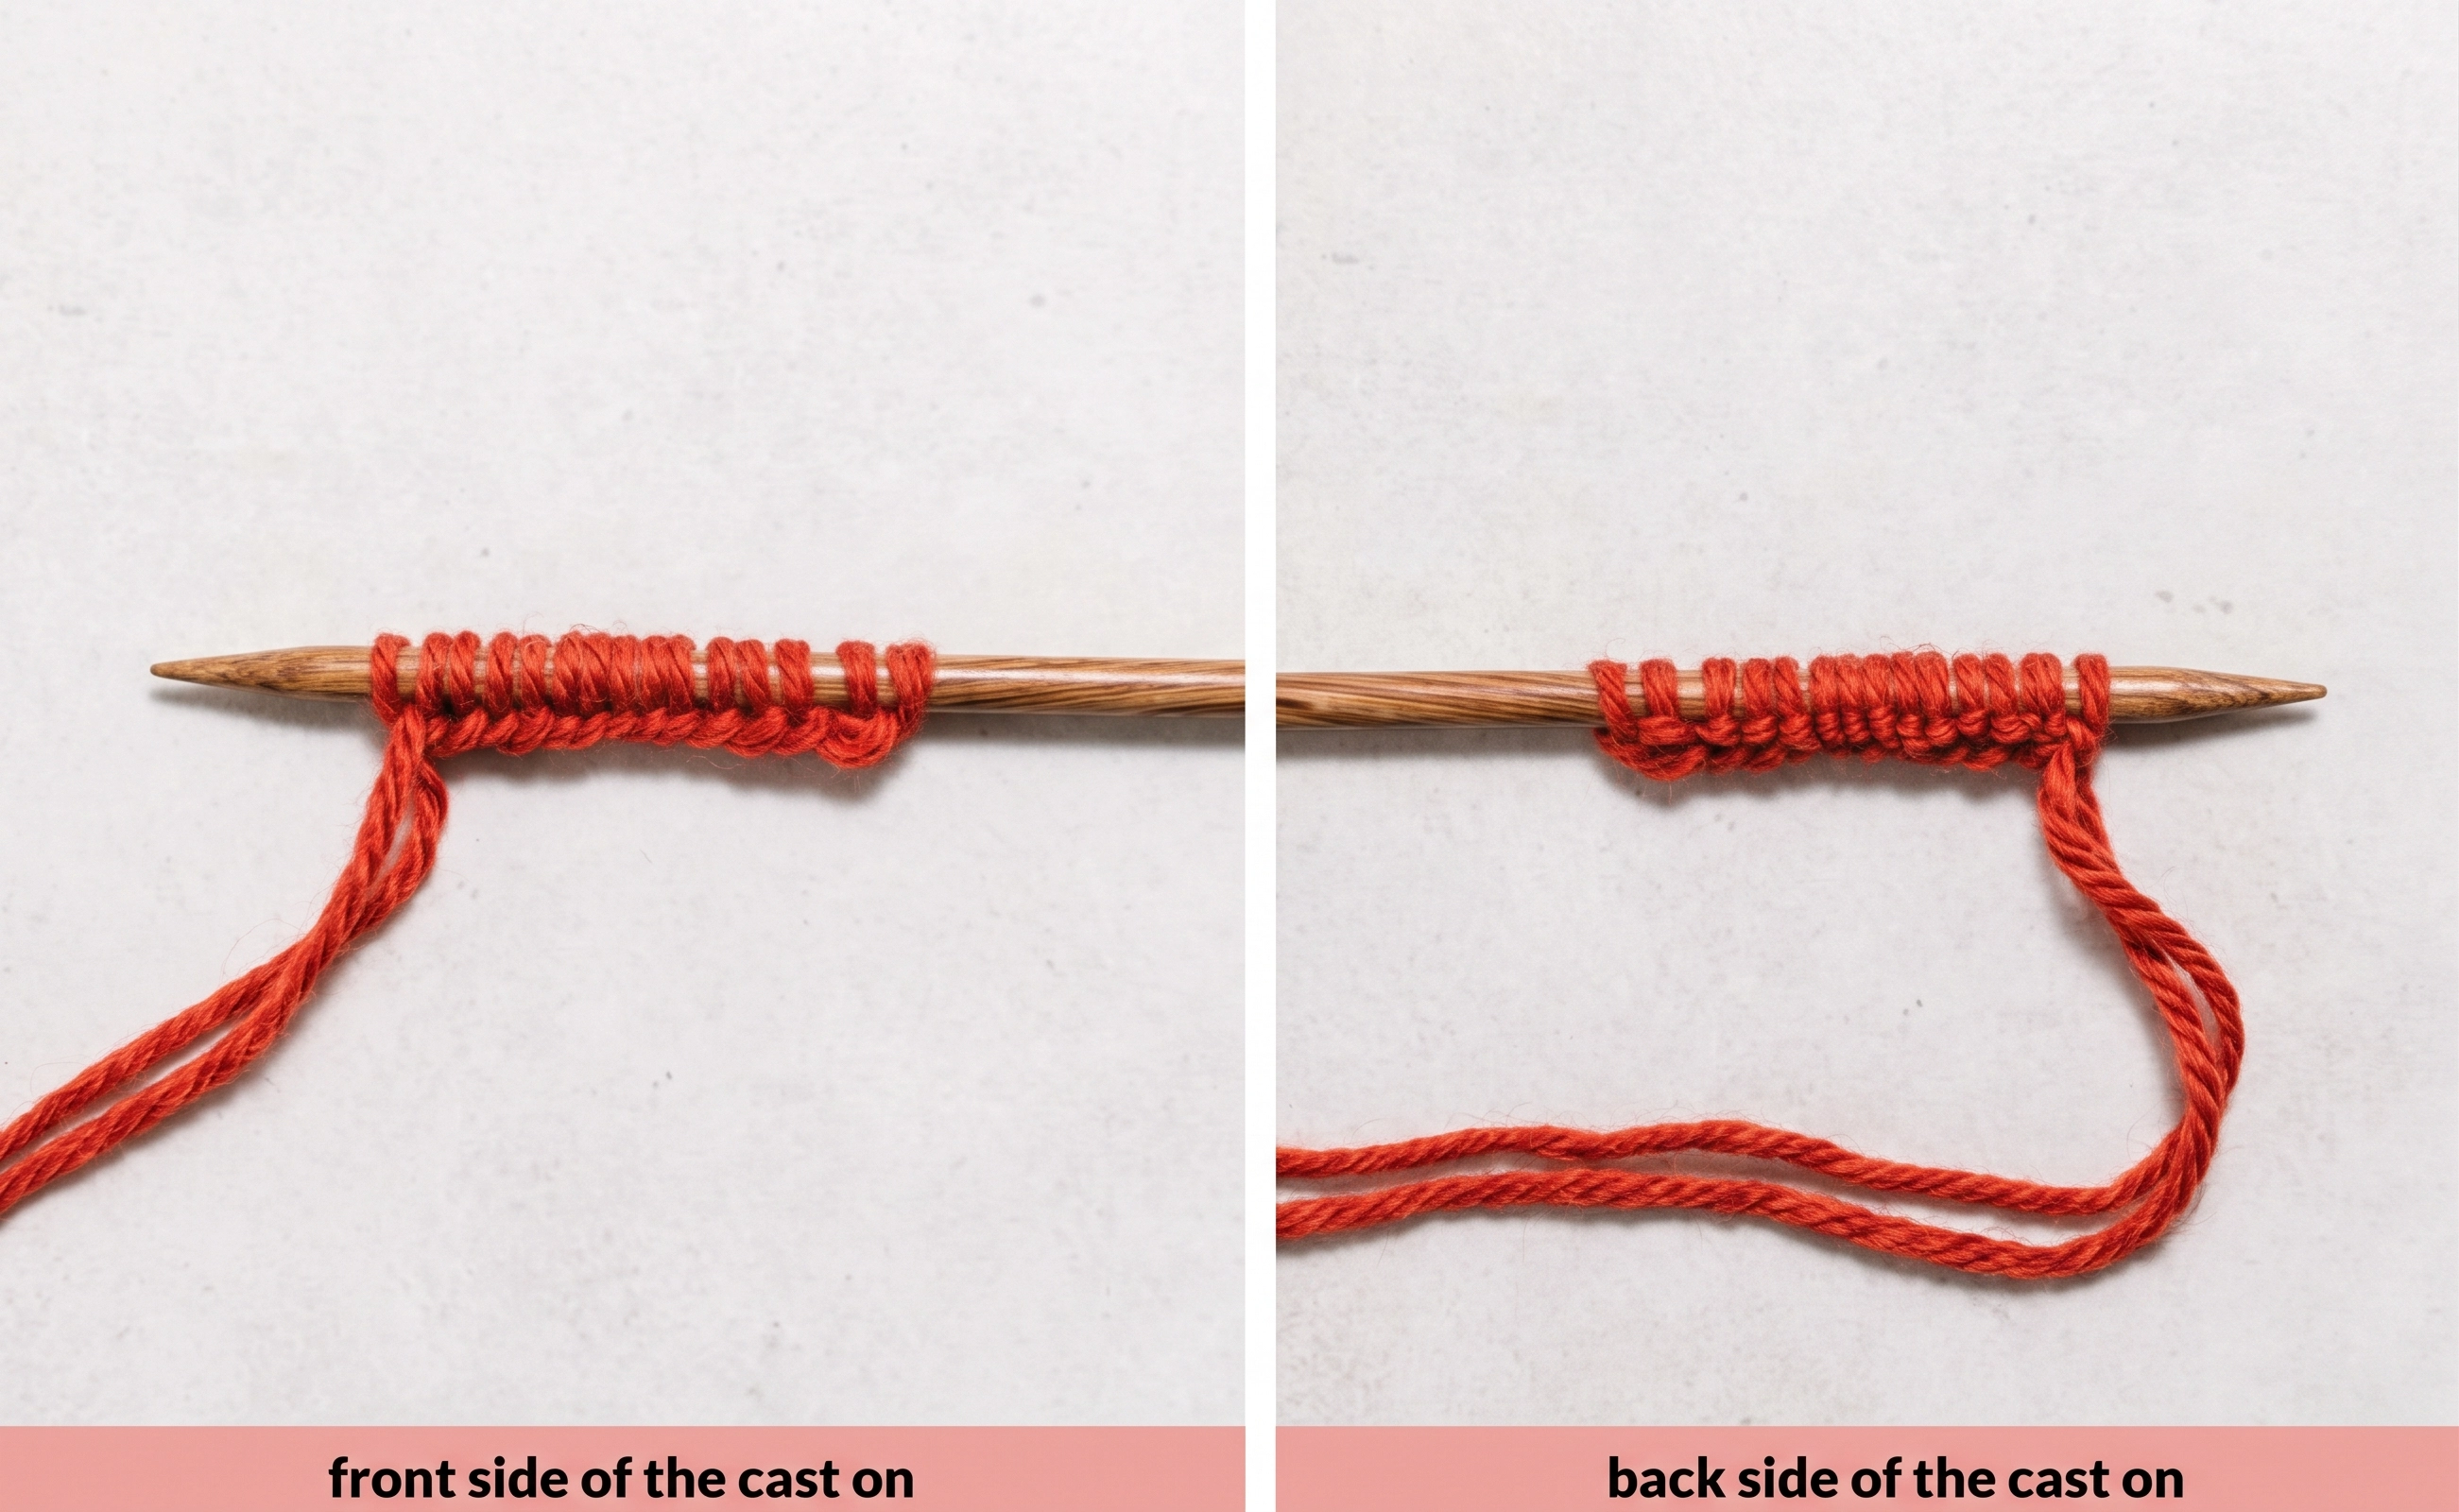
Turn the needle over to inspect the other face. It has a different texture, so decide which side should face outward before following your pattern’s first row.
Move the needle with the cast-on stitches to your left hand and take the empty needle in your right. Work the first row exactly as your pattern instructs; the cast-on itself does not replace a numbered pattern row unless the pattern says so.
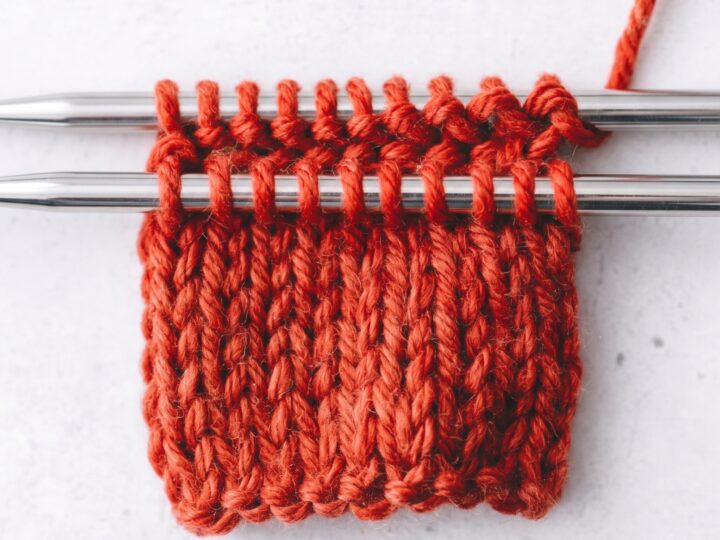
If you are practicing without a pattern, knit one row and see whether the needle passes through each stitch comfortably. Our beginner knit-stitch lesson takes you through that next move.
Fix common cast-on problems
The edge feels tight. Try another short sample, leaving a little space between stitches as you place them on the needle. Do not yank the tail after every loop; a gentle snug is enough.
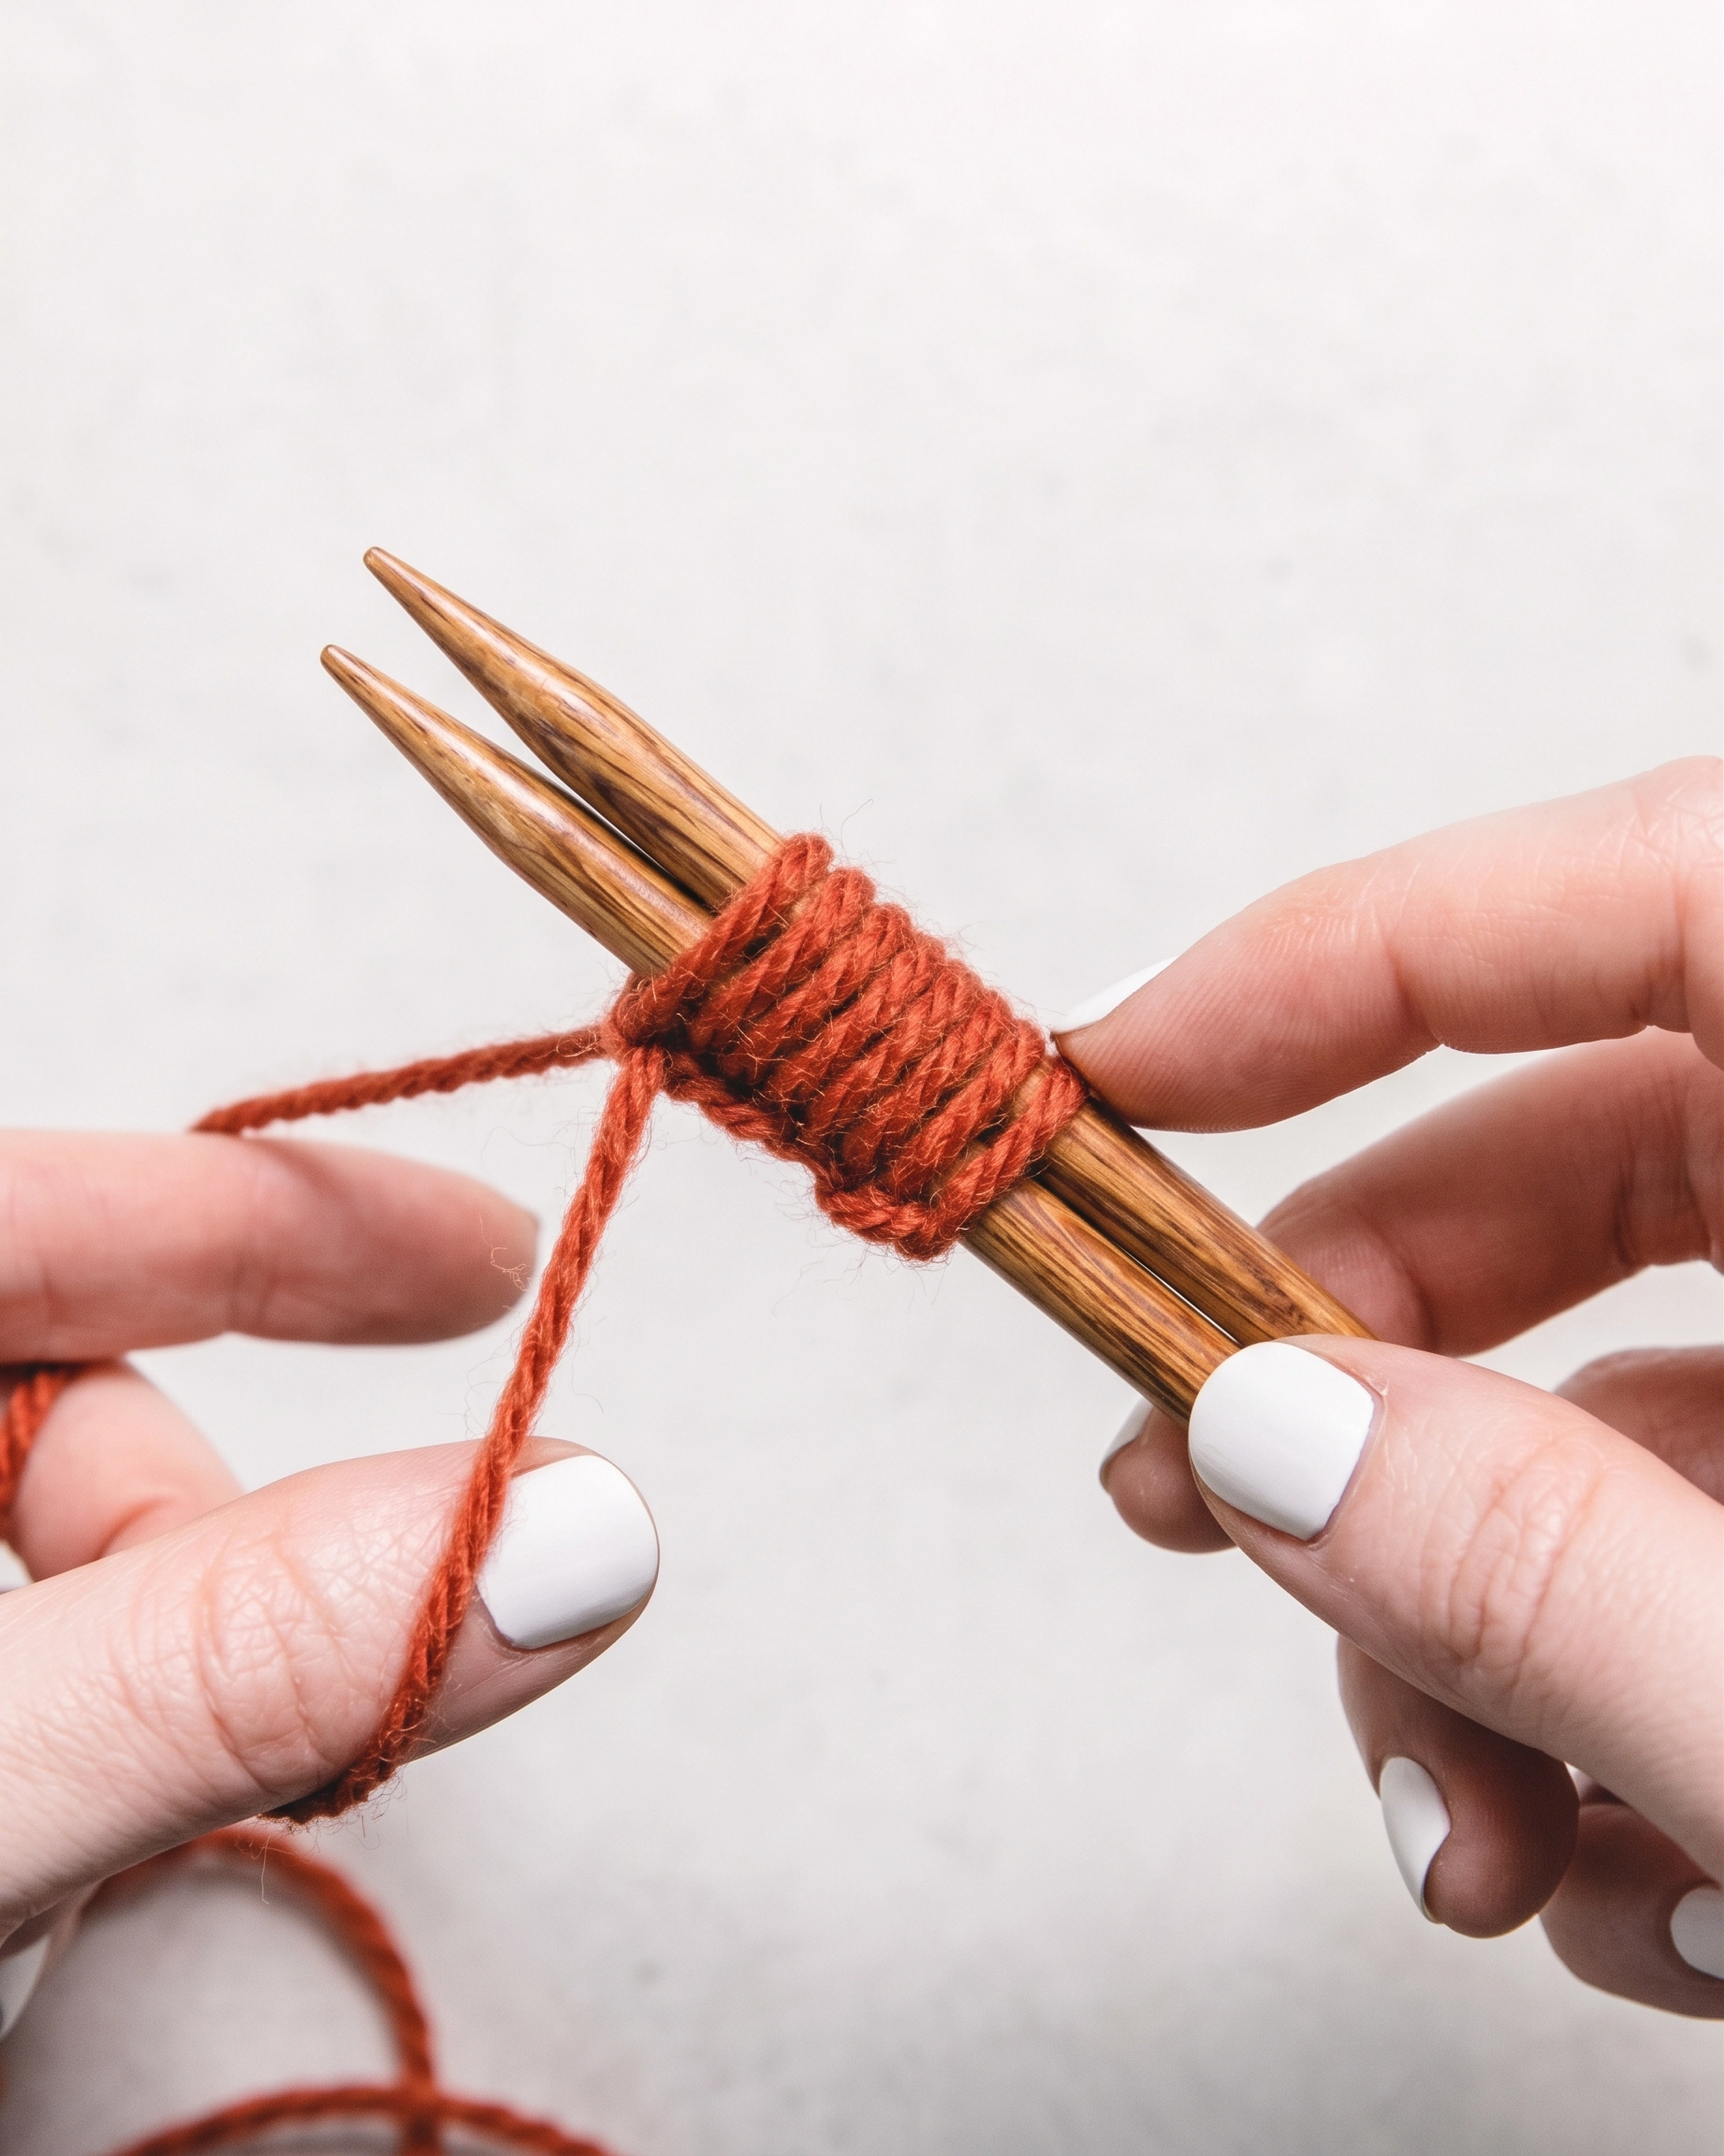
The first row is hard to enter. Form each loop around the needle’s full shaft instead of its tapered point. Some knitters cast on over two needles held together and remove one before knitting; test this with your yarn before committing to a full project.
The tail starts to untwist. Stop, release the strands, and let the free tail hang until it settles. Then put the tail back over your thumb and resume the same hand position.
The tail runs short. For this version, pull the cast-on out and measure again, adding extra length. On a very long project, a measured practice sample is more reliable than guessing from the finished width alone.
The stitches vary in size. Reset your thumb and index finger to the same V after each stitch, and snug each new loop on the same part of the needle. A 20-stitch practice row is a good place to establish that rhythm.
Questions beginners ask
How much yarn should I leave? The wrap estimate and a finishing allowance give you a starting point, but yarn thickness, needle size, and your tension change the amount. Test a short cast-on when precision matters.
Does the slip knot count? Yes, it counts as stitch one in the method shown here. Other cast-on variations can start differently, so follow the counting rule supplied with those instructions.
Can I substitute long-tail for any cast-on? Use it when your pattern needs a standard, moderately stretchy edge. Keep the specified method when the edge must open later, stretch unusually far, or form part of a special design.
What if I cannot hold the slingshot shape? The thumb method forms a similar long-tail edge with a different hand motion. KnittingHelp’s cast-on videos show both approaches so you can choose the one your hands find easier.
Why does the edge look different on each side? The two faces show different parts of the loops formed by the cast-on. Check your pattern’s right-side and wrong-side directions before deciding which face should show on the finished project.
The best next step is a small swatch: cast on 20 stitches, knit one row, and check that the edge rests flat without squeezing the fabric. Once that feels comfortable, use the same motion for the stitch count in your pattern.
Have a question? Use the form above to submit your question or comment.
I love hearing from you and seeing what you made!