


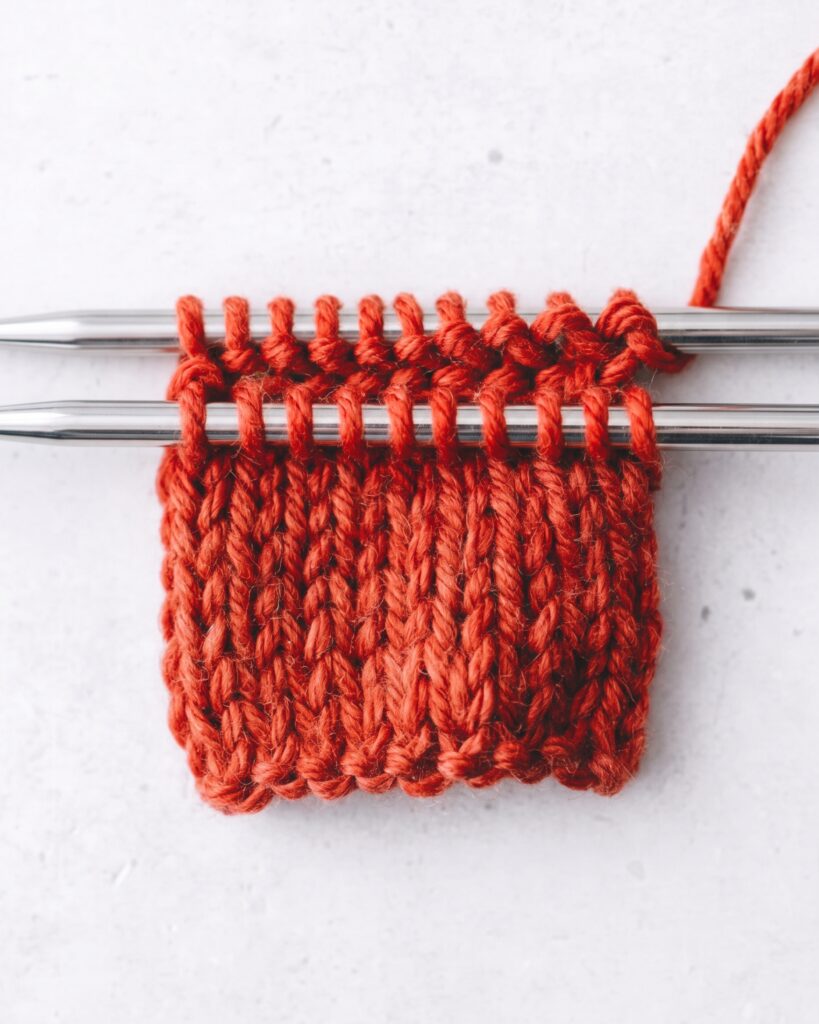
Kitchener stitch joins two sets of live stockinette stitches by sewing a new row between them. It is the familiar way to close a sock toe without a bulky bound-off ridge. The movements are simple once you know which stitches stay on the needles and which come off.
This guide uses a right-handed, two-needle setup and follows the yarn through every pass. Practice first with two small groups of six live stitches, then return to your sock or other project. You can keep this page beside you and check the stitch count after each four-part repeat.
What Kitchener stitch makes
Instead of stitching the edges of two finished pieces together, you pass a threaded yarn needle through loops that are still held on knitting needles. Each pass forms part of a new row of knit-looking stitches across the gap. The result can blend into stockinette when the yarn and tension match.
The method is especially useful for a top-down sock toe, where the remaining stitches are divided evenly across two needles. It can also join two flat stockinette pieces with live stitches. Both sets must be accessible at the same edge; a bound-off edge needs a different joining method or must be reopened first.
The instructions below are for stockinette. Garter stitch and ribbing need different grafting sequences because their knit and purl columns meet differently. Also consider the job the seam must do: the Craft Yarn Council’s instructor handbook advises against ordinary Kitchener stitch for a shoulder seam that needs more strength.
The route is easier to remember as two setup passes followed by one repeating cycle. In the setup, the front stitch gets a purlwise pass and stays on; the back stitch gets a knitwise pass and stays on. Each full repeat then removes one stitch from each needle while preparing the next pair.
Prepare the stitches, needles, and yarn
You need two knitting needles holding equal numbers of live stitches, a blunt tapestry needle, and matching yarn. The yarn can be a long tail left from the knitted piece. If you are learning the motion, a smooth, light-colored stockinette swatch makes the loops easier to see than a dark or fuzzy sock toe.
Count the loops on each knitting needle before threading the yarn. For a practice piece, six on the front and six on the back are enough to repeat the cycle several times. If the counts differ, stop and check the pattern or redistribute stitches as it directs; grafting cannot pair an unmatched loop cleanly.
Hold the two needles parallel, with their tips pointing right. Bring the wrong sides of the fabric together so the smooth knit sides face outward. Keep the fabric untwisted. This orientation makes the new row appear on the visible stockinette side rather than as a ridge across it.
Call the needle nearest you front and the farther needle back. The yarn tail should come from the right end of the back needle, near its tip. If you are joining two separate pieces and no tail is positioned there, attach a new length of matching yarn at that corner and leave a weaving-in tail.
Allow a working length of yarn at least three times the width of the opening, with extra for weaving in. The Craft Yarn Council uses roughly three times the width as its grafting estimate; adding about six inches gives a beginner room to finish securely. Thread the yarn through a blunt needle and keep it below the knitting needles as you work.
Push the live stitches close to the tips without letting them fall off. A small test with six stitches on each needle lets you check the direction of the sewing needle before you work on a project. If the front and back labels feel easy to reverse, put a removable marker on the front needle’s fabric.
Make the two setup passes
Pass the tapestry needle through the first stitch on the front knitting needle purlwise: enter it as though you were about to purl. Pull the yarn through gently. Leave that stitch on the front knitting needle. This prepares the first front loop; it does not complete a grafted pair by itself.
Next, pass the tapestry needle through the first stitch on the back knitting needle knitwise, as though you were about to knit. Pull the yarn through and leave that stitch on the back needle. The two setup passes happen once, before the repeating four-part cycle.
Look at the needles before moving on. Each still holds its original number of live stitches. The threaded yarn crosses between the first front and back loops without a knot, and it runs beneath the knitting needles. If either setup stitch has slipped off, put it back before you begin the repeat.
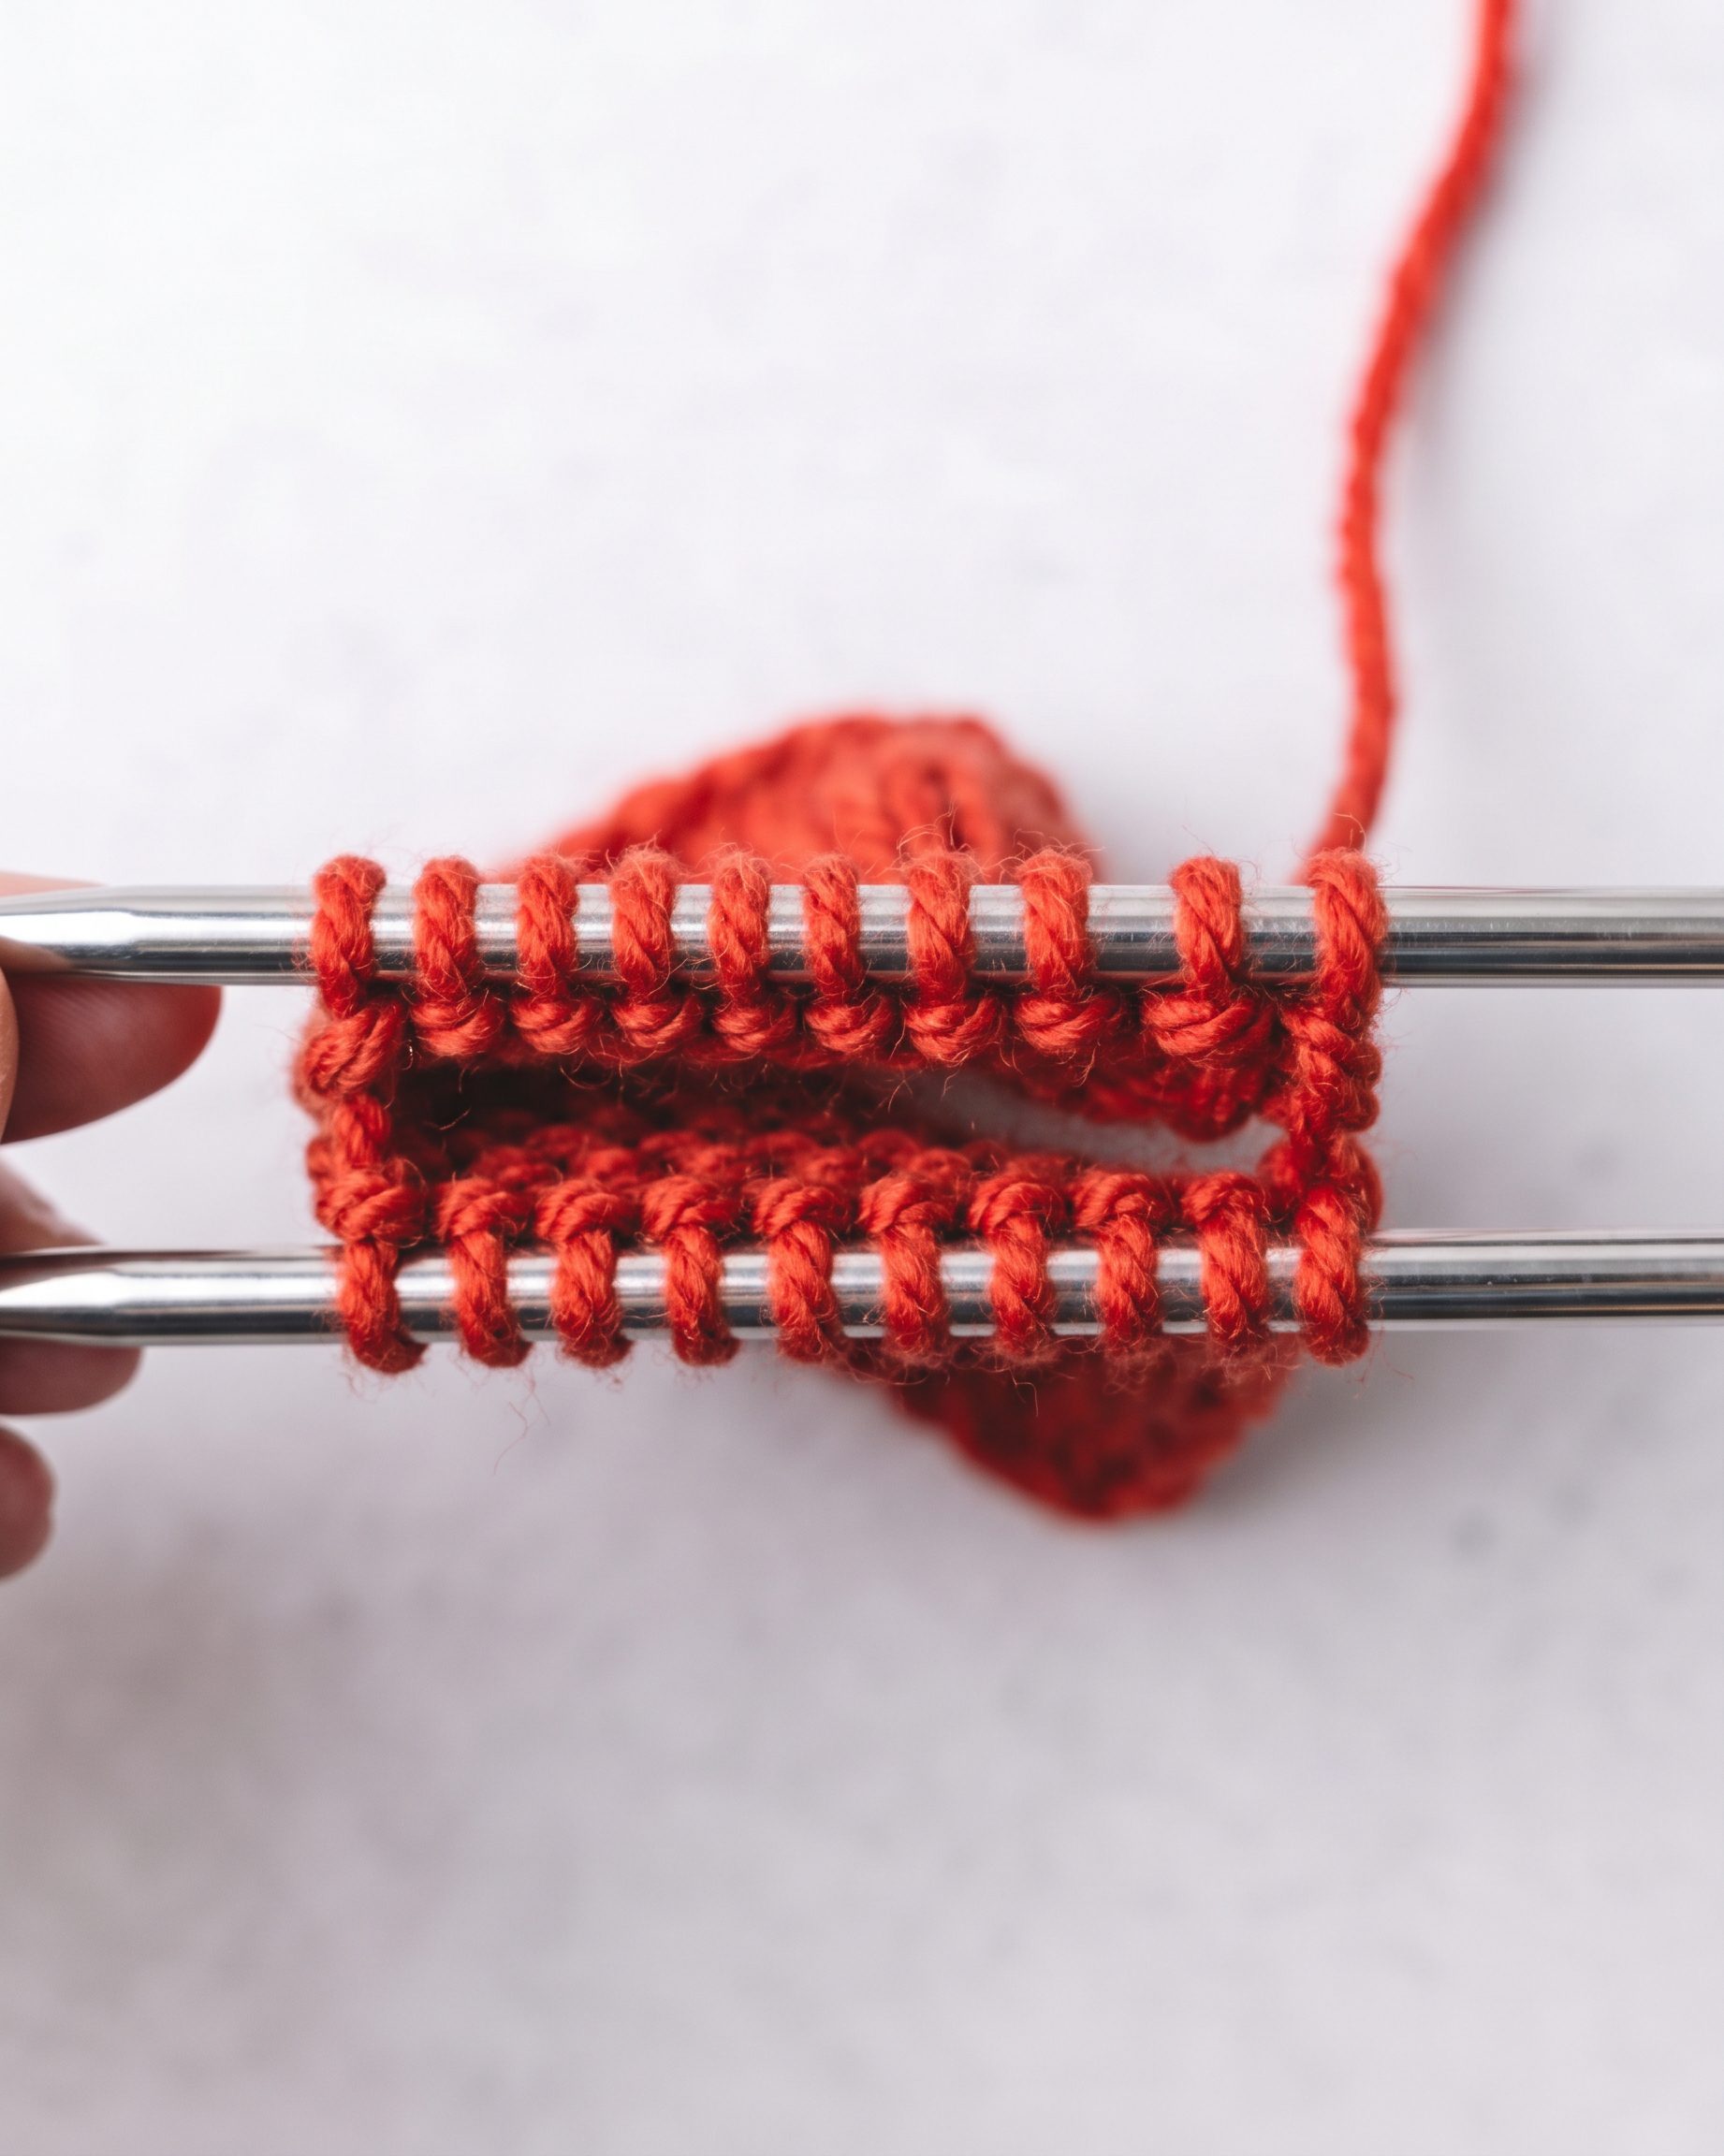
Keep the first crossing relaxed. Pulling it tight can make a dent at the edge of the toe; leaving a large loop can make the first grafted stitch look loose. You can fine-tune that yarn length after several repeats, when the new row is easier to see.
Repeat four passes across the opening
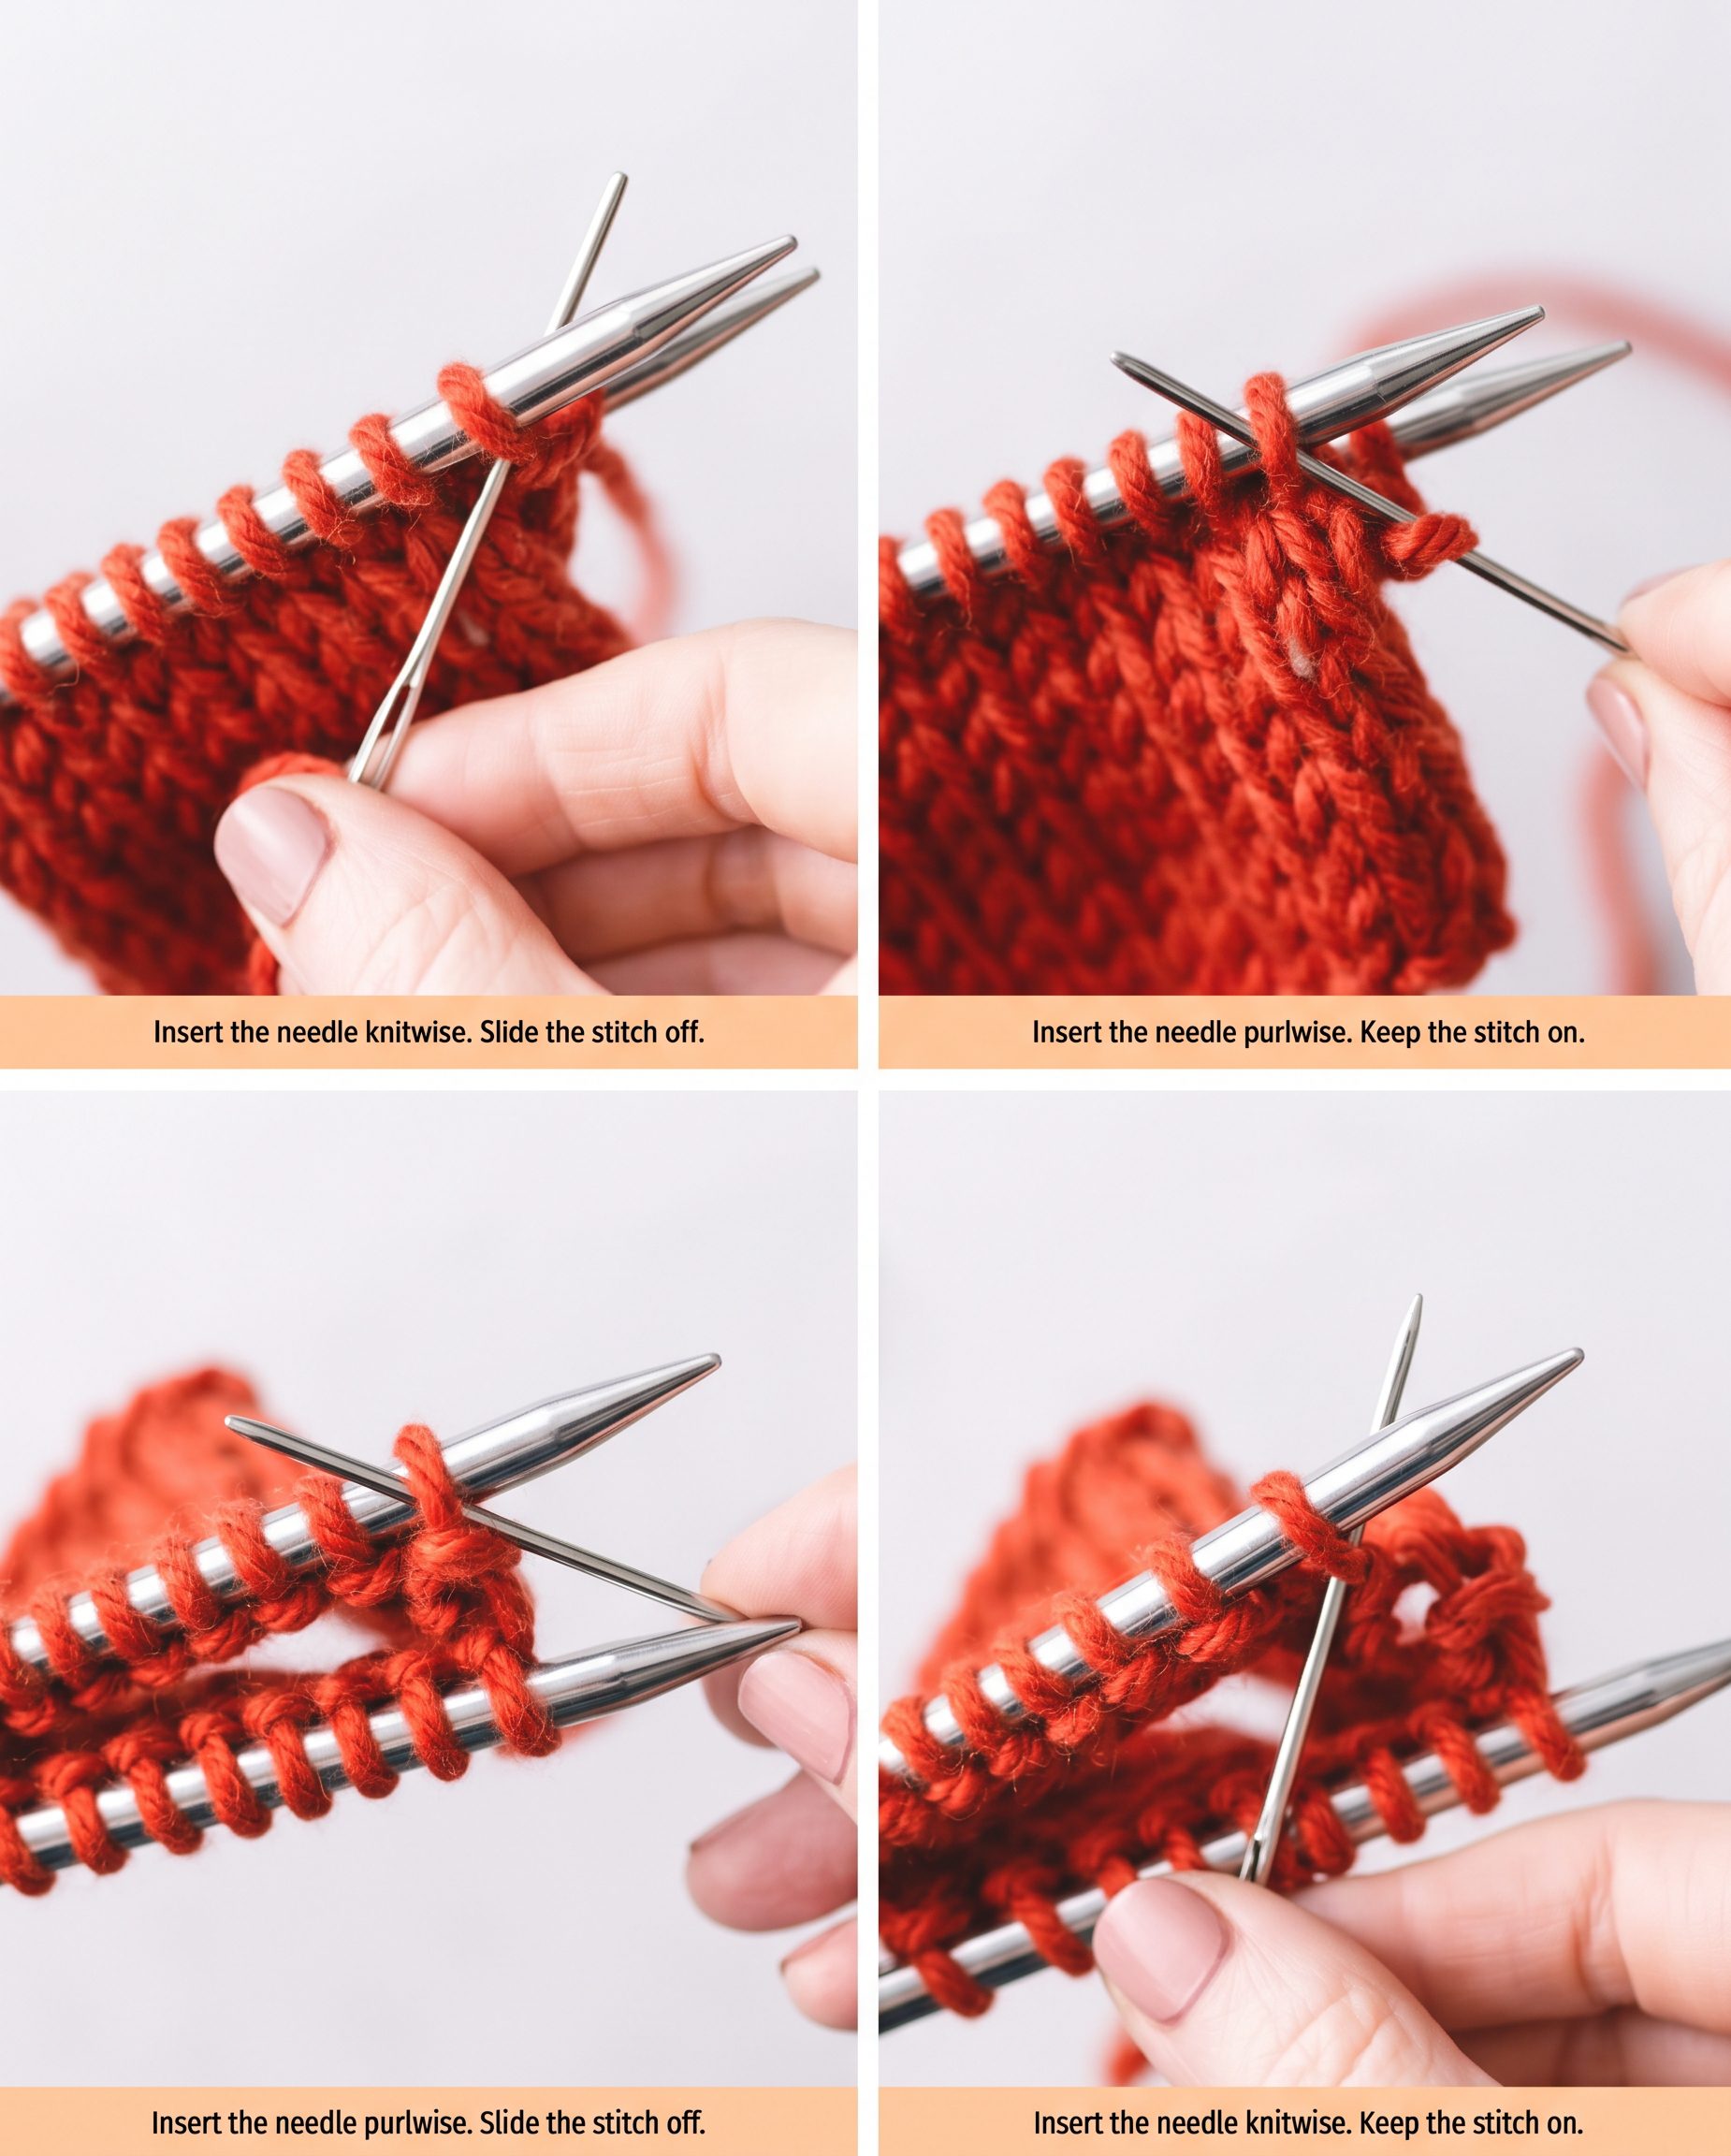
Work the same four actions in order: front knitwise off, front purlwise on, back purlwise off, back knitwise on. “Off” means remove the stitch from its knitting needle after the yarn passes through it. “On” means leave it there for the next cycle. Say those words aloud if the sequence is new.
1. Front knitwise, off. Enter the first stitch on the front needle as if to knit, pull the yarn through, then slide that stitch off the front needle. Only that first stitch comes off. The yarn now holds the loop that was on the needle.
2. Front purlwise, on. Enter the new first stitch on the front needle as if to purl and pull the yarn through. Leave this stitch on the needle. It will become the stitch removed at the start of the next repeat.
Before you move to the back needle, glance at the front tip. One stitch has been removed and the next has been prepared. If you accidentally removed both, replace the second loop now; continuing would shift the graft by one stitch.
3. Back purlwise, off. Enter the first stitch on the back needle as if to purl, pull the yarn through, and slide that stitch off the back needle. Keep the yarn below the knitting needles rather than wrapping it over their tops.
At this point, one stitch has come off each needle during the current cycle. The live stitch counts should still match. If they do not, check which “on” stitch was removed or which “off” stitch was left behind before pulling the yarn snug.
4. Back knitwise, on. Enter the new first stitch on the back needle as if to knit, pull the yarn through, and leave that stitch on the needle. The back side is now prepared for the next repeat. Bring the yarn back under the needles toward the front tip.
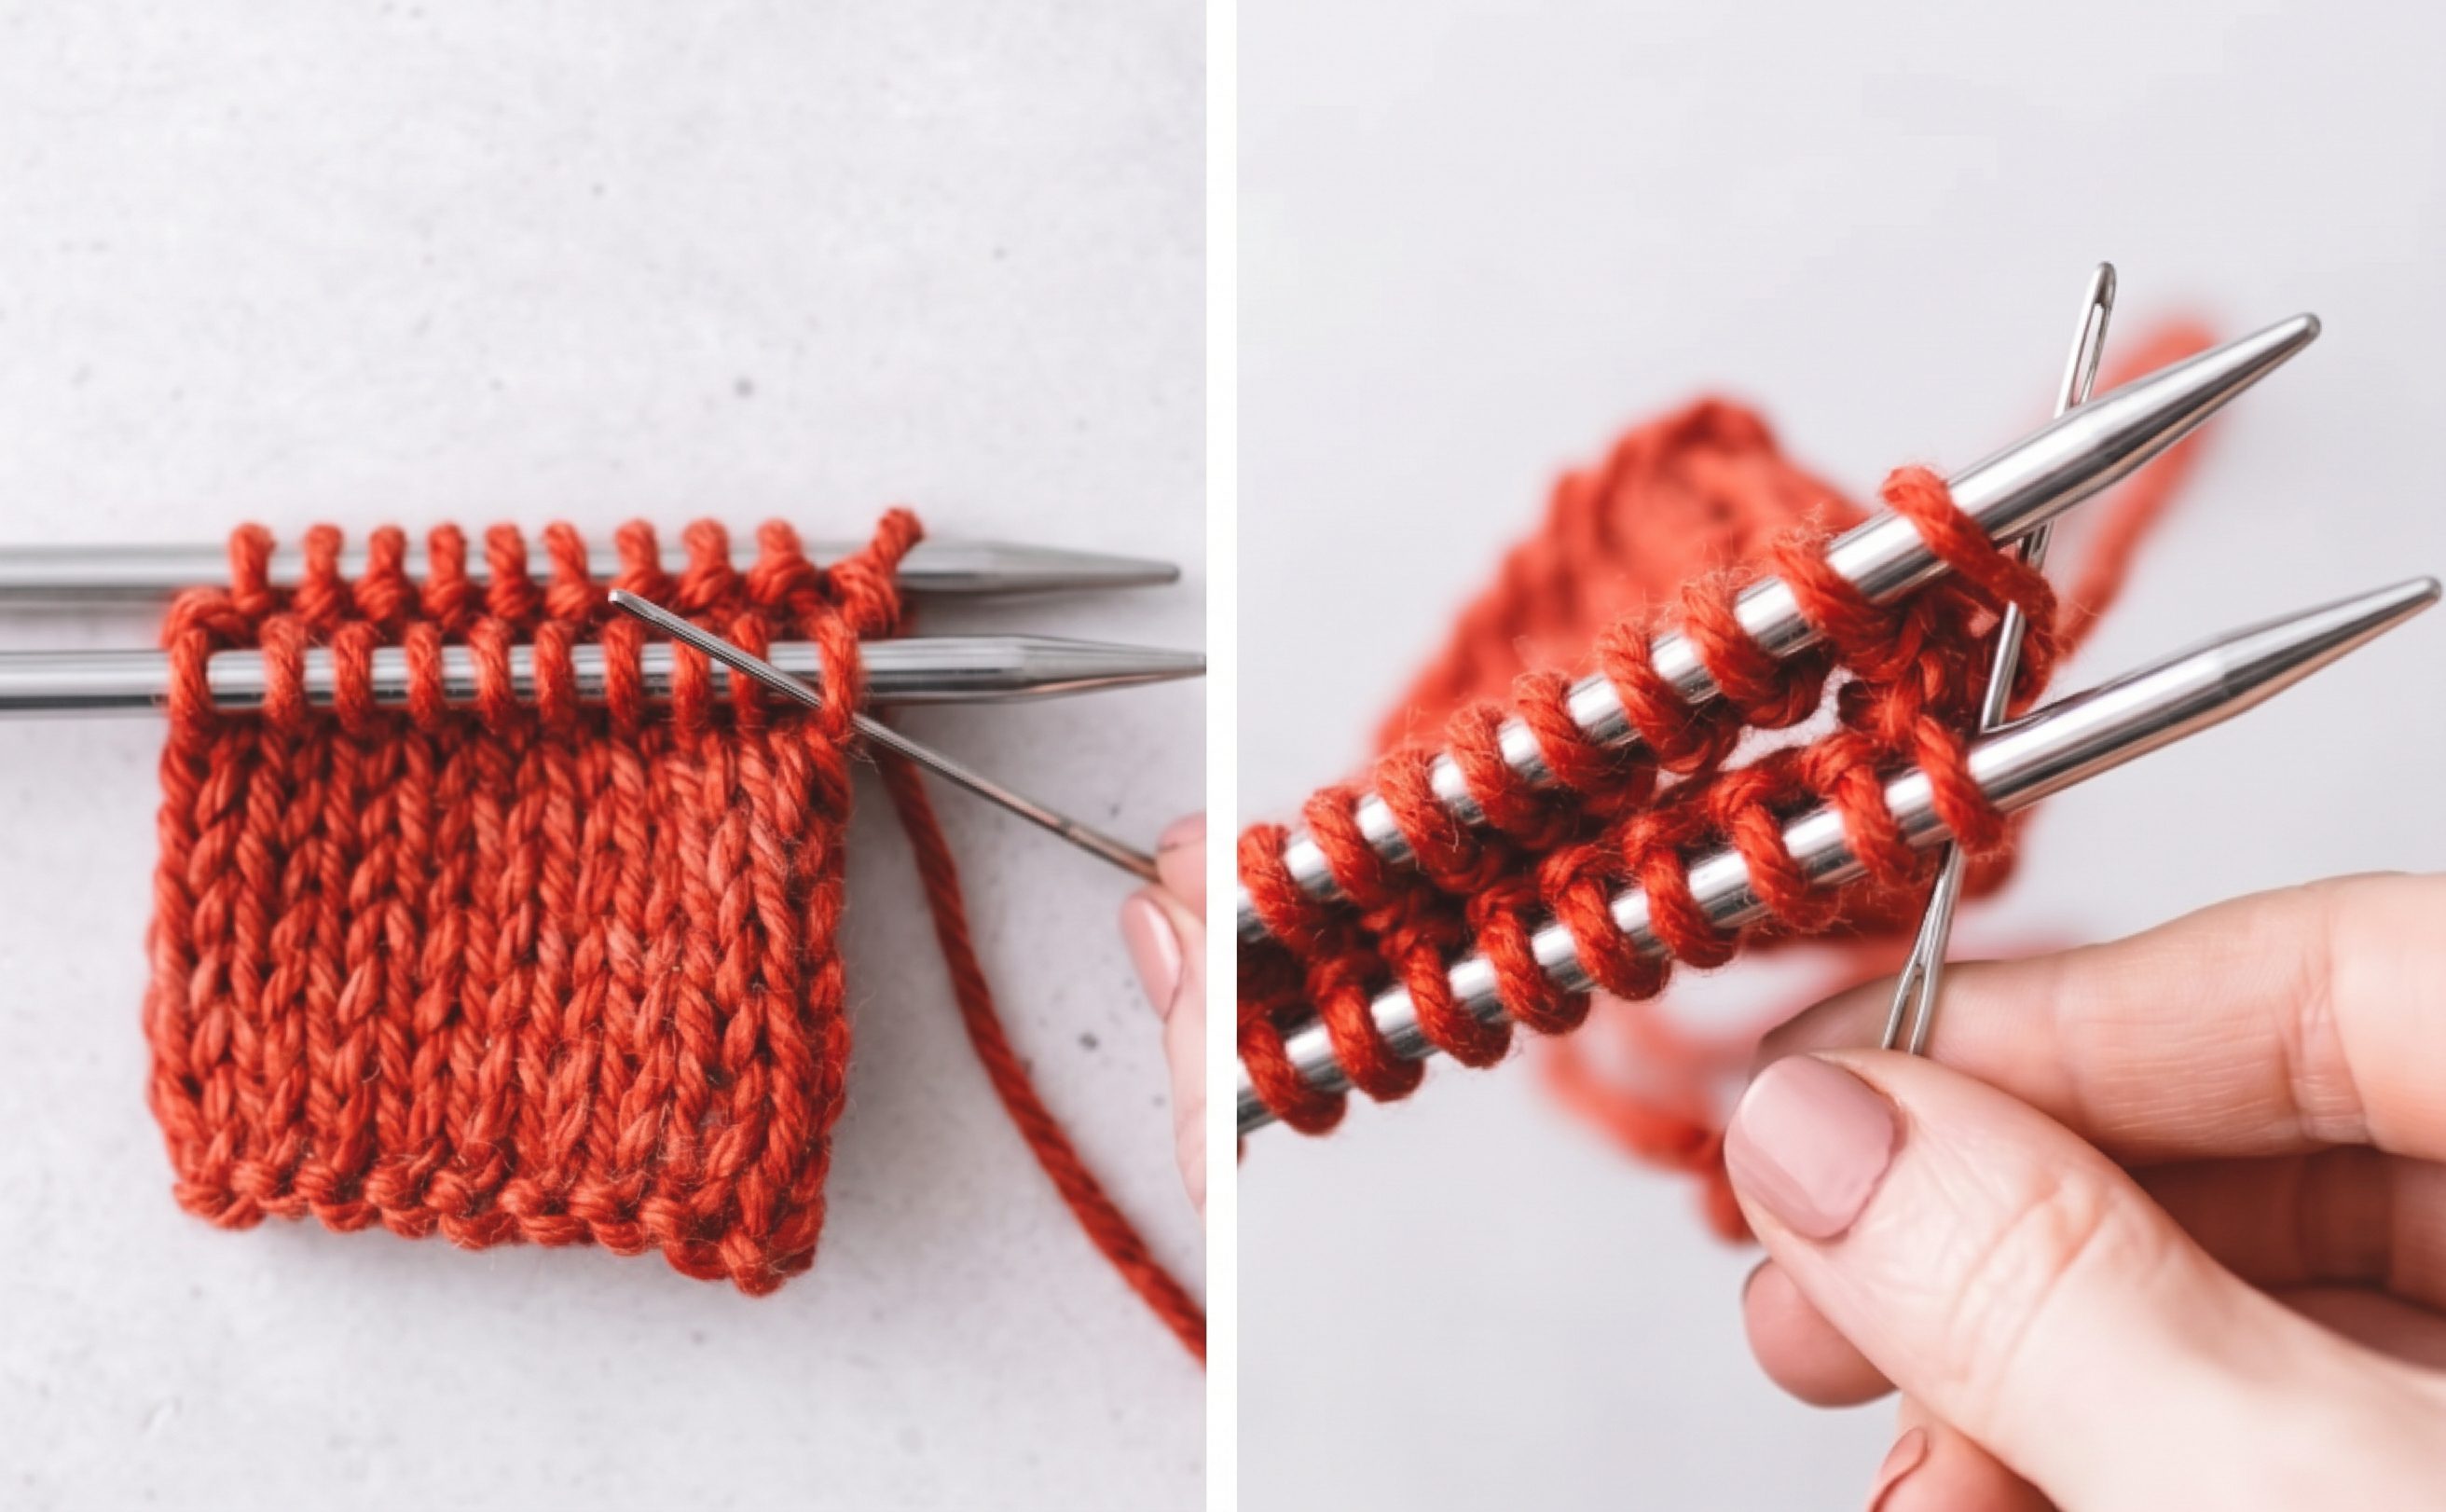
That completes one full repeat. The pair of stitches removed from the knitting needles has become part of the sewn row. Repeat the four actions, letting only the two “off” stitches leave their needles in each cycle. Lion Brand’s grafting guide offers another view of the hand motion.
Finish the final pair correctly
Continue until exactly one live stitch remains on each needle. Do not attempt the two “on” passes again, because there is no next stitch to prepare. Check that you are at the same point in the cycle on both needles before making the final passes.
Pass the tapestry needle knitwise through the last front stitch. Pull the yarn through and slide that stitch off the front knitting needle. The front needle is now empty; do not add another front purlwise pass.
Pass the tapestry needle purlwise through the last back stitch. Pull the yarn through and slide that stitch off the back knitting needle. Both needles should now be empty, and the yarn should travel through the newly formed grafted row without a knot across the visible side.
Even out the graft and finish the yarn
Spread the fabric flat and compare the new V-shaped loops with the knit stitches just above and below them. If some grafted loops are larger, use the tapestry needle tip to move a little yarn from one loop to the next. Work across the row in small adjustments rather than tugging only the loose loop.
Avoid pulling the whole graft tight at once. A very tight row can pucker the toe or make a visible line; a very loose row can form a gap. Match the neighboring stitch size as closely as the yarn allows. The first and last loops may need a separate, gentle adjustment.
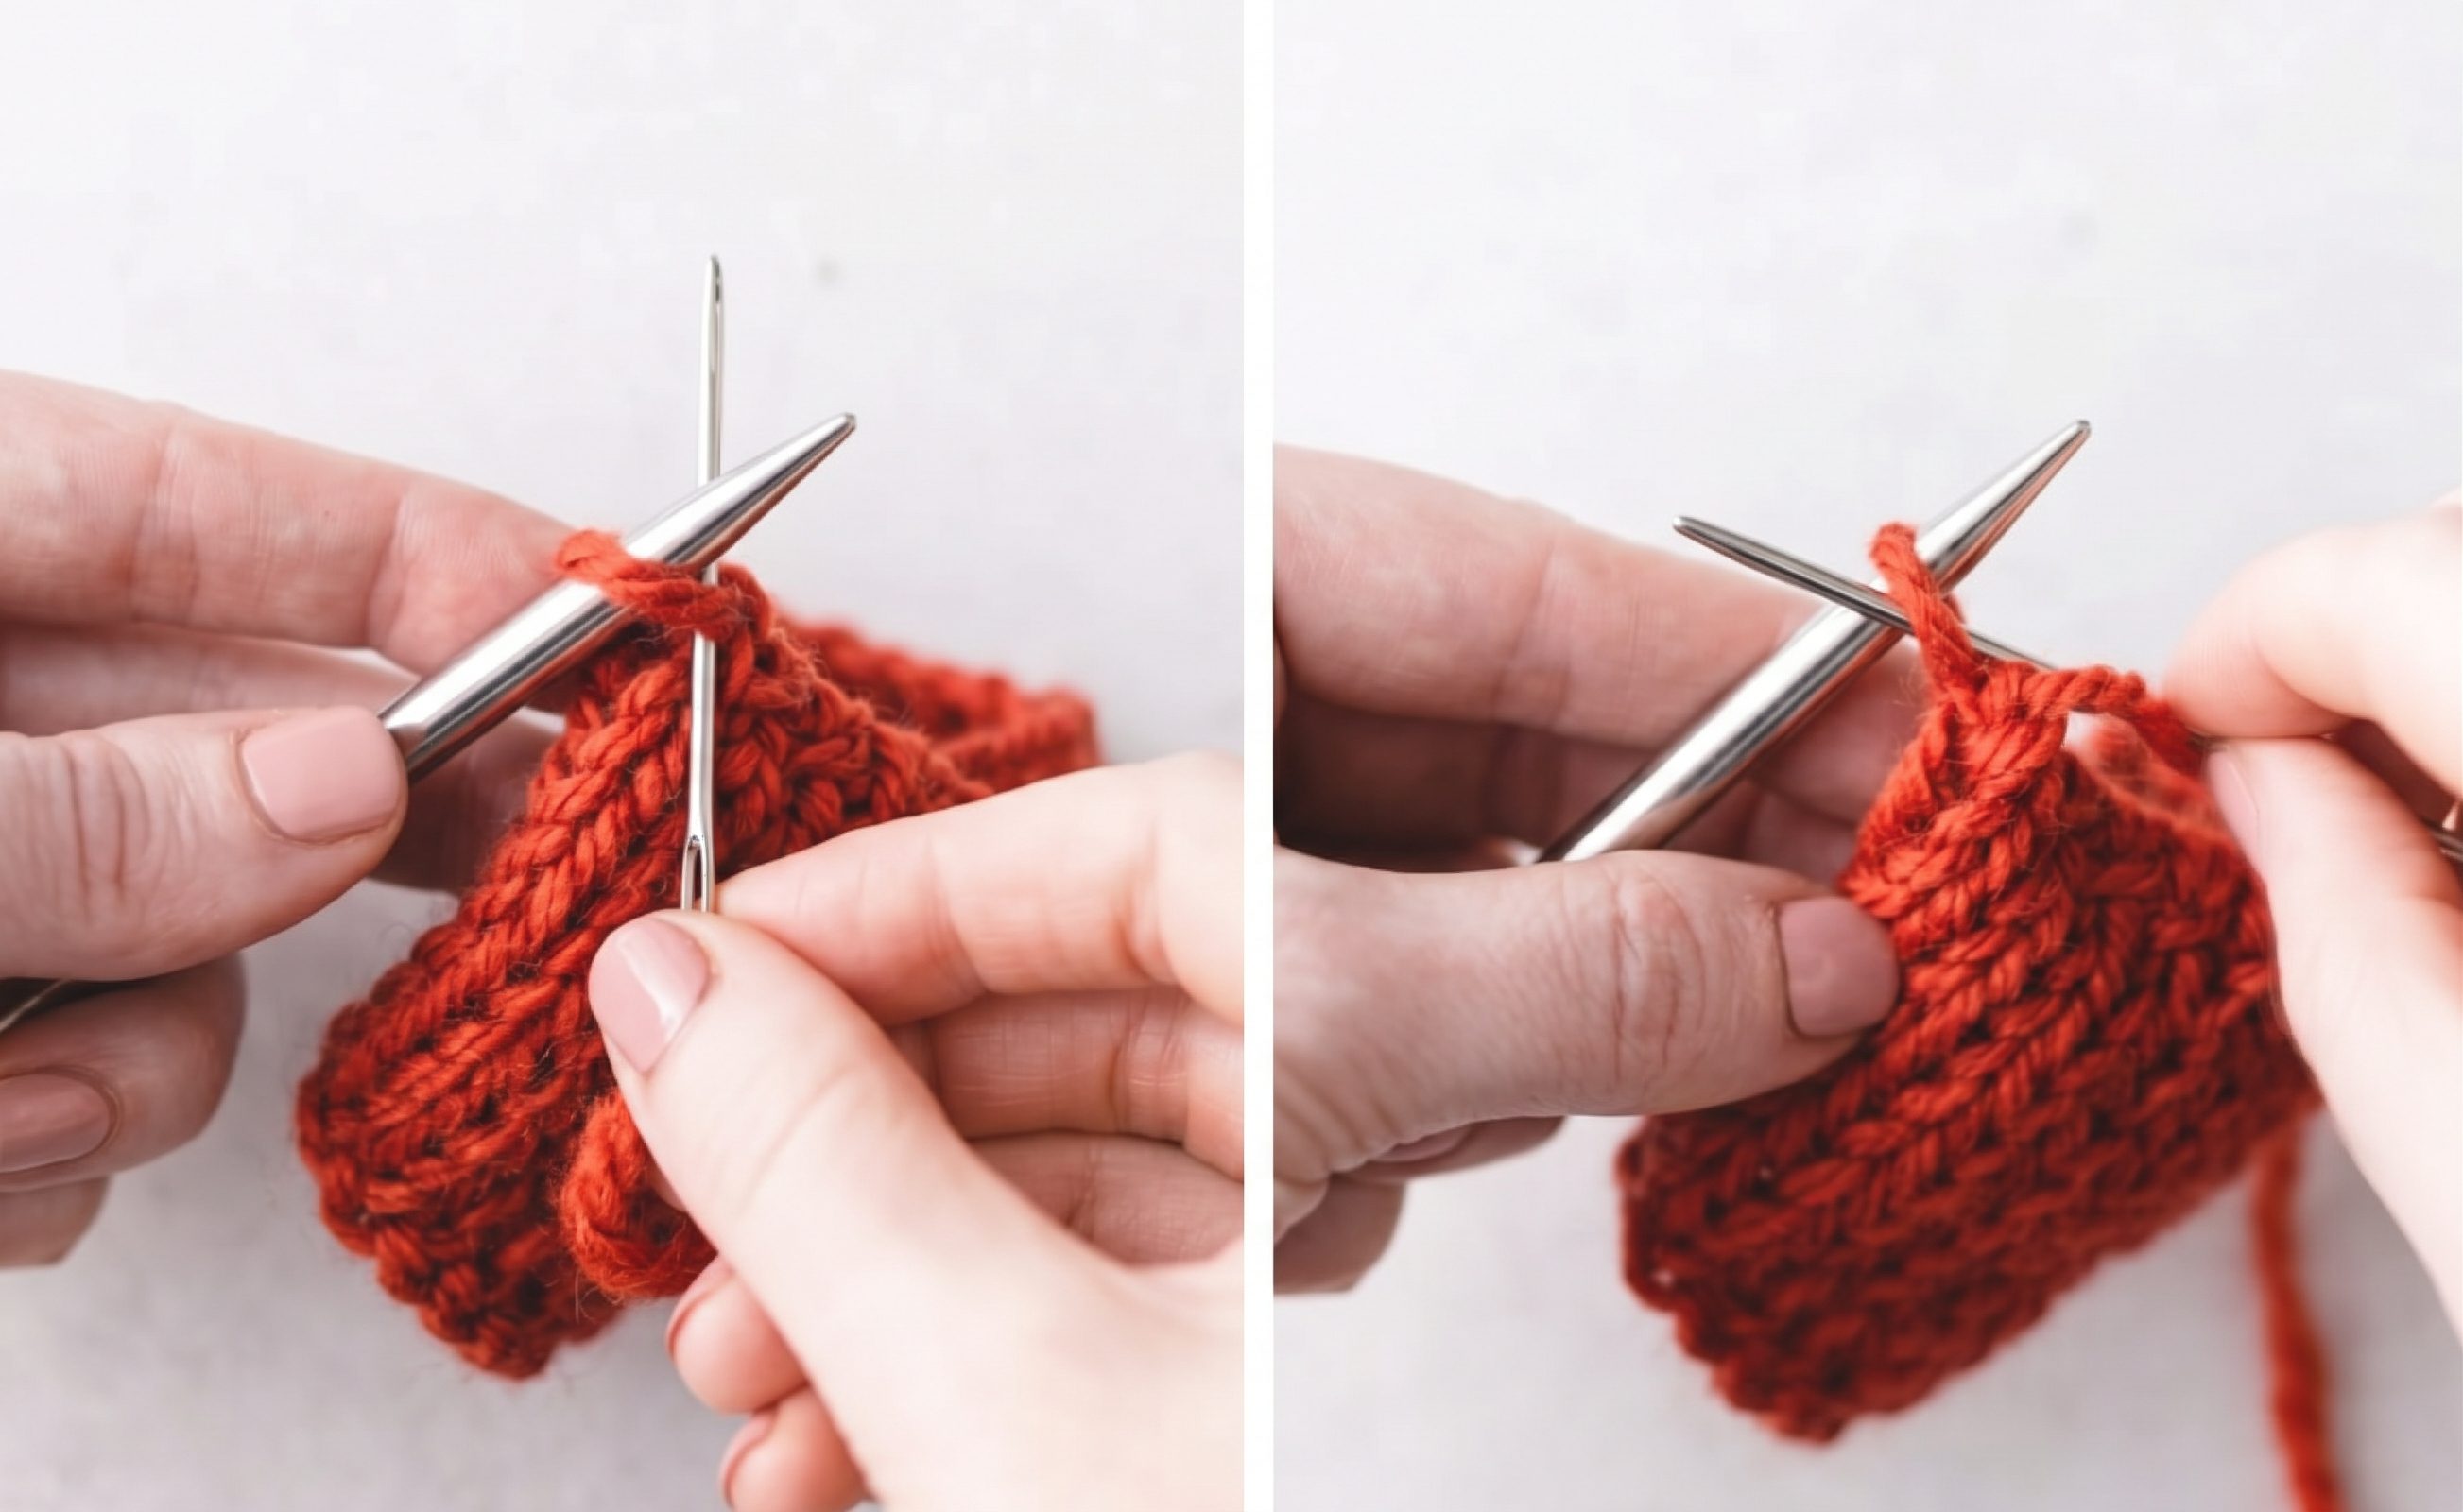
When the row looks even, take the yarn tail to the wrong side and weave it through several nearby stitches. Change direction once and trim only after the tail is secure. If you used a separate joining length, weave in its starting tail as well.
Fix common grafting mistakes
A live stitch fell off early. Stop before pulling more yarn. Catch the loose loop with a knitting needle or spare needle, return it to its original front or back position, then check the last completed action. This is easier while the graft is still loose.
The pattern has a jog or an extra-looking stitch. Compare the counts on both needles. Each completed four-part repeat removes one stitch from each side; the “on” passes remove none. If you cannot identify the last correct pass, unthread the newest grafted loop carefully and return the live stitches to the needles before retrying.
The join forms a ridge or twists. Check that the wrong sides faced each other when you began and that the working yarn traveled below the knitting needles. If the fabric was folded the wrong way, tension changes will not hide the ridge; back out the graft and orient the pieces again.
Small corners stick out at the edges. A sock toe’s shape and edge decreases can affect those corners as much as the final graft. First even the first and last grafted loops. If the corners remain, review the pattern’s toe shaping before changing the setup sequence; skipping steps without a tested pattern can distort the edge.
Know when to choose another finish
Use these steps for two matching runs of live stockinette stitches. A garter or ribbed fabric can be grafted, but its stitches require a different order to preserve the visible pattern. Follow instructions written for that fabric rather than applying this stockinette sequence to every texture.
For a load-bearing shoulder, choose the finishing method specified by the garment pattern. The Craft Yarn Council notes that ordinary Kitchener stitch lacks the strength it recommends for shoulder seams. A three-needle bind off or sewn seam may be more suitable there, even though it leaves a visible or internal ridge.
Quick questions before you start
Can I graft stitches that have already been bound off? This method needs open loops held on needles. If the edge is bound off, you would have to undo the bind off and restore the live stitches or use a seam meant for finished edges. For a regular edge finish, see our guide to binding off knitting.
What do knitwise and purlwise mean here? They describe how the threaded tapestry needle enters a live stitch, just as a knitting needle would enter for a knit or a purl. You are sewing through the loop, not making a conventional knitted stitch with the tapestry needle.
Practice, then graft your project
Try the sequence once on scrap stockinette, count the remaining live stitches after each repeat, and compare the finished row with the surrounding fabric. If you are building your basics first, our knit stitch lesson, cast-on guide, and Knitting library are good next stops. Keep the four-action reminder beside your sock until the motion becomes familiar.
Have a question? Use the form above to submit your question or comment.
I love hearing from you and seeing what you made!