


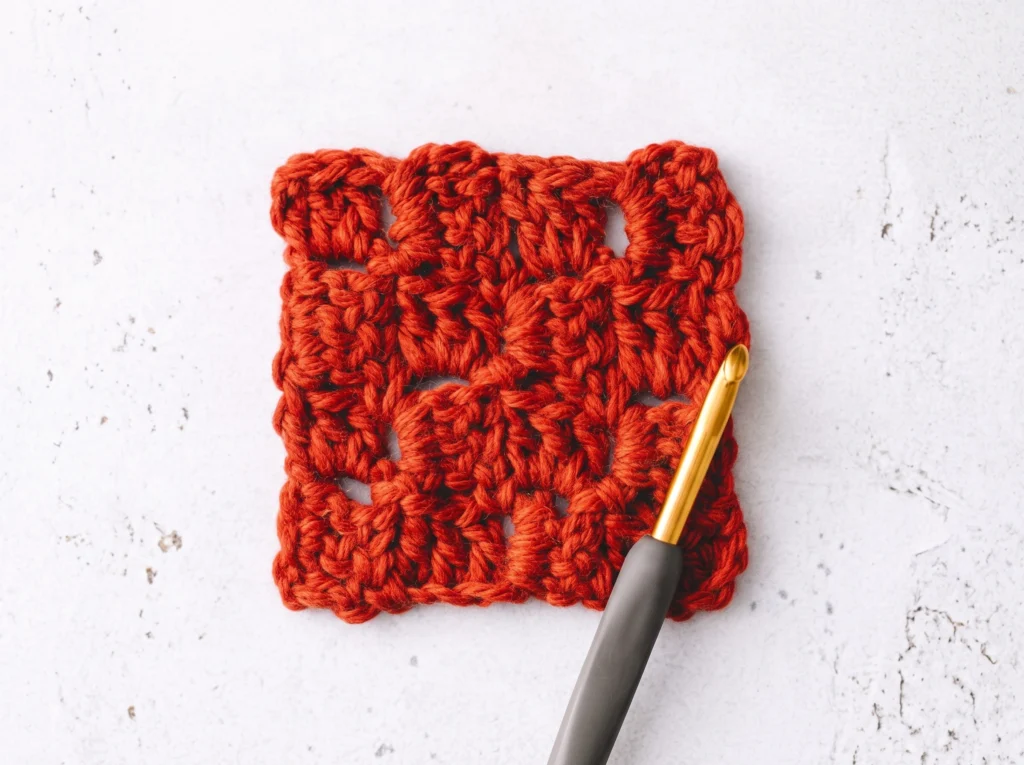
Corner-to-corner crochet, or C2C, turns a few familiar stitches into a fabric of little diagonal tiles. If you can chain, double crochet, and slip stitch, you can make the practice square in this guide. You will know what each row should look like before you move on.
We will use one color and a seven-row swatch: the tile counts climb 1, 2, 3, 4, then fall 3, 2, 1. That small shape gives you both an increase and a decrease without asking you to manage a blanket or a color chart on your first try.
The directions use US crochet terms and describe a right-handed starting orientation. Left-handed makers can mirror the direction of travel. If double crochet is still new, work through our first crochet practice square before beginning this project.
What is C2C crochet?
C2C is a way of building fabric from one corner to the opposite corner. Each diagonal row consists of small blocks, usually called tiles. A new row can gain a tile, keep the same number of tiles, or lose a tile, depending on the shape you want.
In the version below, a tile has three US double crochet stitches beside a turning chain. The chain creates an open space where the next tile can attach. Those repeated spaces are the landmarks that make the fabric easy to navigate.
The first few rows look like a growing triangle. After the widest row, the edges taper until only one tile remains. Viewed flat, the finished sample looks like a square even though you worked it on the diagonal.
This construction also explains why C2C suits pixel-style blankets: one chart square can stand for one crocheted tile. For now, a solid swatch is the clearest way to learn the stitch path; color decisions can wait until the motions feel familiar.
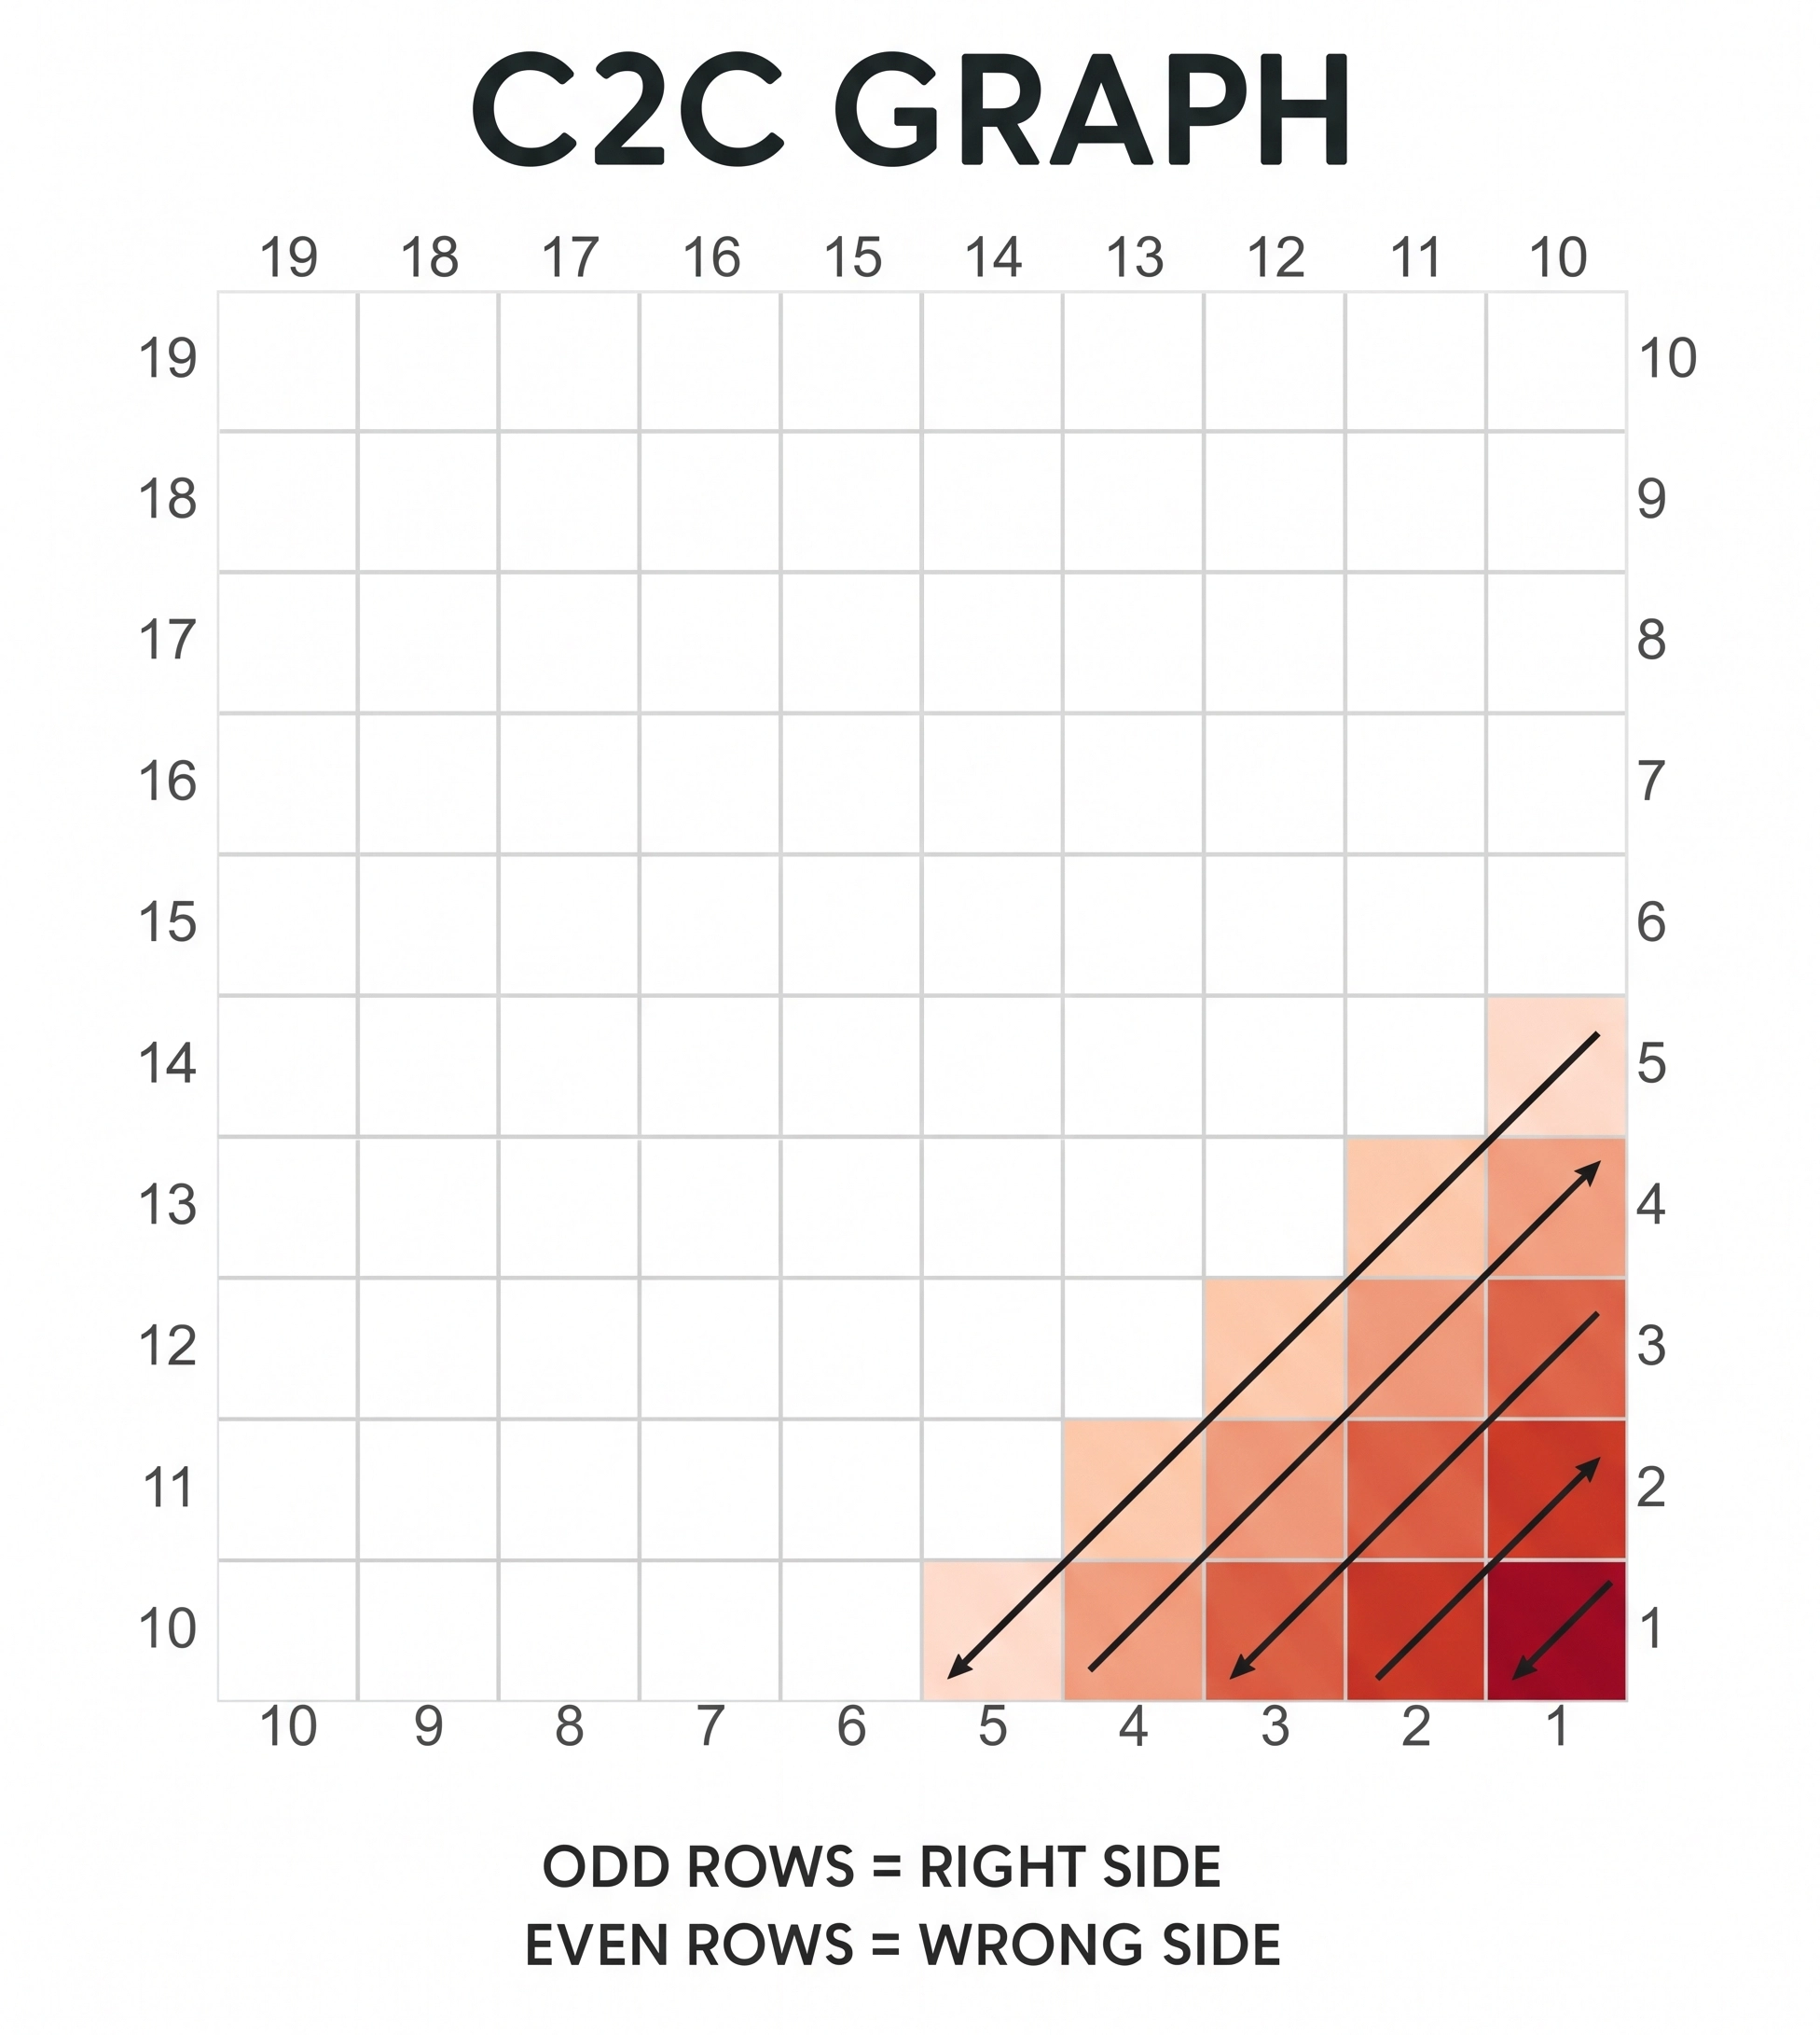
Quick row check: A four-tile-wide square uses seven diagonal rows with tile counts 1 · 2 · 3 · 4 · 3 · 2 · 1. Count completed tiles at the end of each row, not individual stitches along the slanted edge.
Gather yarn and learn the landmarks
Choose a smooth, light-colored yarn so you can see the top loops and chain spaces. A medium-weight yarn and a hook that suits its label make a comfortable practice pair. You also need scissors and a blunt yarn needle for the final tail.
Avoid fuzzy or highly textured yarn for the first sample. Its halo can hide the chain spaces you need to enter. Once you can find those openings by touch, you can try the same construction with a different fiber or color.
If the fabric feels stiff, try a slightly larger hook; if the loops collapse and hide the spaces, try a smaller one. These are adjustments to your tension, not a fixed hook-size rule. Make the sample first before estimating yarn for a larger project.
This guide follows the Craft Yarn Council’s US abbreviations: ch means chain, dc means double crochet, sl st means slip stitch, and RS/WS mean right side/wrong side. A UK pattern calls the US double crochet a treble, so check which vocabulary your pattern uses.
The term ch-3 space means the opening beside a tile’s three-chain turning edge. You slip stitch into that opening to join tiles, then work the next tile into the same opening. Aim the hook through the open space rather than splitting a strand of yarn.
Keep the working yarn attached to the hook while you turn the piece. A removable marker in the first tile can help you remember which corner was your starting point, but it is optional for this one-color swatch.
Make the first tile
Start with a slip knot and chain six. Count back from the hook; the loop on the hook does not count as a chain. The first three chains you skip will become the turning edge of this tile.
Work one US double crochet into the fourth chain from the hook. Make a double crochet in each of the next two chains. You now have three double crochets grouped beside the skipped chain edge.
The skipped chains stand next to the three double crochet posts; they are not three extra stitches to work into now. If the block looks like a narrow rectangle with one open side, you have the right foundation for the joining step.
Lay the tiny block down and find the open space between its chain edge and stitches. You will return to that space on the next row. If you cannot see it, loosen the turning chain slightly instead of tugging the completed stitches apart.
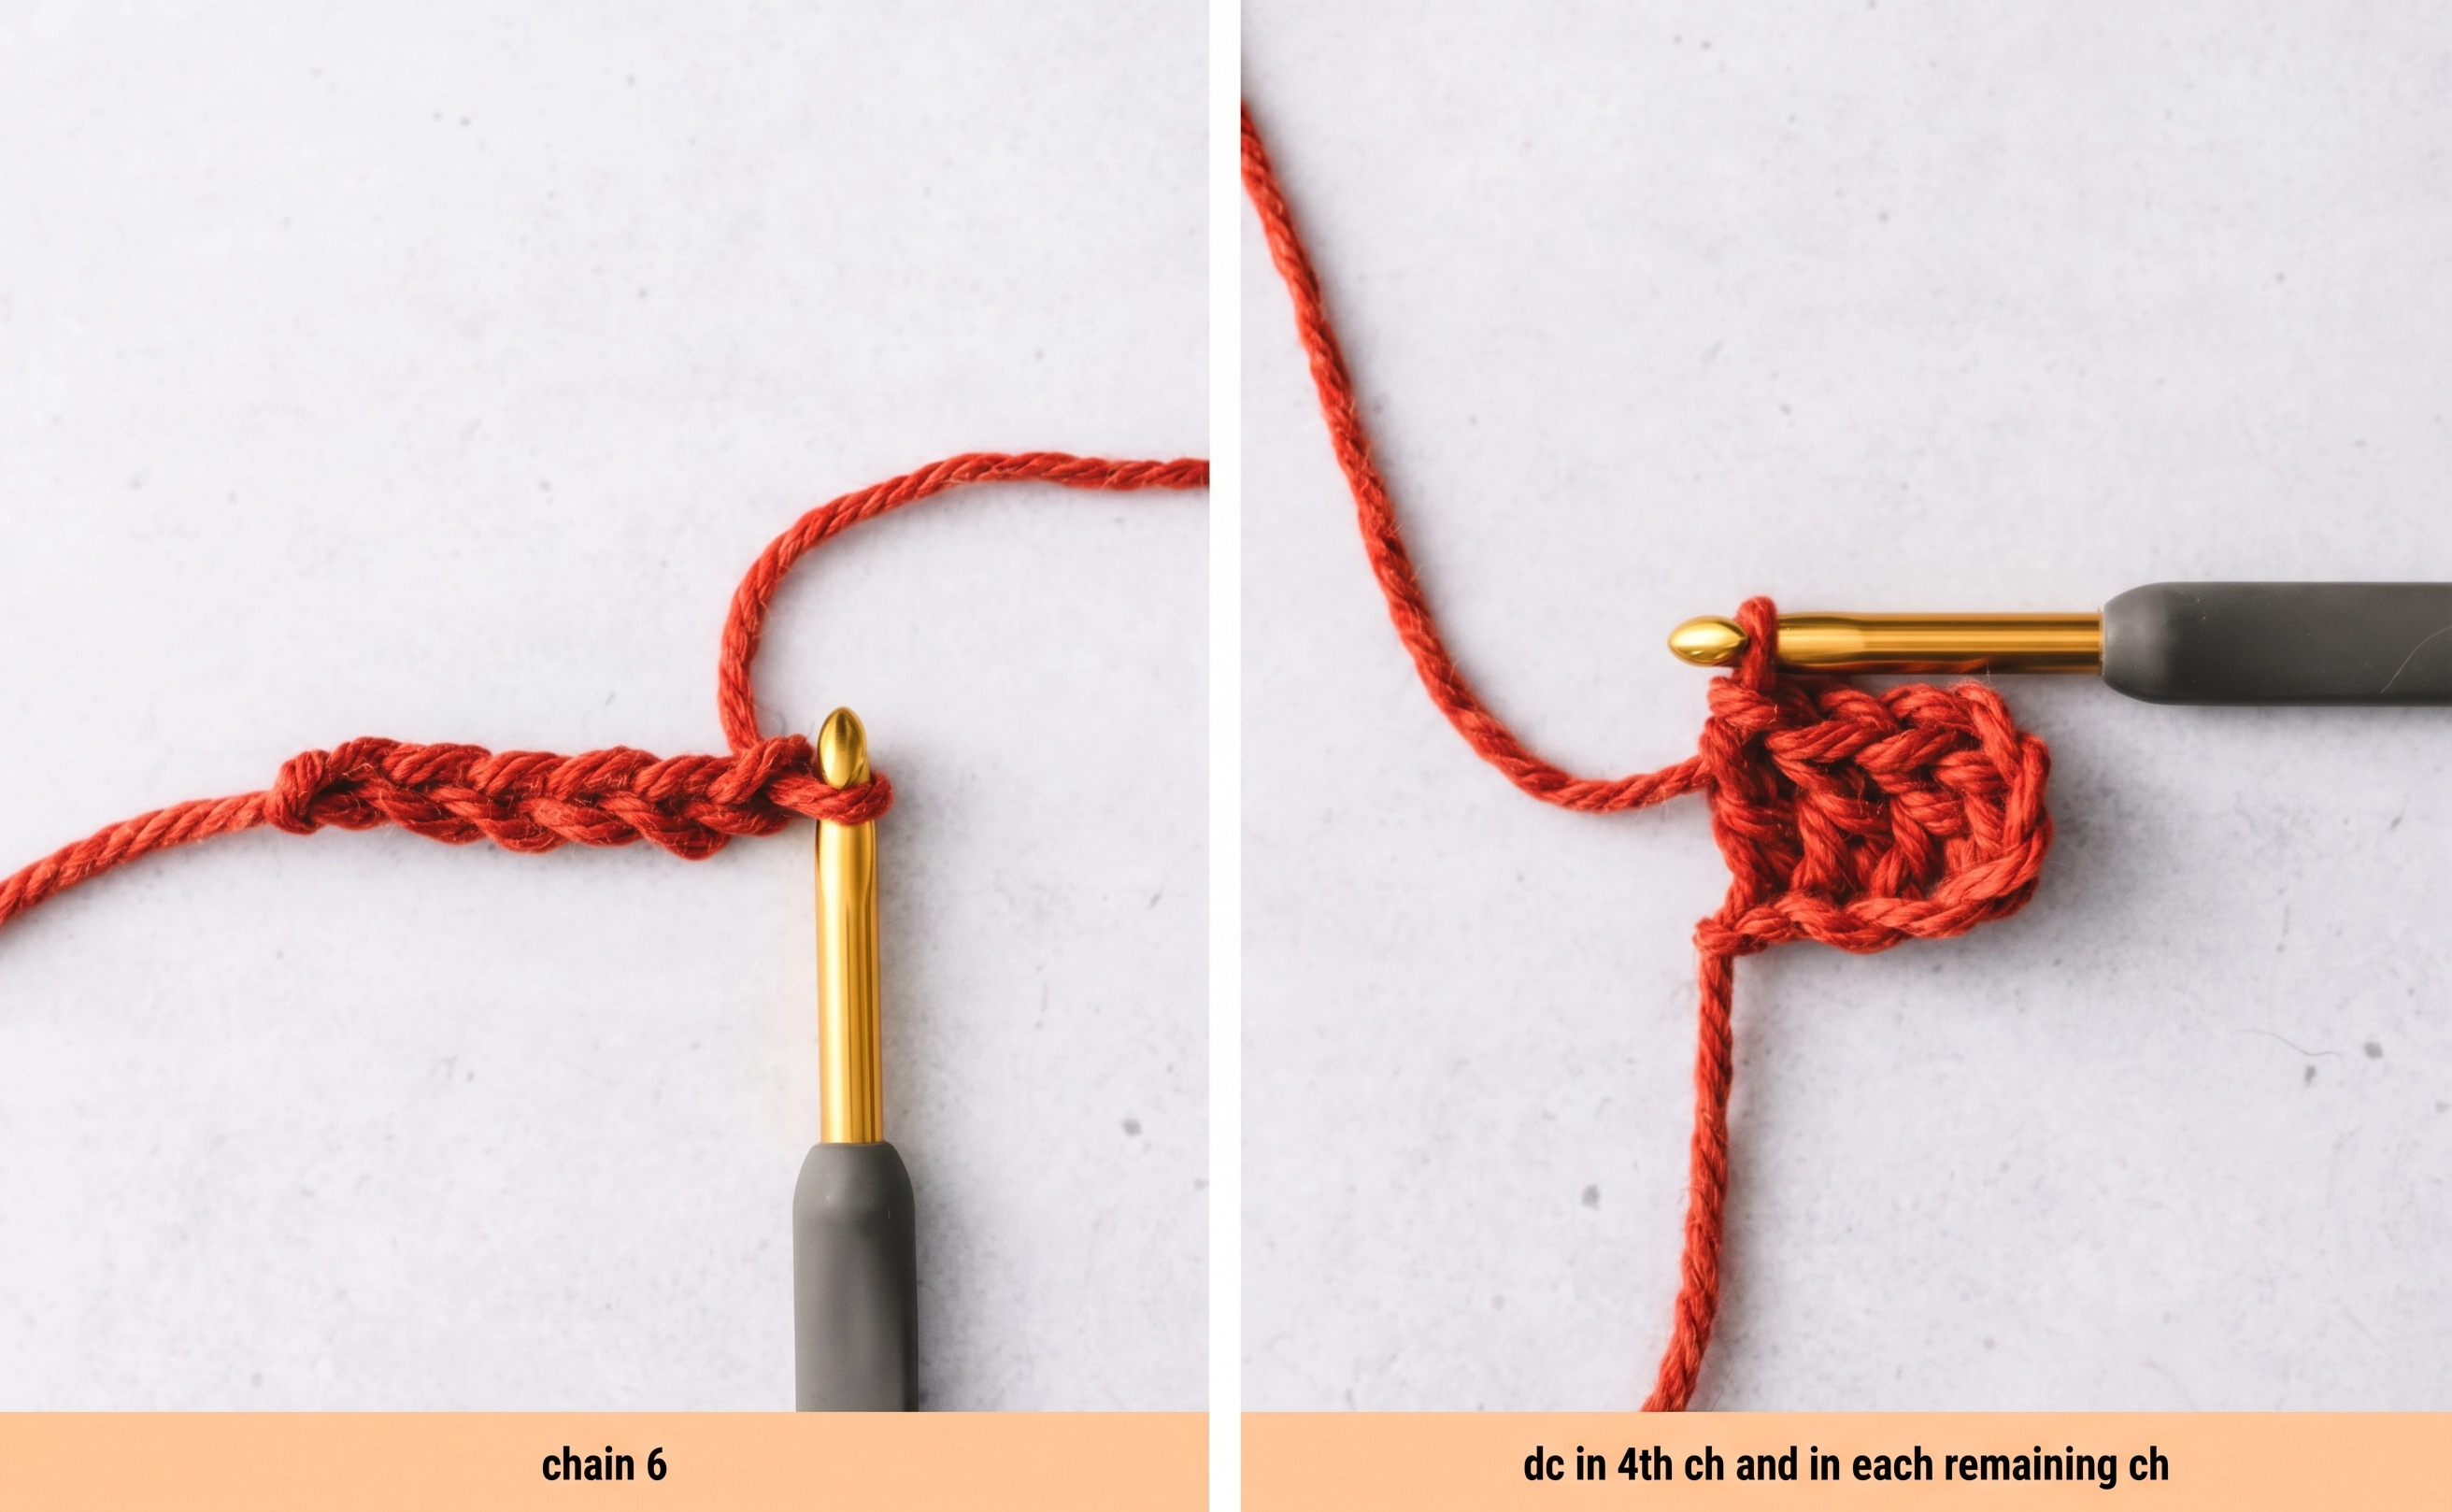
Row 1 is complete with one tile. The loose starting tail is separate from the working yarn, so leave enough length to weave it in at the end.
Turn and make row 2
Turn the small tile as you would at the end of an ordinary crochet row. To create a new tile at the outside edge, chain six and work a double crochet into the fourth chain from the hook, then into the next two chains.
You now have two small blocks that are not yet joined. Hold them so the newest tile sits next to the first one rather than twisted behind it. The open ch-3 space of row 1 is your joining point.
Insert the hook into that open space and make one slip stitch. Keep the slip stitch low and relaxed; it connects the blocks but does not add the height of another double crochet.
With the hook still at the join, chain three. Those three chains become the open edge of the second tile in this row. Work three double crochets into the same ch-3 space where you made the slip stitch.
The second tile grows outward from the join, so the row now has two attached blocks. Spread them gently with your fingers. If the join feels pinched, check that you worked into the space rather than into a single chain strand.
Pause to identify both ch-3 spaces along the new outer edge. You will join to each of them as you cross the next row. They are often easier to see from the side than from directly above.
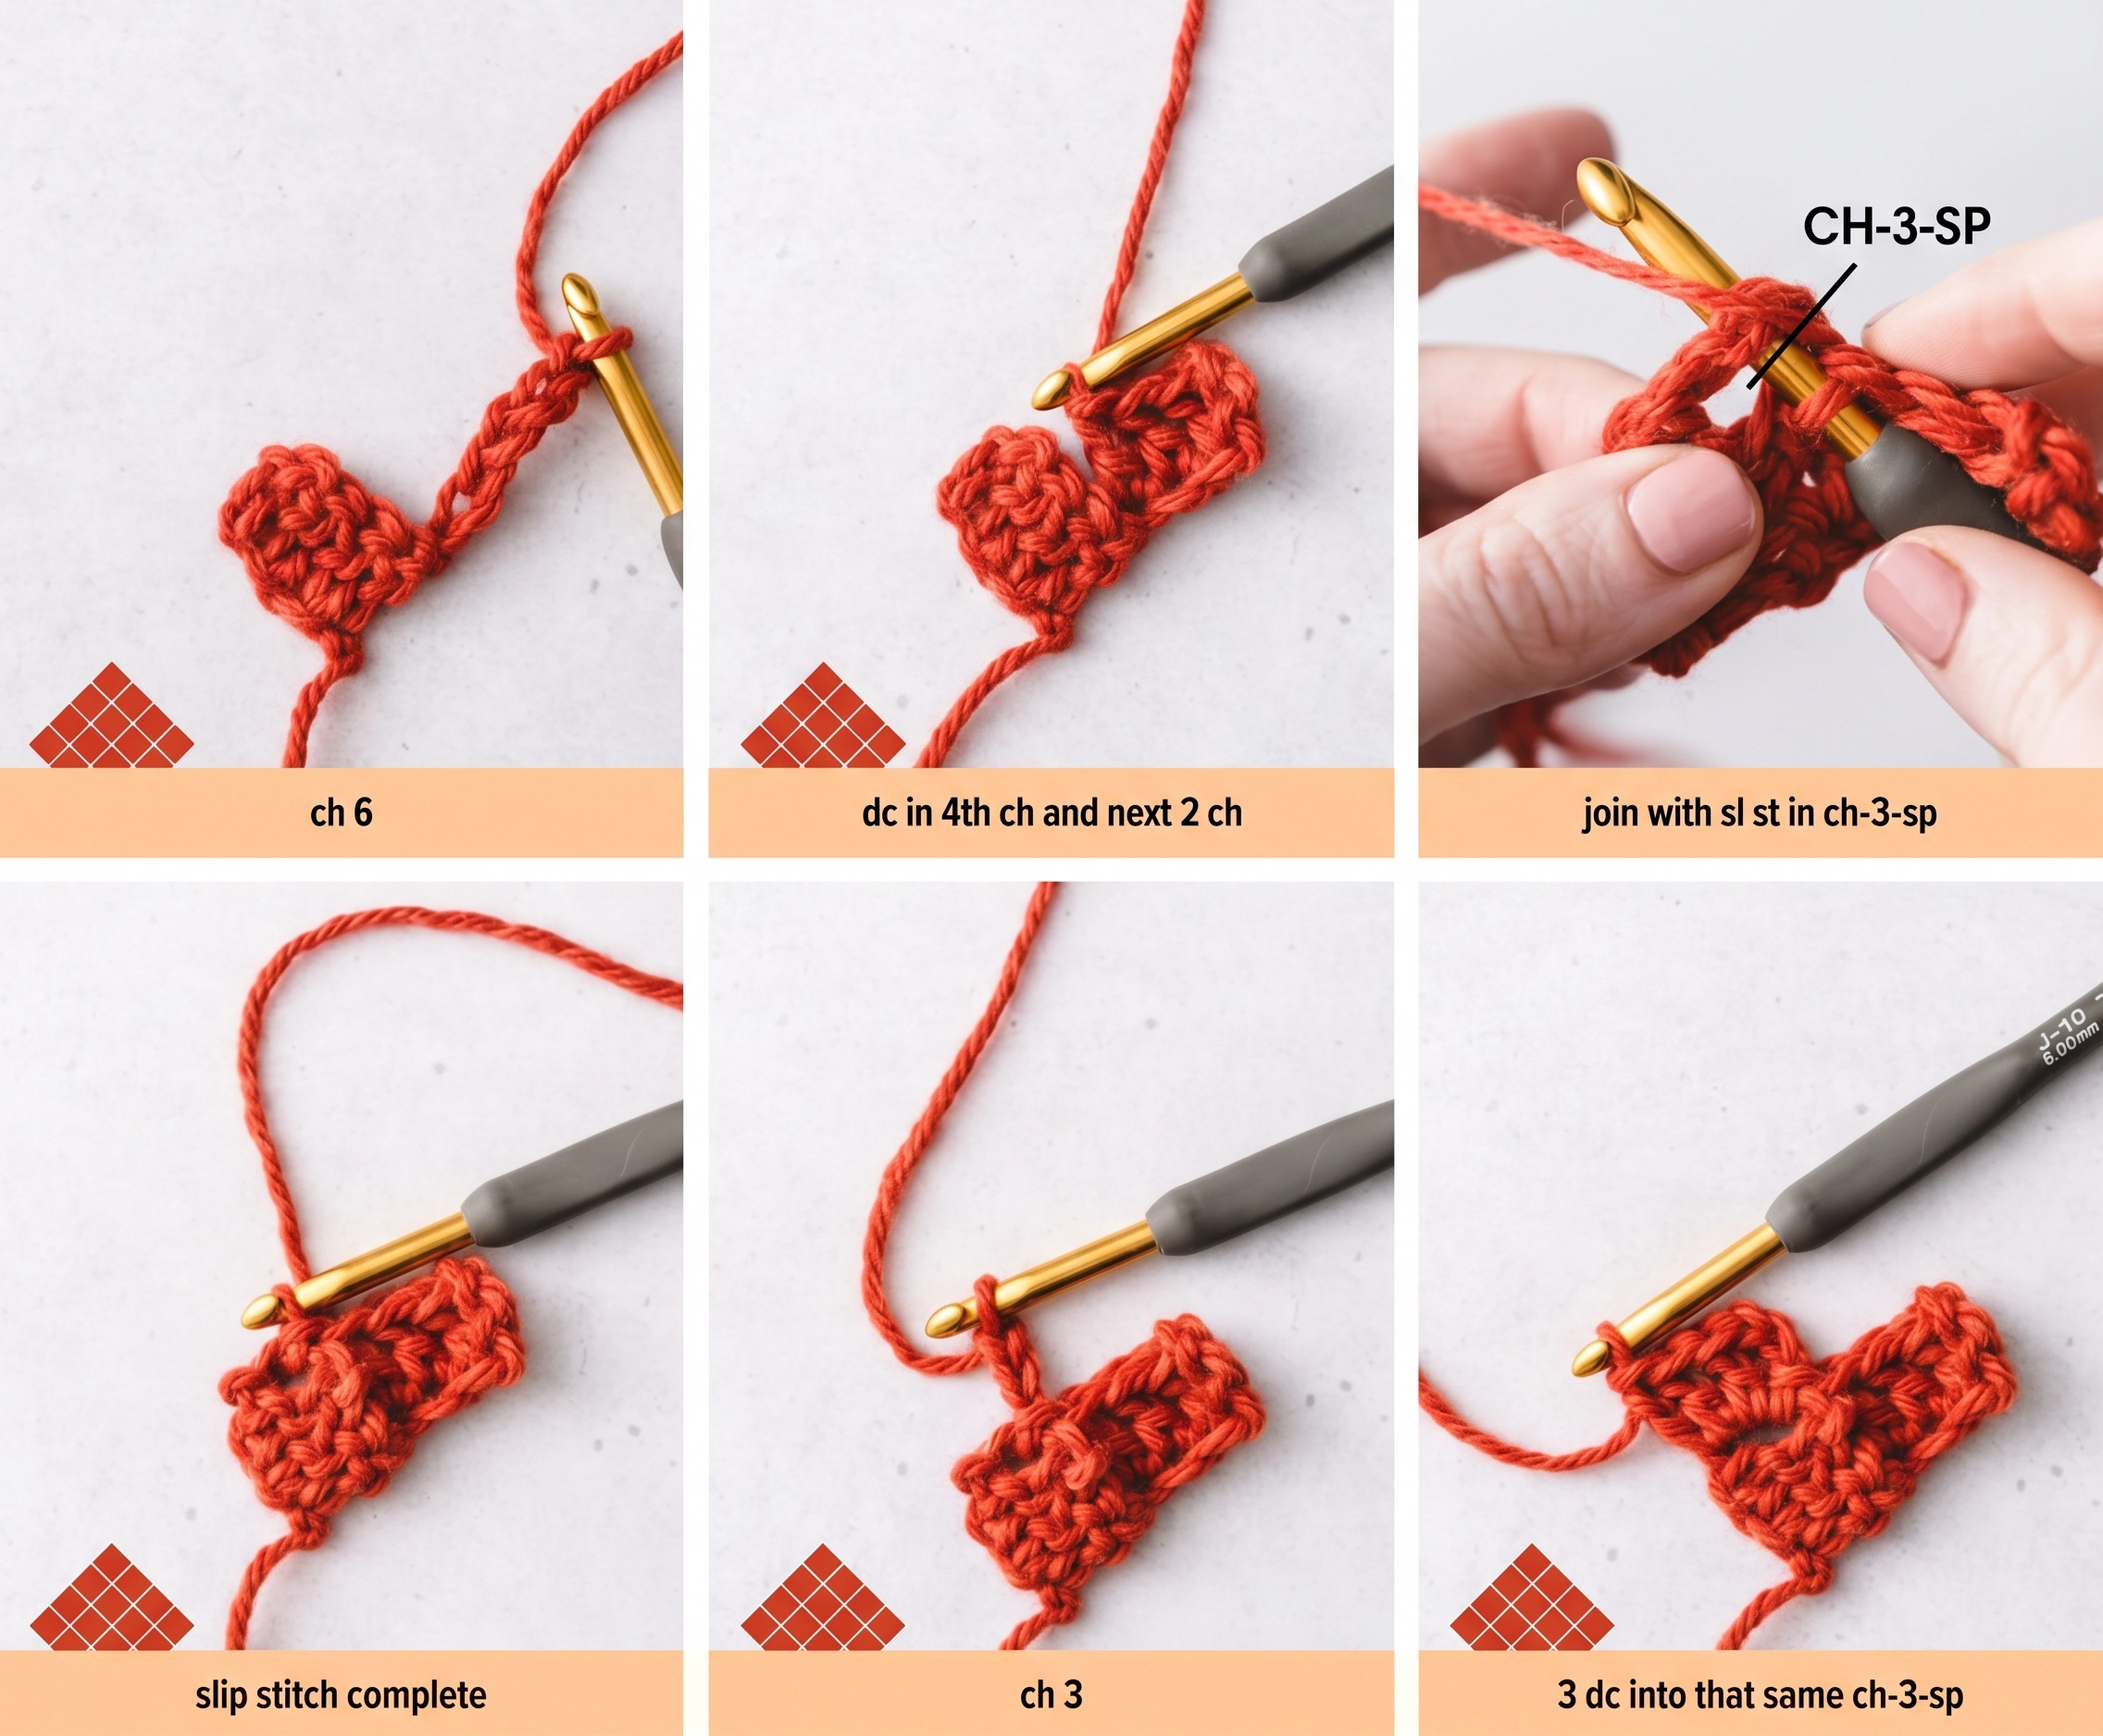
Row 2 is complete with two tiles. A V-like outline at this stage is normal. The square shape does not appear until you begin decreasing.
If your second tile is missing a post, undo only that tile back to its chain three and remake its three double crochets. Correcting one tile now is simpler than hiding an uneven edge later.
Increase to three tiles
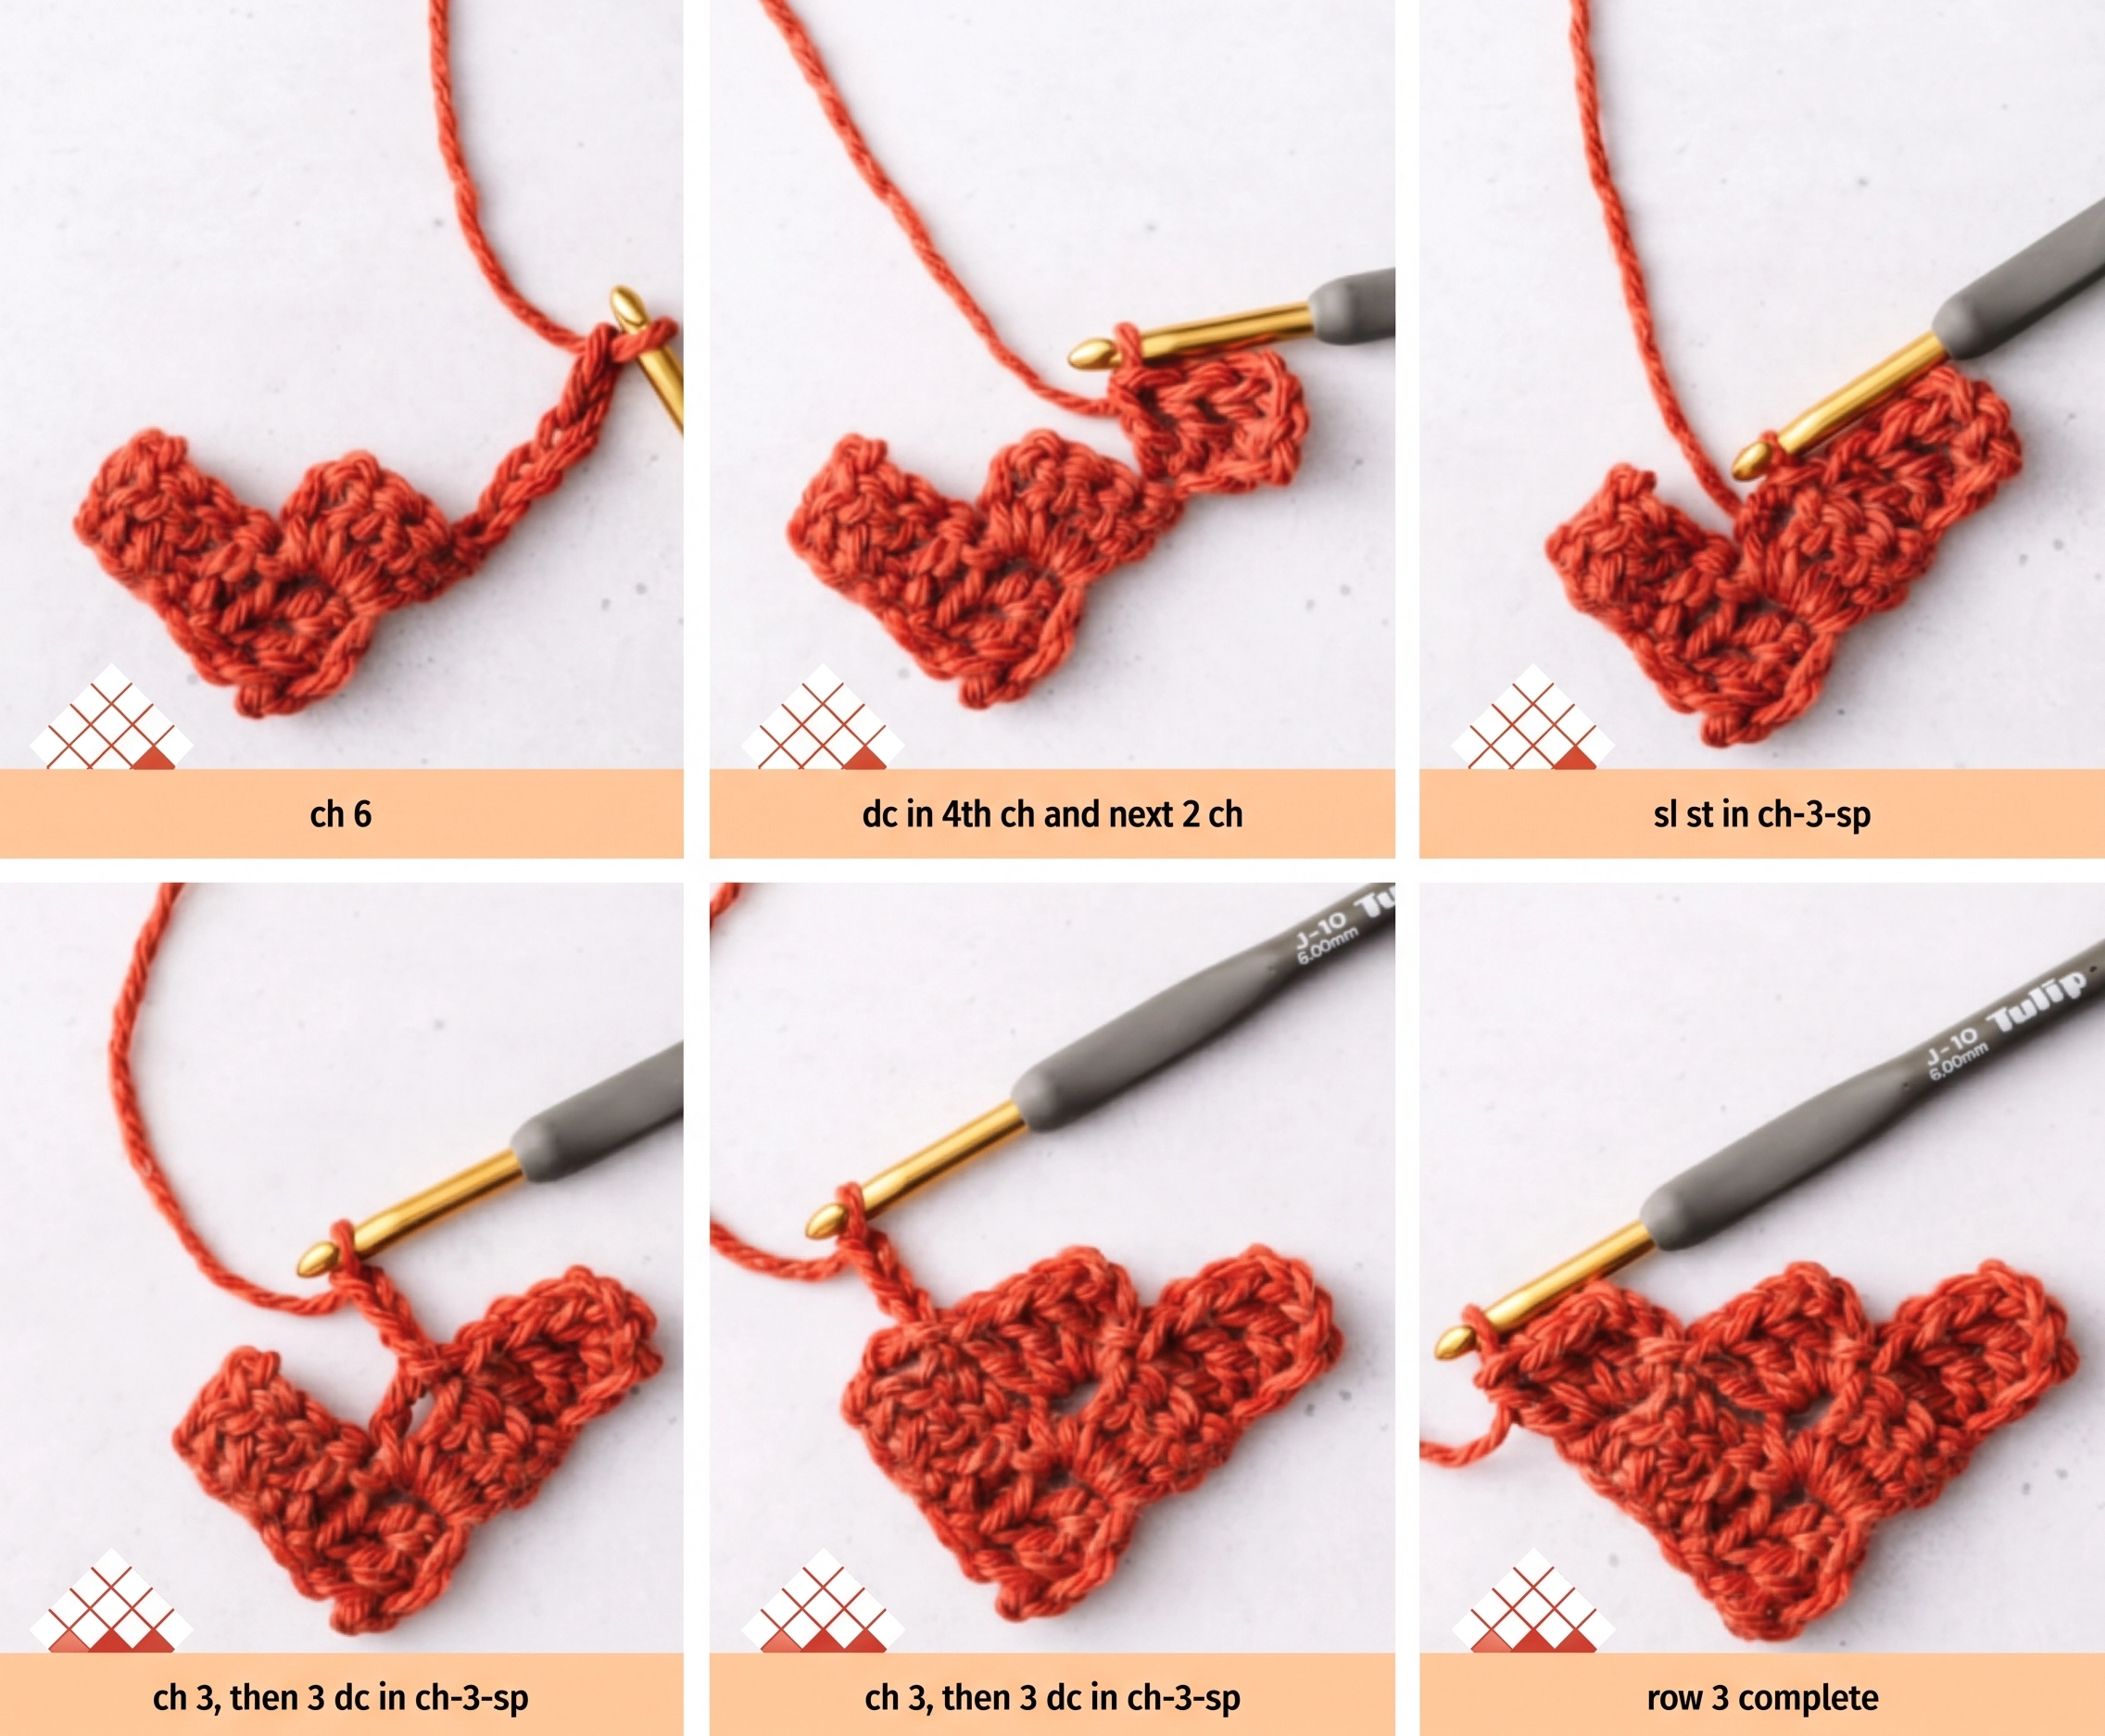
Turn the work again. Chain six and make a double crochet in the fourth chain from the hook and in the next two chains. This new outside block is tile one of row 3.
Locate the closest ch-3 space on row 2. Slip stitch into it, chain three, then make three double crochets into that same space. This forms tile two and keeps the diagonal row connected.
Find the remaining ch-3 space on row 2. Slip stitch into that opening, chain three, and work three double crochets into it for tile three. Do not start another six-chain edge in the middle of the row.
Count the row from one outer edge to the other: three tiles. Each tile should have three double crochet posts and one chain edge. The joins sit between tiles rather than on top of them.
Rows alternate which side of the fabric faces you after each turn. You can label the side facing you on row 1 as the right side if a later color chart uses RS and WS; for this solid sample, the stitch sequence works the same on both sides.
The piece is still a triangle, now wide enough for you to recognize its stair-step sides. Flatten it without stretching; a slight curl often relaxes after the next row or a gentle wash.
If a join slips into a stitch instead of the open space, that edge may look tighter than its partner. Back up to the join and place the slip stitch through the full space, then rebuild the following tile.
Work the widest row
For row 4, turn and make one outside increase tile with chain six and three double crochets as before. Then cross the row, joining to each available ch-3 space and making a chain-three-and-three-double-crochet tile in that space.
You should finish row 4 with four tiles. This is the widest diagonal of our sample. Take a moment to count 1, 2, 3, 4 across the row before you change how the next row begins.
If you want a larger square, keep increasing at the start of every row until the widest diagonal has the number of tiles you want. A wider swatch needs more yarn and more decrease rows, but the stitch sequence does not change.
For the small sample here, stop increasing now. Continuing with chain six at the next outside edge would make a five-tile row, so the next turn uses slip stitches instead.
Start the decrease
Turn the work. Instead of chaining six, slip stitch across the three double crochets at the edge of the last tile you made. Move into its ch-3 space with one more slip stitch. These short stitches shift the hook inward without adding a new block.
At that space, chain three and work three double crochets into it. This is the first tile of row 5. The outer edge ends here because you did not make a six-chain increase tile.
Keep the slip stitches close to the tops of the edge tile’s stitches. If you skip a double crochet while crossing, the hook may reach the ch-3 space from an awkward angle and pull the outside edge out of line.
Continue across the row: slip stitch into the next available ch-3 space, chain three, and work three double crochets there. Repeat at the final available space to make the third tile of this row.
Count three tiles in row 5. When you reach the opposite outside edge, join with a slip stitch and stop. Do not chain three to make an extra tile hanging past the edge.
Turn the work to begin row 6. Slip stitch across the edge tile’s three double crochets and into its ch-3 space. Chain three, work three double crochets there, then join and build one more tile in the next space.
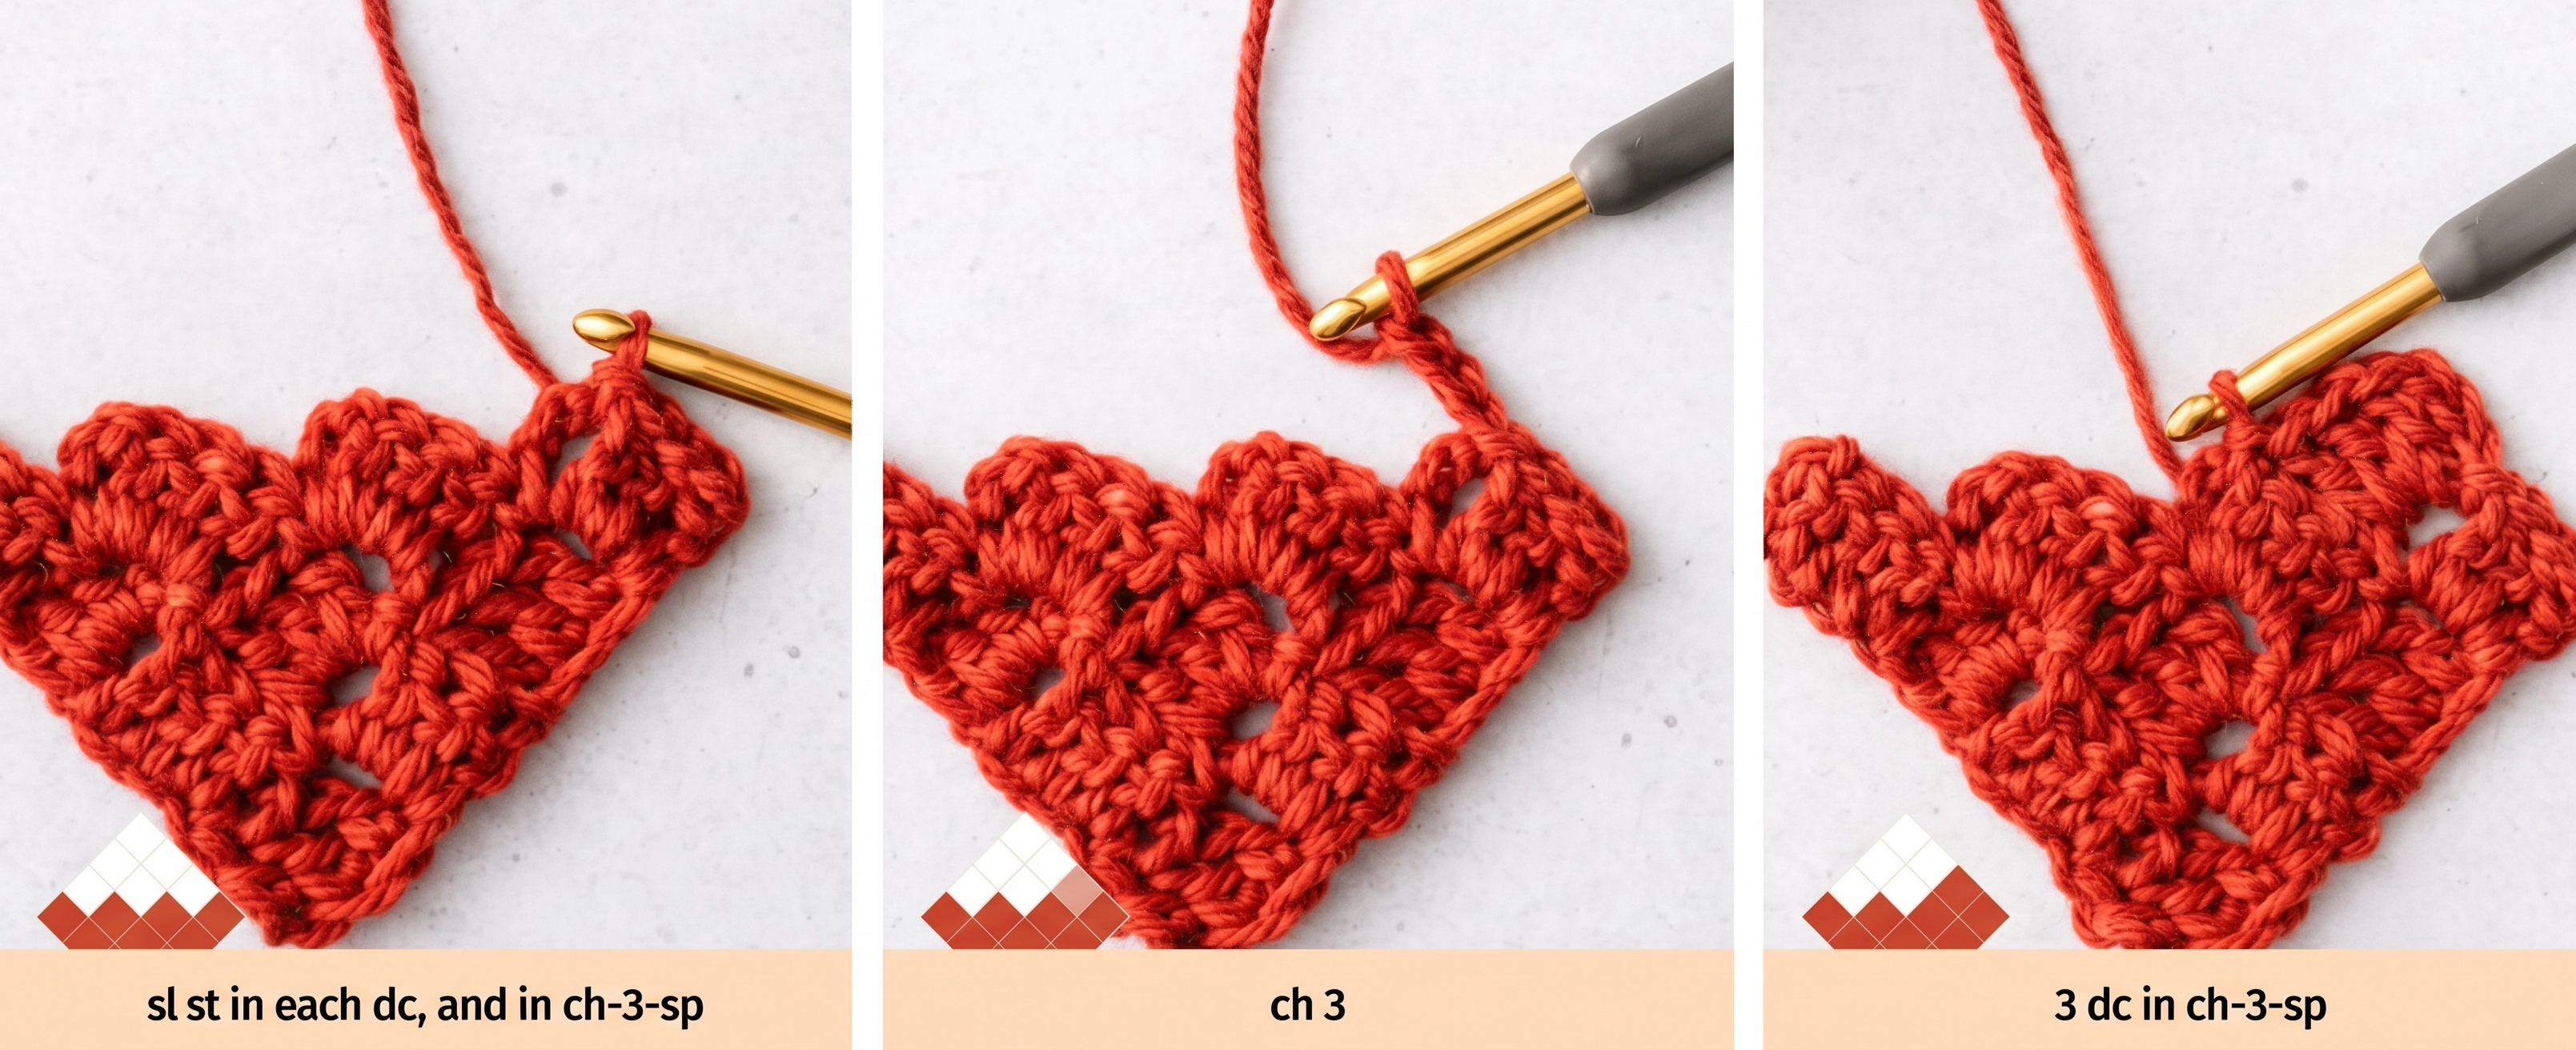
Row 6 should contain two tiles. The two tapering sides should now look roughly balanced. A slightly lopsided sample may reflect tension, but a whole extra step on one side usually means a misplaced increase or join.
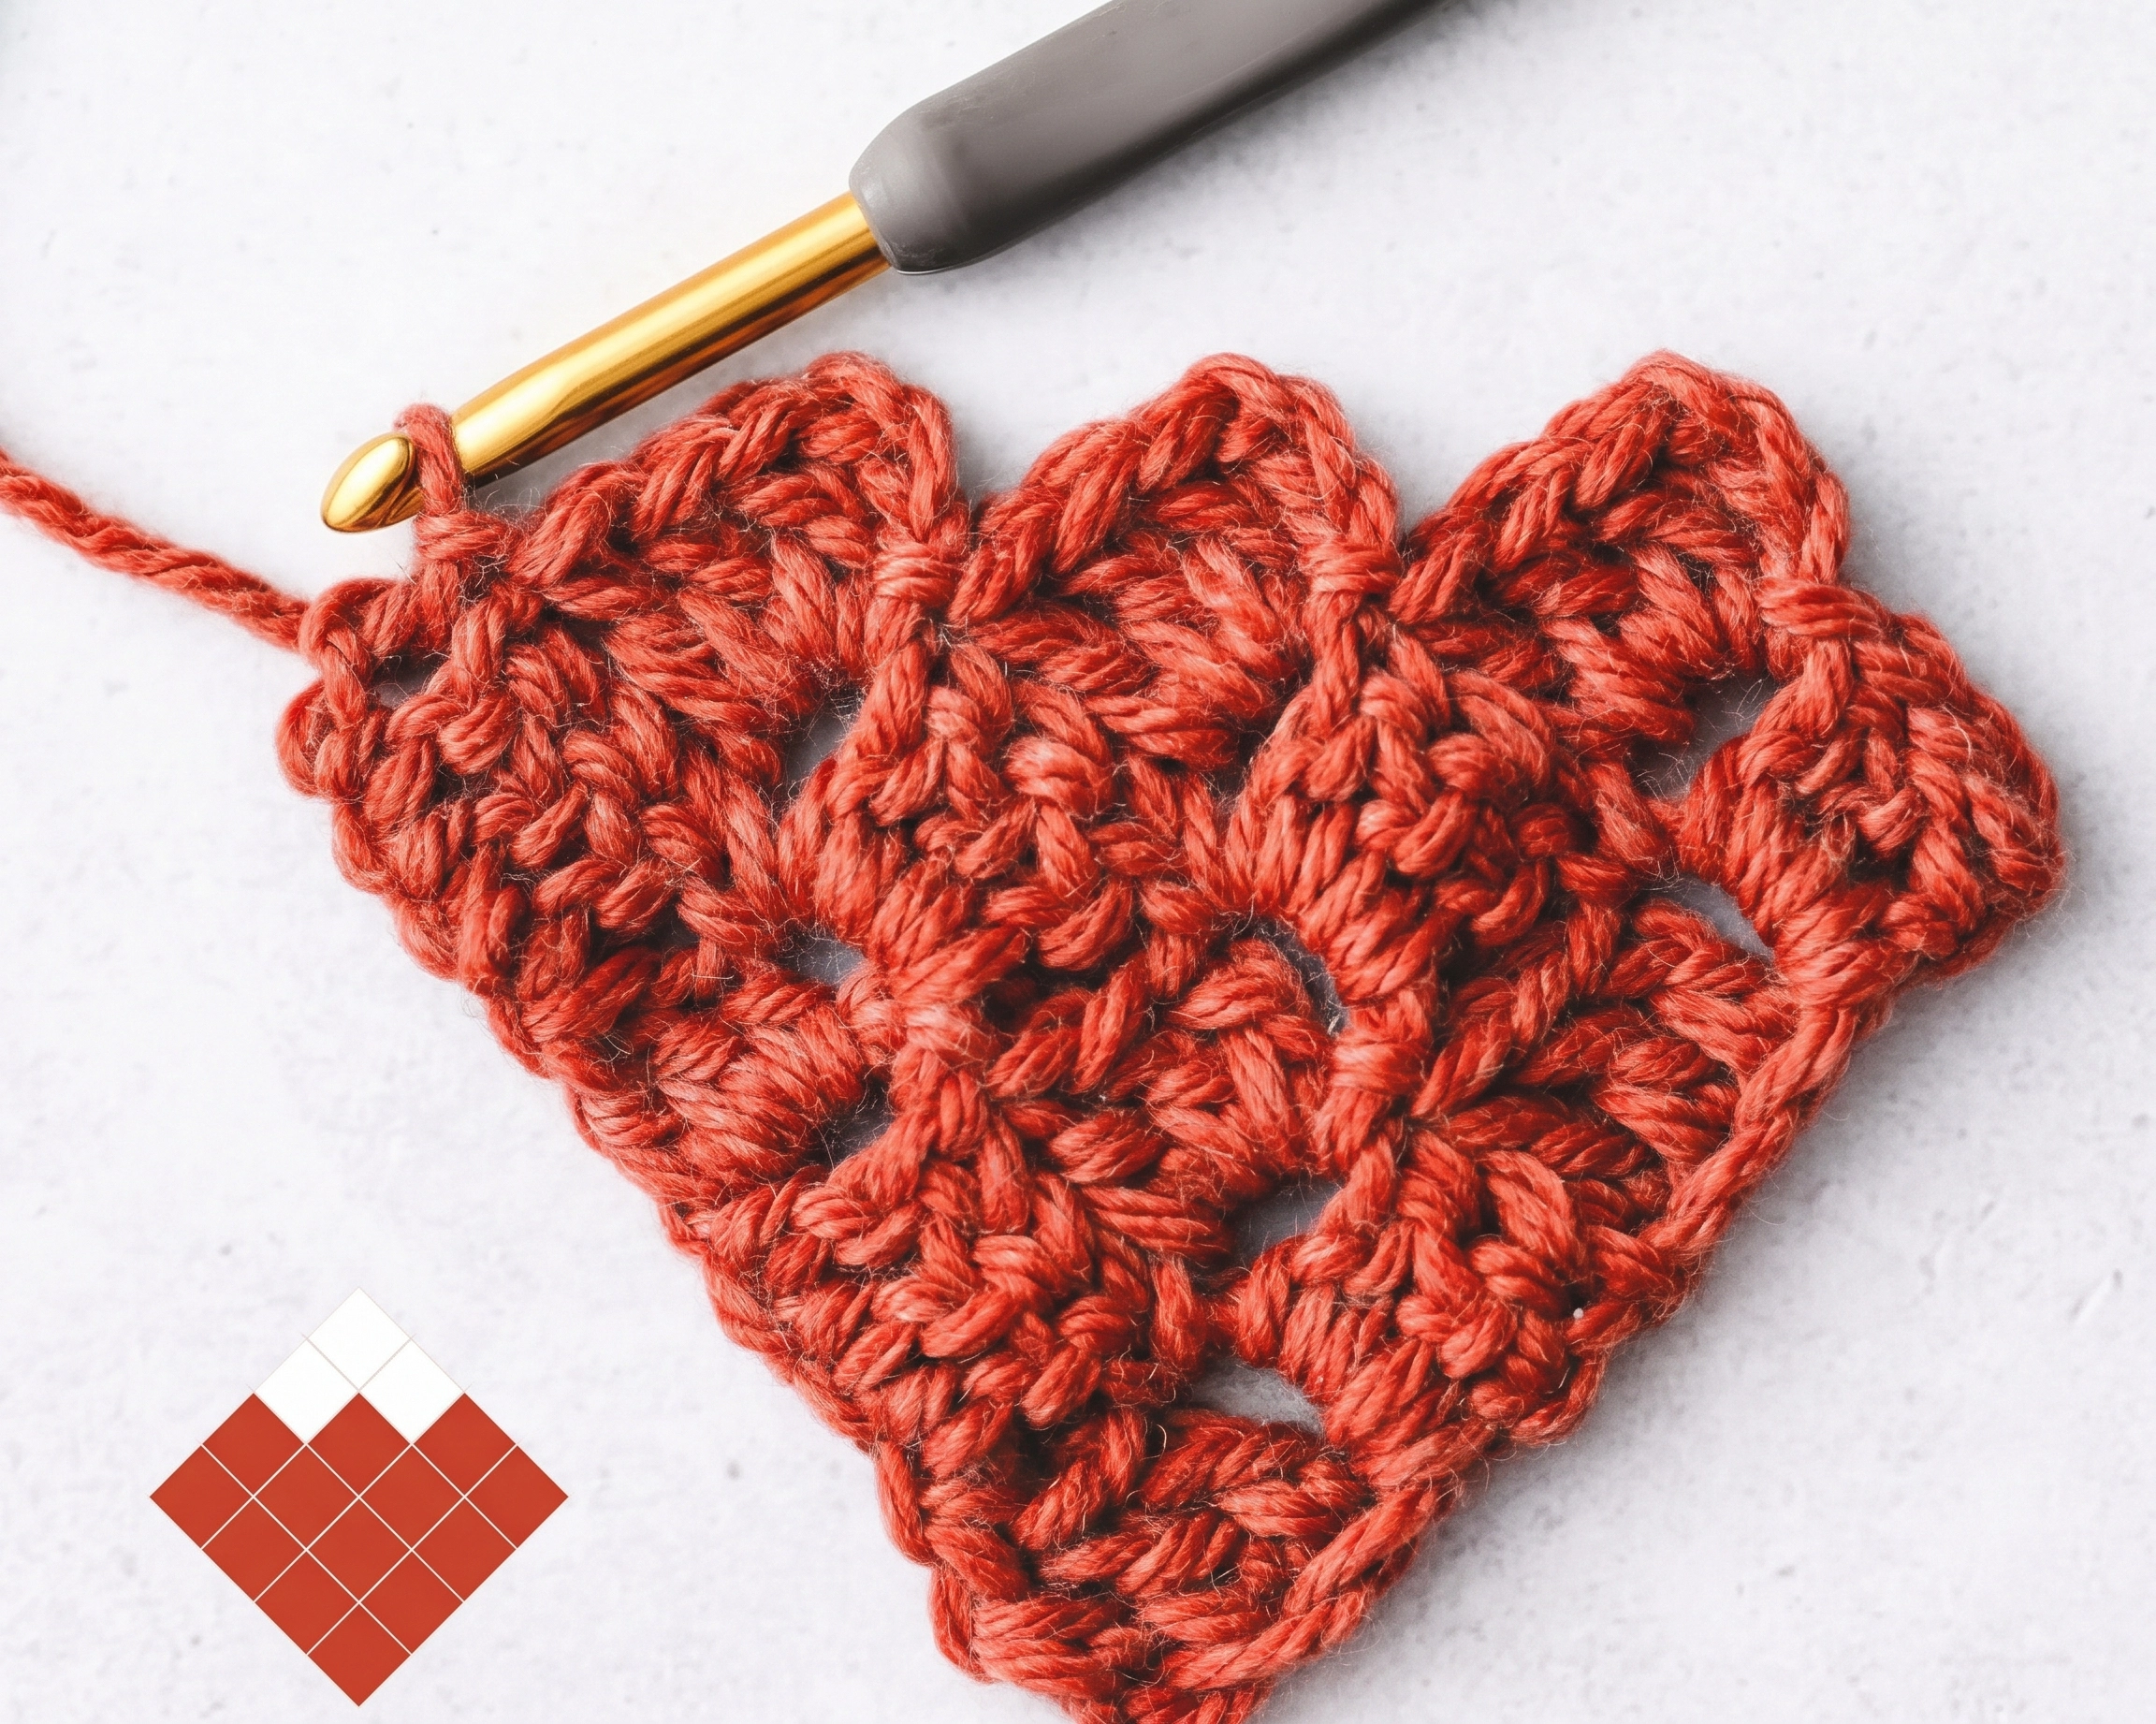
For row 7, repeat the inward slip stitches at the outside edge, then chain three and work three double crochets in the ch-3 space. This single tile closes the final corner of the square.
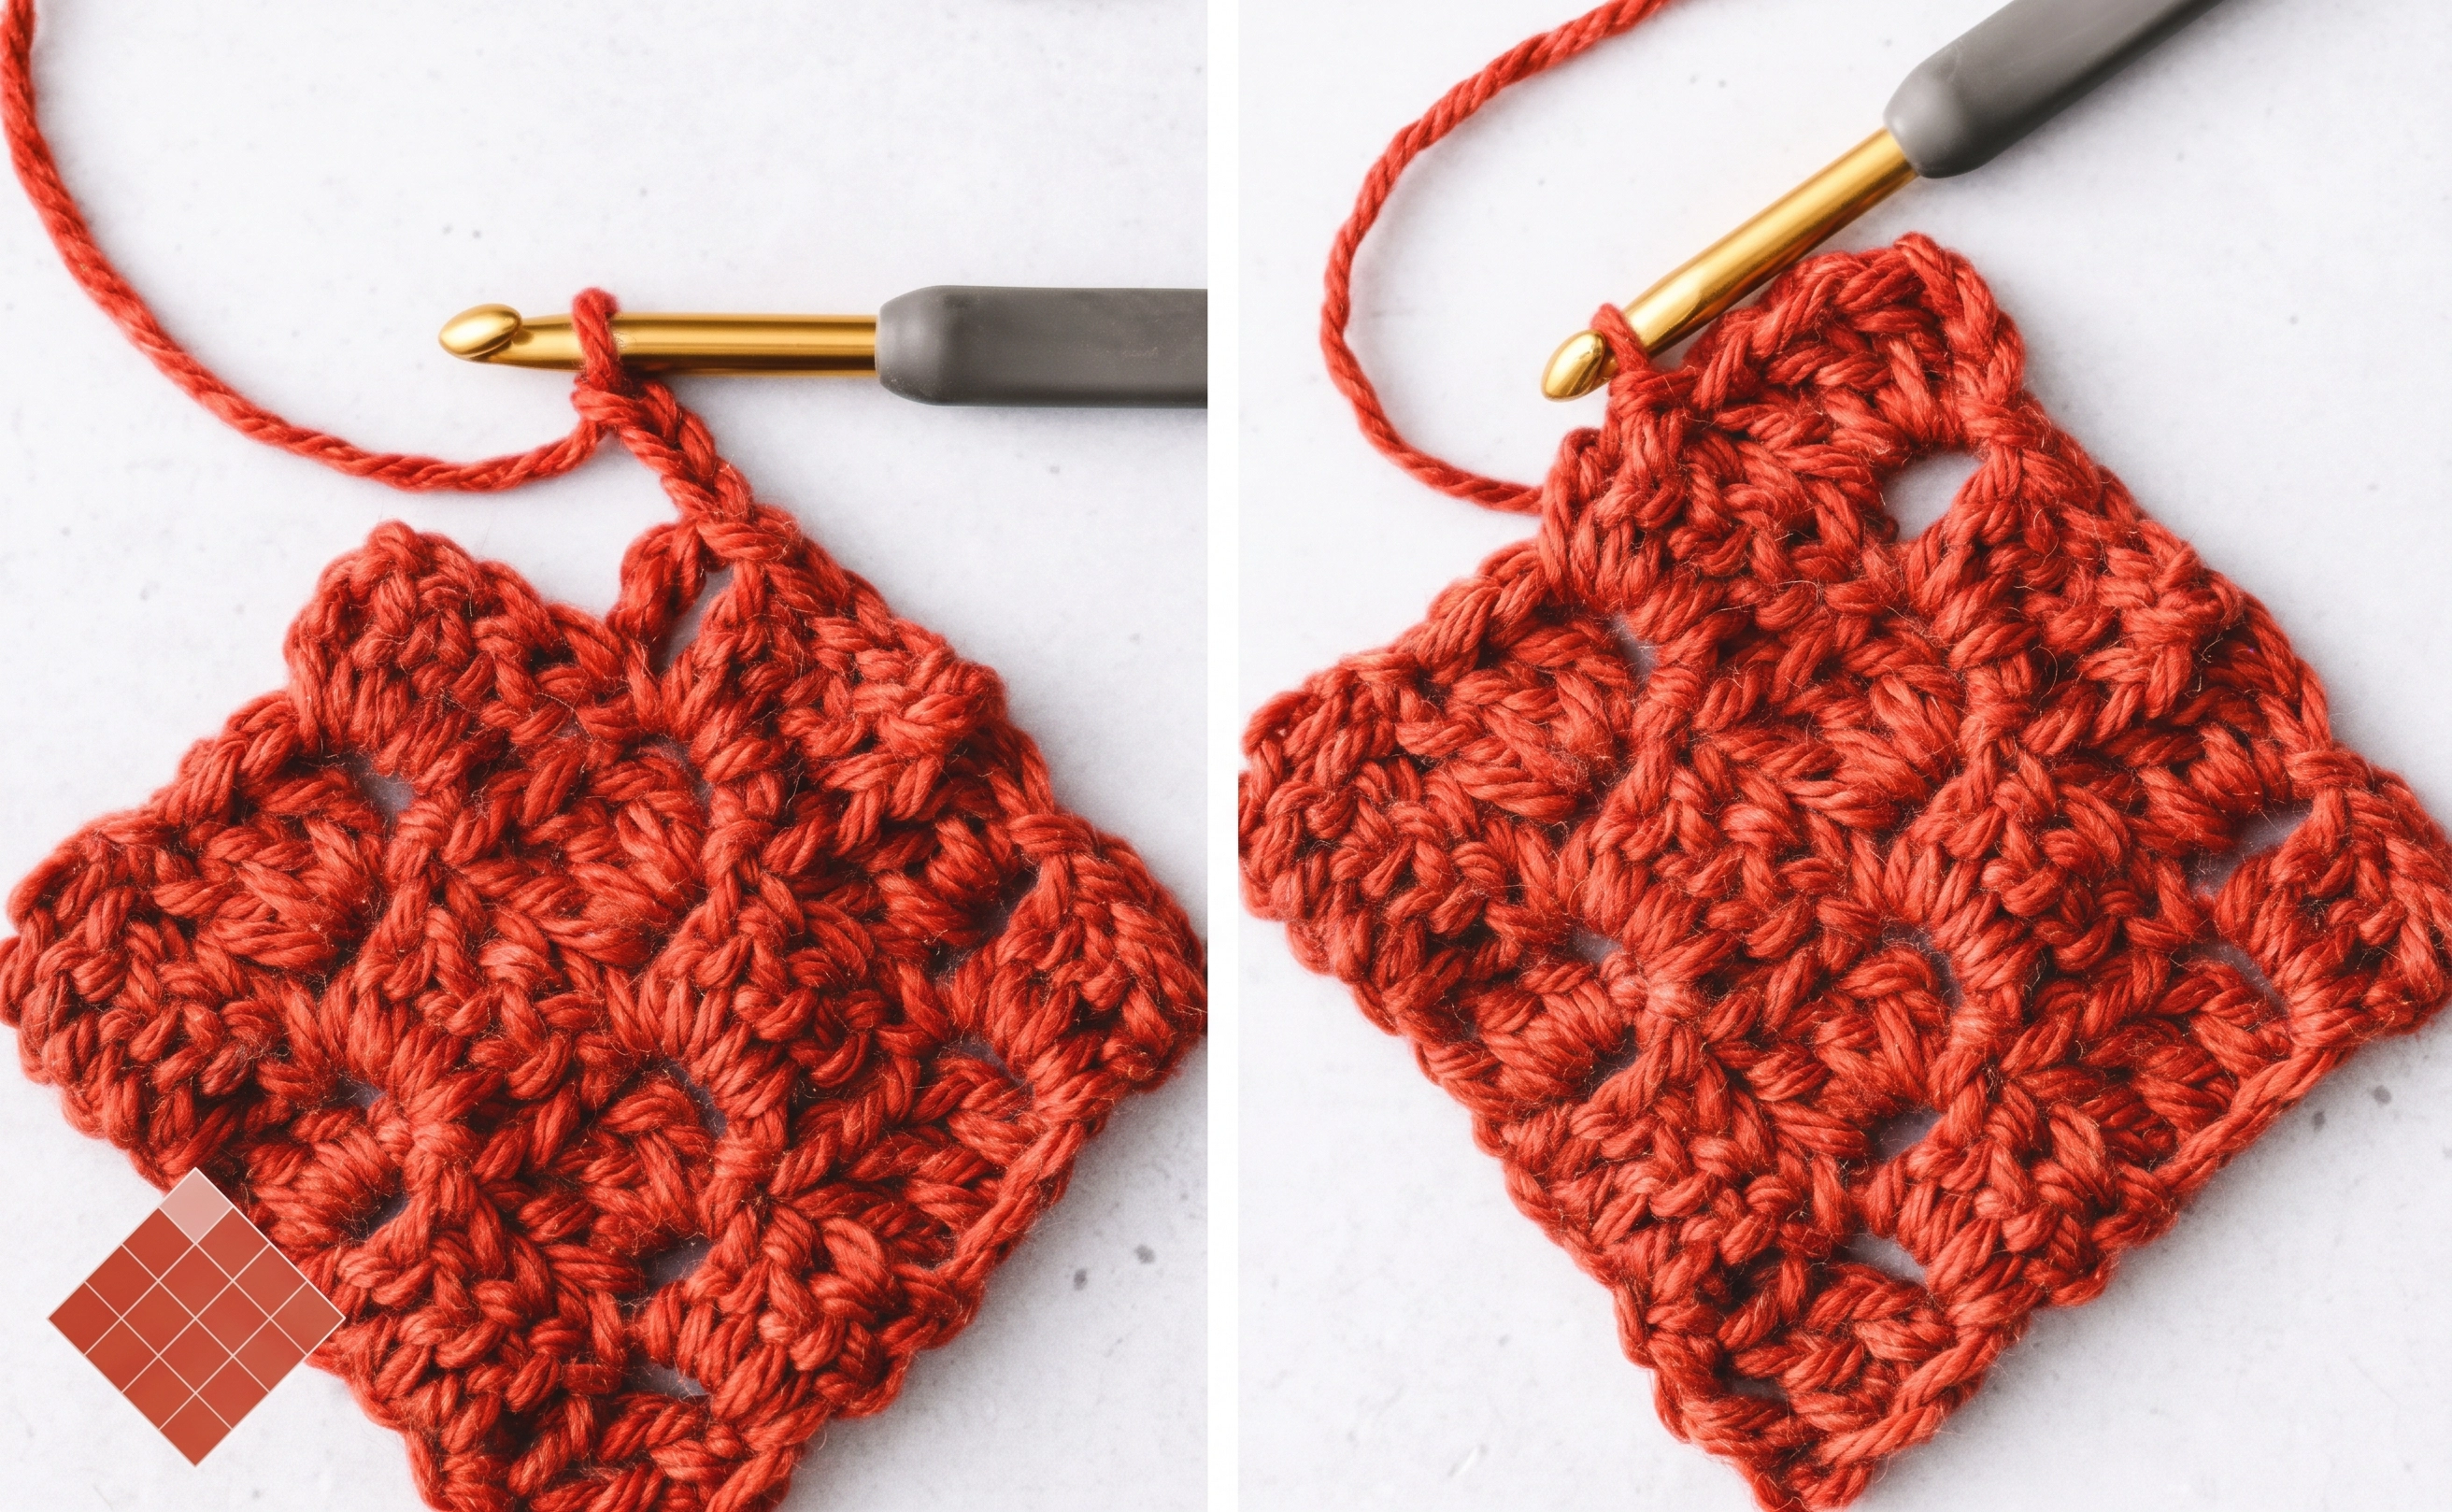
Count the diagonal rows from start to finish: 1, 2, 3, 4, 3, 2, 1. That sequence is a faster shape check than trying to count every double crochet in the finished fabric.
Finish and check your sample
Cut the working yarn with a tail long enough to thread onto a yarn needle. Pull the tail through the final loop to secure it, then weave it through several stitches on the back of the piece. Change direction once so the tail is less likely to work loose.
Do the same with the starting tail, keeping the needle within similar-colored stitches so it does not show on the front. Avoid pulling so hard that the first or last corner puckers.
Lay the swatch flat and compare the four edges. The edges are made from the ends of tiles, so they may look stepped before a border. Count the tiles in the widest diagonal again if one side appears longer.
The exact measurement depends on yarn, hook, and your tension. If you plan a larger project, measure this finished swatch and use its tile size to estimate your target dimensions; a pattern’s gauge is more useful than a blanket-size guess.
How to read a C2C graph
A C2C color graph is a grid of squares. In a common design, each grid square corresponds to one crocheted tile, and the color of that square tells you which yarn to use. A chart is a color plan, while the increase and decrease rules still control the fabric’s shape.
Find the chart’s marked starting corner before you crochet. Many right-handed charts begin at the lower right, but a designer may mark a different origin or give separate left-handed directions. Follow the chart key instead of assuming that every graph starts in the same place.
Read one diagonal at a time. On our practice square, the diagonals contain 1, 2, 3, 4, 3, 2, and 1 chart squares. Mark off a diagonal after you finish it; this prevents a color change from shifting by a whole row.
For example, if a three-square diagonal is blue, cream, blue, plan three tile colors in the order you will actually crochet across that diagonal. When you turn, your working direction reverses, so reread the next diagonal from its entry edge.
If a chart uses numbers around its edges, check whether they label diagonal rows, horizontal grid lines, or both. A tiny test swatch can resolve an unclear chart before you commit to a large multi-color blanket.
For a first graph project, choose large areas of one color rather than many isolated single-tile color changes. You can practice the motion and the reading direction without managing several loose yarn strands at once.
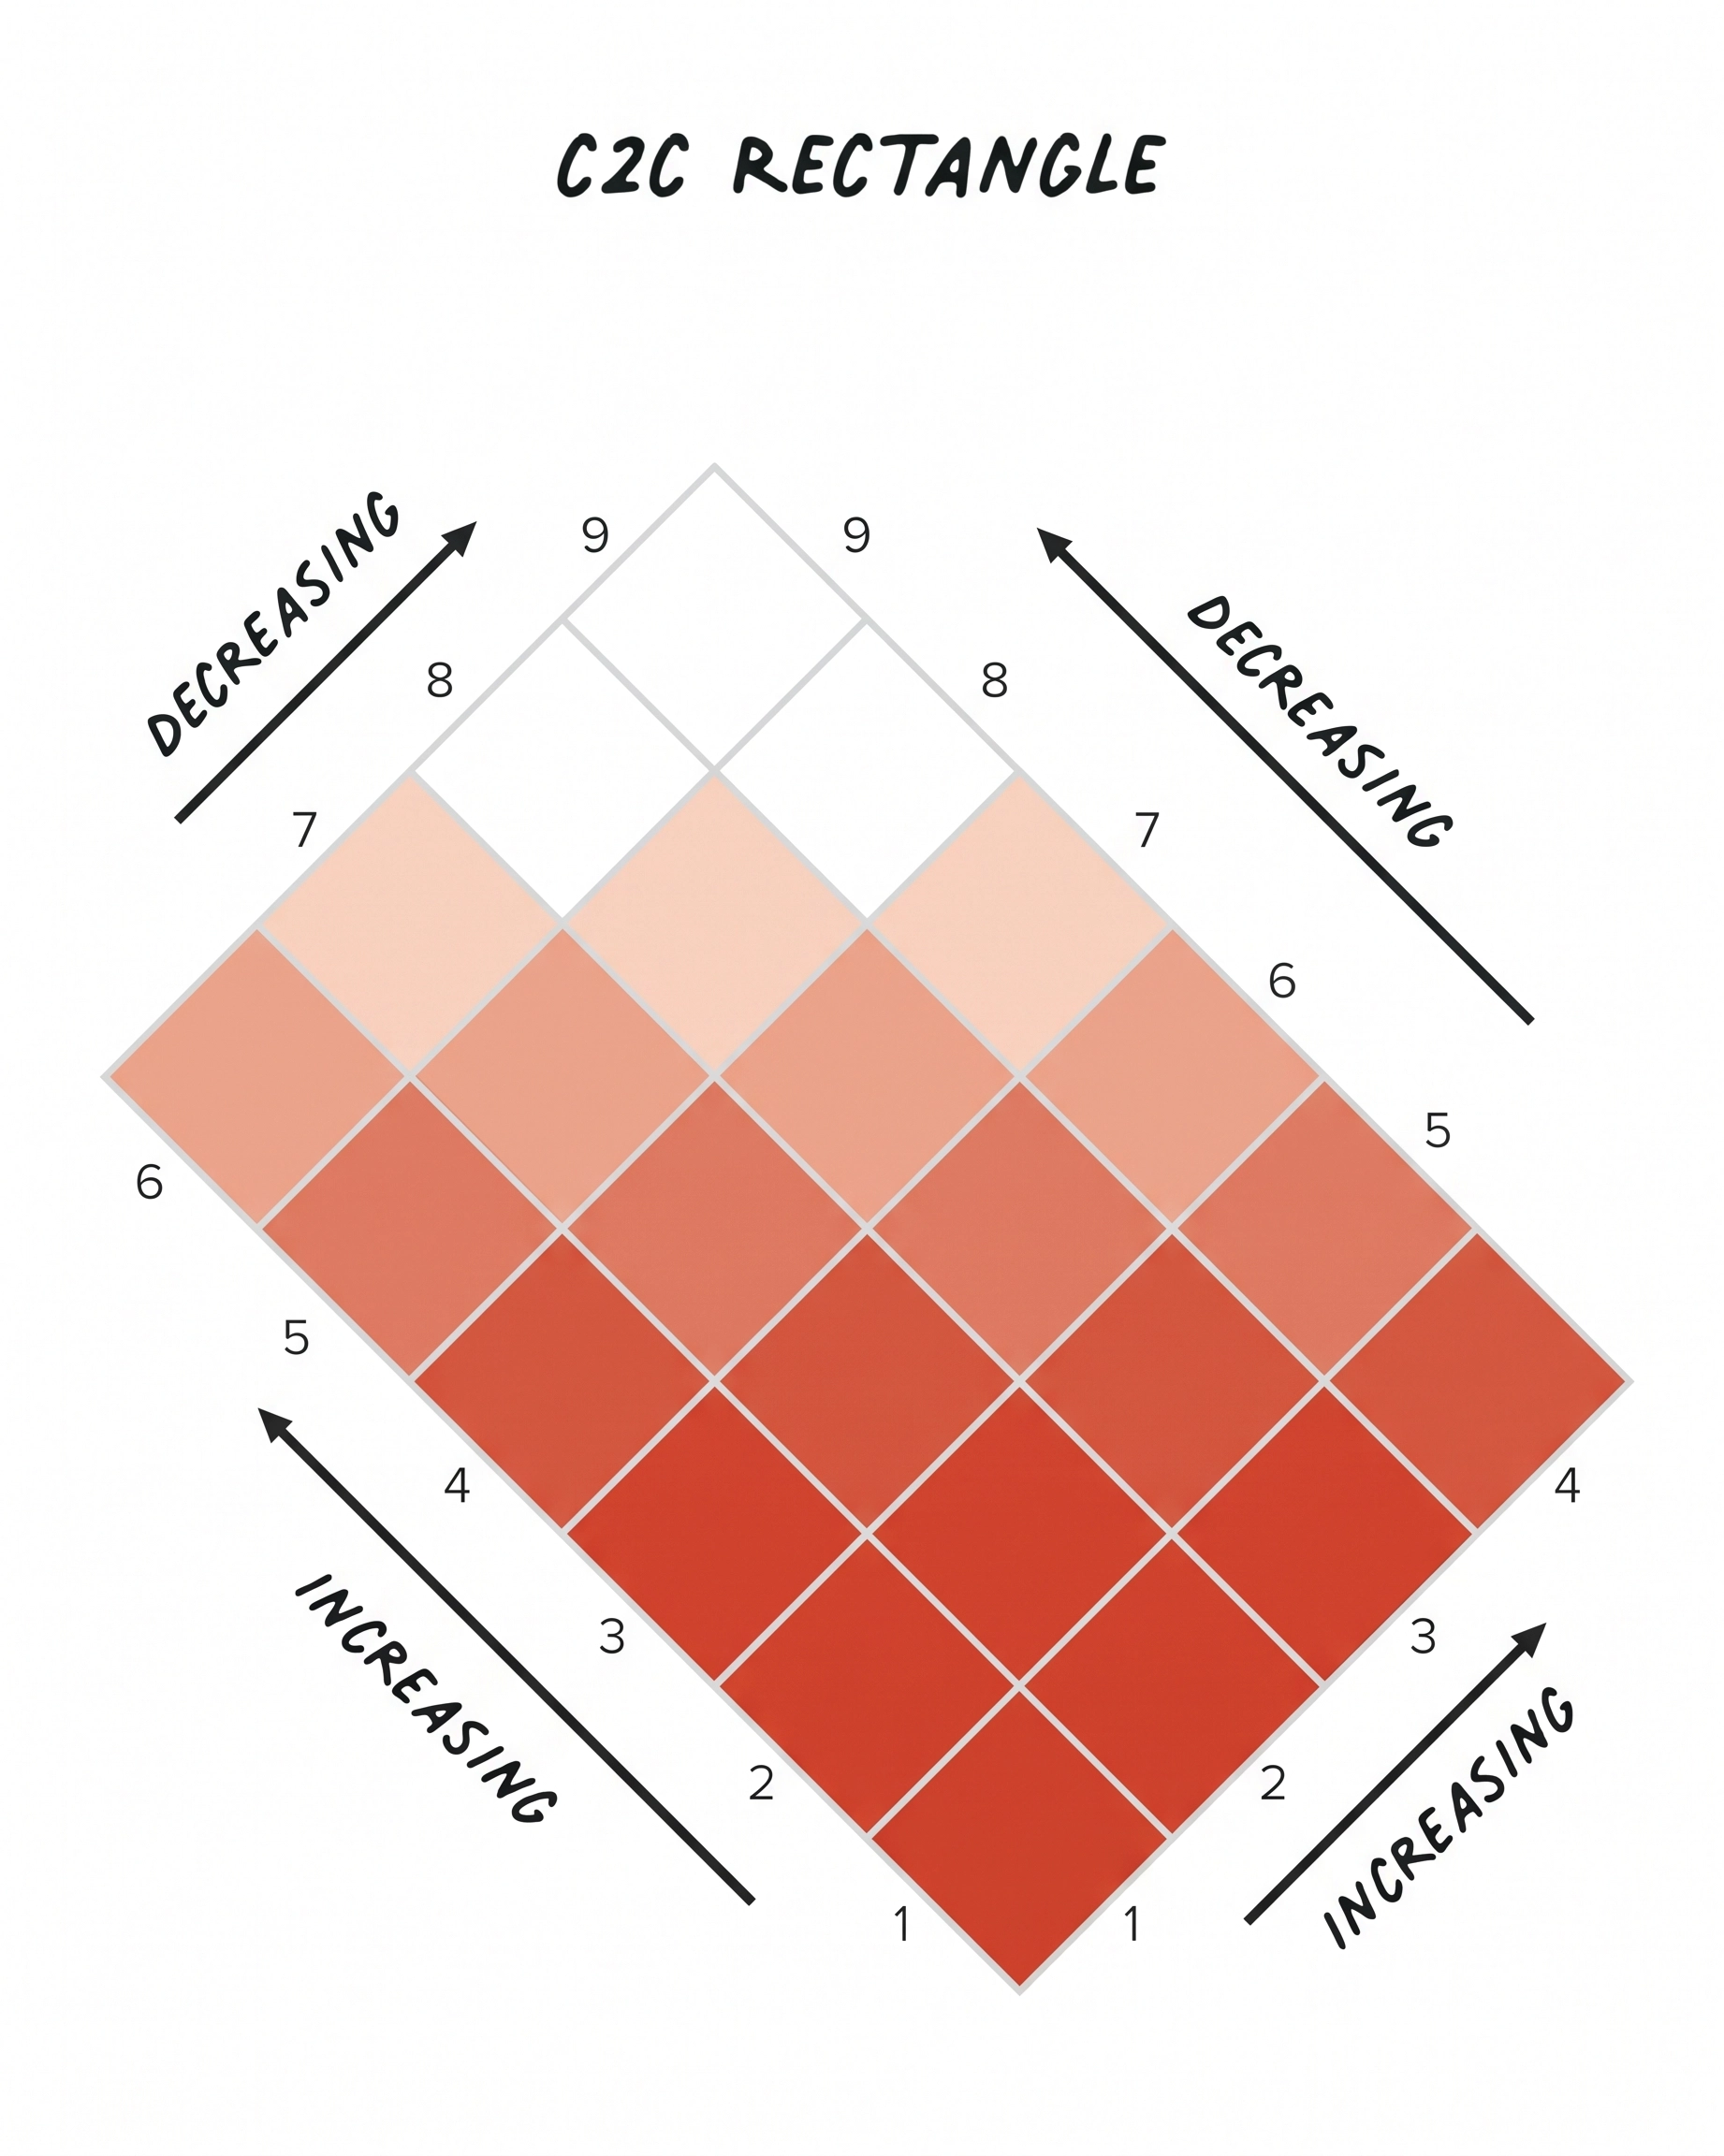
Turn the square into a rectangle
A rectangle starts like the square: increase on both outer edges until you reach the first intended side length. Then stop growing that side while continuing to increase on the other side. The rows can hold a steady number of tiles while the length grows.
At the next corner, stop increasing on the remaining growing side. Decrease at both outside edges until the final row contains one tile. Lay the work down at each transition and check which edge is meant to stay straight.
Think of a four-by-six-tile rectangle as having a short side and a long side, not as a square with extra border rounds. You still begin and finish at opposite corners; the middle diagonals preserve width while the longer side develops.
The most common rectangle mistake is switching both edges to decreases at the first corner. That produces another square or a shape that narrows too soon. Put a removable marker at the edge that has stopped growing if the two sides are hard to tell apart.
Plan dimensions with a measured swatch rather than a guessed tile count. A tile may be wider than it is tall in your own fabric, and a border adds size. Measure after you have made enough tiles for the fabric to lie flat.
Add color without tangles
To change color at a tile boundary, work the final double crochet of the old-color tile until two loops remain on the hook. Pull the new color through those last two loops, then use it for the joining slip stitch and the next tile.
Keep the unused strand loose on the back. A short carry across nearby tiles can save ends, but a long exposed strand may catch or show through lighter fabric. For a distant color block, cut the yarn and weave in a tail instead.
Small yarn bobbins help when several colors recur on neighboring diagonals. Arrange them in the order you will use them, turn the work consistently, and untwist the strands before beginning a new row.
Check the front and back after each color change. The face you want to display should have clean tile boundaries; the back can hold neatly woven tails, but no long loops that could snag during use.
Fix four common C2C problems
My tiles have large gaps. First check that each new tile begins with the chain length the instructions call for. If your tension is loose, try a smaller hook or a shorter chain method such as five chains for an increase and two for an inner tile, then make a fresh swatch to compare.
My edge has a bump. Look for a six-chain increase on a row that was supposed to decrease, or an extra chain-three tile at the end of a decrease row. Undo to the last correctly counted row and rebuild from there.
My join is too tight. A slip stitch through one chain strand can pull neighboring blocks together. Insert the hook through the full ch-3 space and keep the slip stitch relaxed enough that the row can lie flat.
I keep losing my place. Mark the first tile of a new diagonal or write its expected tile count on a small note. Finish one row, count its tiles, and only then turn. This habit catches mistakes before they spread through several rows.
Where to go next
You now have a one-color square that demonstrates the complete C2C path: increase, cross a diagonal, decrease, and close the last corner. Keep it as your gauge sample or add a simple single-crochet border after the edges are secure.
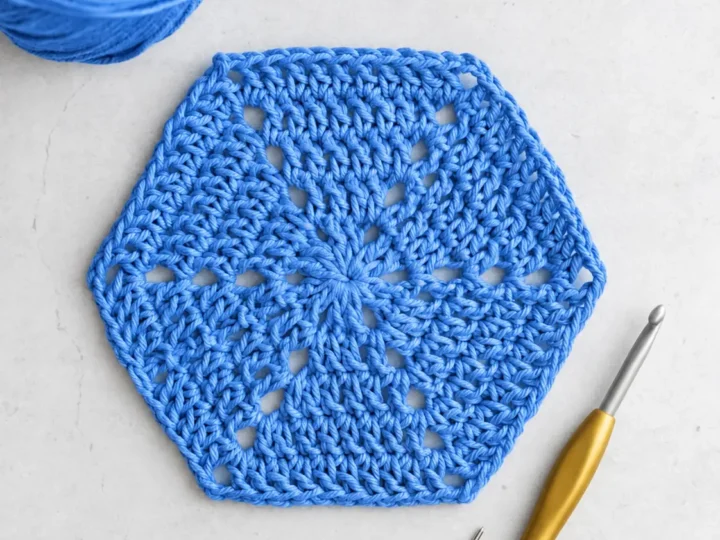
For your next practice, make a larger solid-color square or a narrow rectangle before adding a color chart. If you want another small project that builds on chains and double crochet, try our four-round crochet hexagon.
When you move to a printed pattern, check its US or UK terms, starting corner, chain convention, and chart key before the first stitch. C2C patterns vary in those details, even though the diagonal-tile idea is the same.
Save your row-count sequence and measure a finished swatch before planning a blanket. I Heart DIY’s Crochet guides collect more foundation lessons, and our About Us page explains how to send a question or correction.
Have a question? Use the form above to submit your question or comment.
I love hearing from you and seeing what you made!