


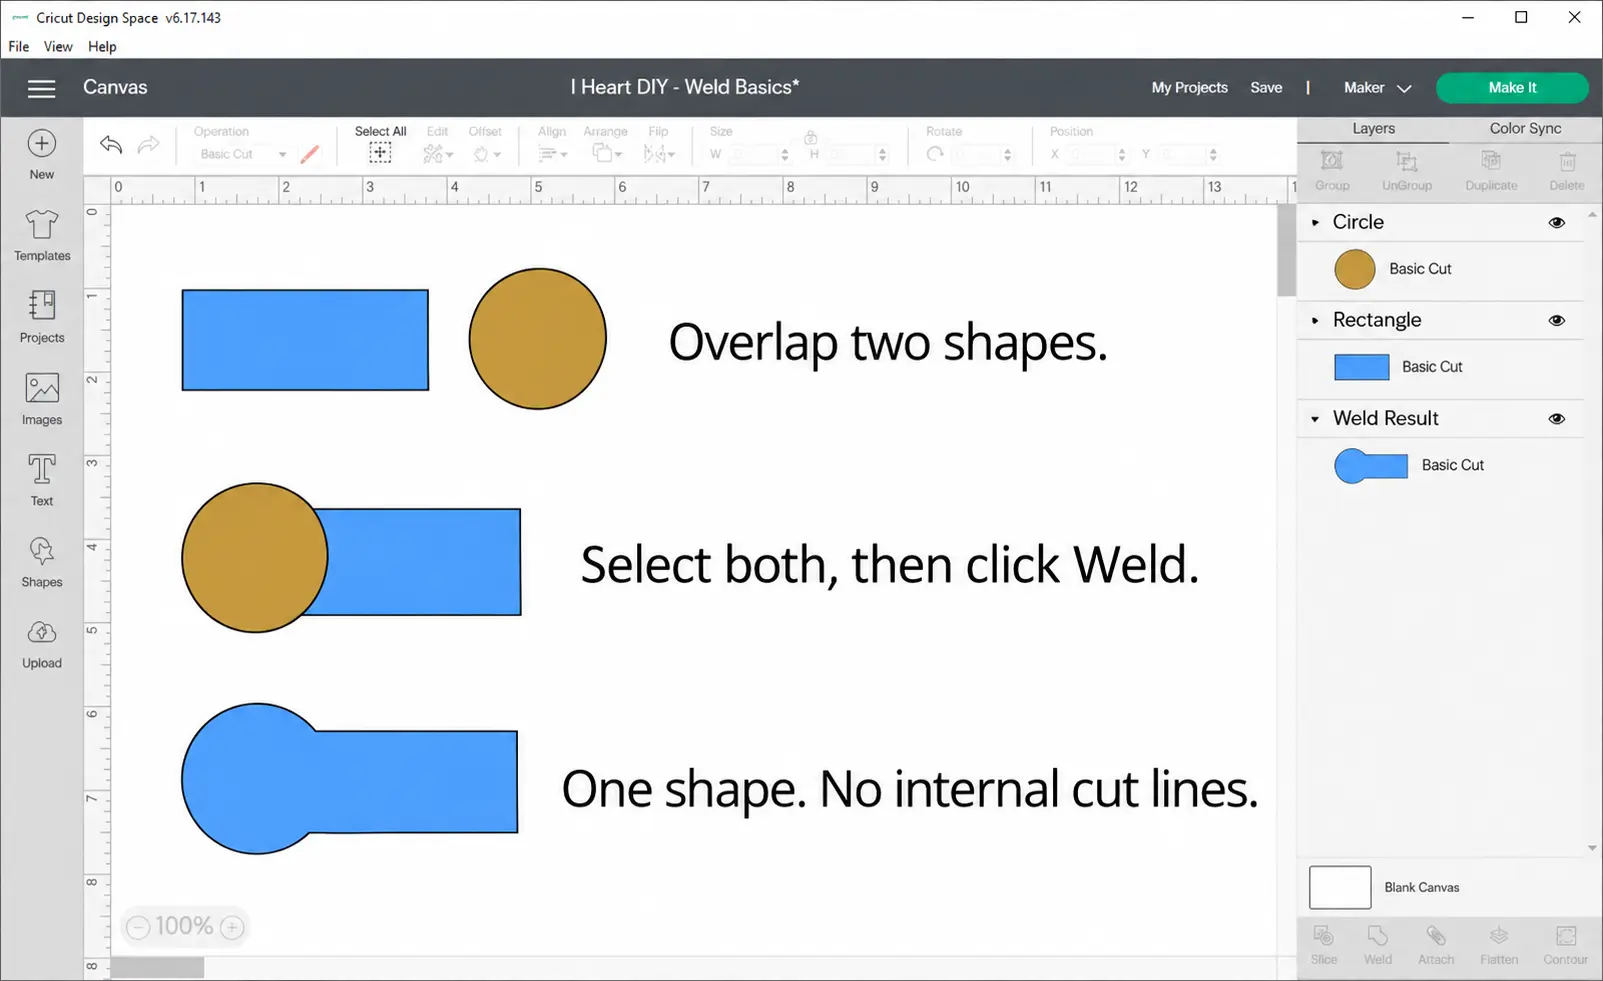
Cricut Weld turns two or more selected cut shapes into one permanent layer. Where those shapes overlap, the internal cut lines disappear, so the machine cuts the outside of the new combined shape.
That makes Weld useful for connected letters, custom silhouettes, and designs that must cut as one piece. It is also easy to use too early: after welding, the original shapes are no longer separately editable.
This guide shows a small shape example, a connected-word example, and the difference between Weld, Unite, and Attach. The instructions follow Cricut's current Combine and Weld guide.
What Weld Changes
Imagine a circle partly covering a rectangle on the Canvas. If you send the two separate shapes to cut, the machine may cut each shape's full outline, including lines that run through the shared area.
Weld creates one outline around the joined result. The overlapping line inside the design is removed, and the two original objects become a single cut layer.
The shapes need to touch or overlap when your aim is one physically connected piece. Welding objects that sit apart can place them in one layer, but it does not create a bridge between disconnected islands.
The welded result takes on a single color and operation, so review the preview before cutting. If you meant to preserve two different material colors, keep those pieces separate.
Think of the Layers panel as the record of what the machine will receive. After Weld, you should see one resulting layer for the joined objects, even though the silhouette may have several lobes or letters.
You can weld shapes, images with compatible cut layers, and text. For script lettering, it is especially helpful when individually positioned letters overlap but still show unwanted cut lines between them.
Weld is permanent once you have moved beyond the available Undo history. Cricut says there is no separate Unweld command for a saved and closed project.
Find Weld in Today's Design Space
On desktop, select the objects on the Canvas and open Combine at the bottom of the Layers panel, then choose Weld. On mobile, use the corresponding Actions menu and its Combine options.
Older tutorials show a stand-alone Weld button beside other tools. Design Space has changed, so look for Combine > Weld if the button in a screenshot is missing from your version.
The Weld choice activates only when a suitable selection contains at least two visible objects. If it is unavailable, check what is actually selected before assuming the app is broken.
For precise placement, zoom in until you can see whether the shapes truly overlap. A one-pixel gap on the Canvas can leave two separate pieces after cutting.



Practice With Two Basic Shapes
Open a new Design Space project and add a circle and a rectangle. Set both to a cut operation and choose simple colors so the overlap is easy to see.
Drag the circle so part of it covers one end of the rectangle. Leave enough overlap that the connected area will not be a fragile thread of paper or vinyl.
Select both objects on the Canvas or in the Layers panel. The selection box should cover both, and both layers should appear selected.
Choose Combine > Weld. Design Space replaces the two layers with a single welded result; the cut line inside their shared area should be gone.
Check the Layers panel and the silhouette on the Canvas. If the result is not the shape you intended, use Undo immediately and adjust the overlap before welding again.
Try moving the result as a test. If both former shapes move together and the Layers panel shows one joined object, you have created the single layer you intended.
Before cutting, inspect the Prepare screen. The mat preview is the best place to catch a shape that became disconnected or smaller than expected after the join.
This quick exercise is safer than welding a finished multi-layer design first. You can see exactly what the tool removes without risking hours of arrangement work.


Connect a Word Without Cutting Through Letter Joins
Script or cursive text can have letters that touch visually yet still send separate cut paths to the machine. Whether this happens depends on the font, the text object, and how its letters are arranged.
Type a short word, enlarge it, and look closely at every connection. If letters are too far apart, adjust spacing or move them until adjacent strokes overlap visibly.
Keep a duplicate editable text object off to one side or in another saved version before welding. Once text becomes a welded cut shape, you cannot simply change a spelling or font inside that result.
If you ungroup letters to position them individually, select all the letters that belong to the word. Then use Combine > Weld to remove cut lines at their overlapping joins.
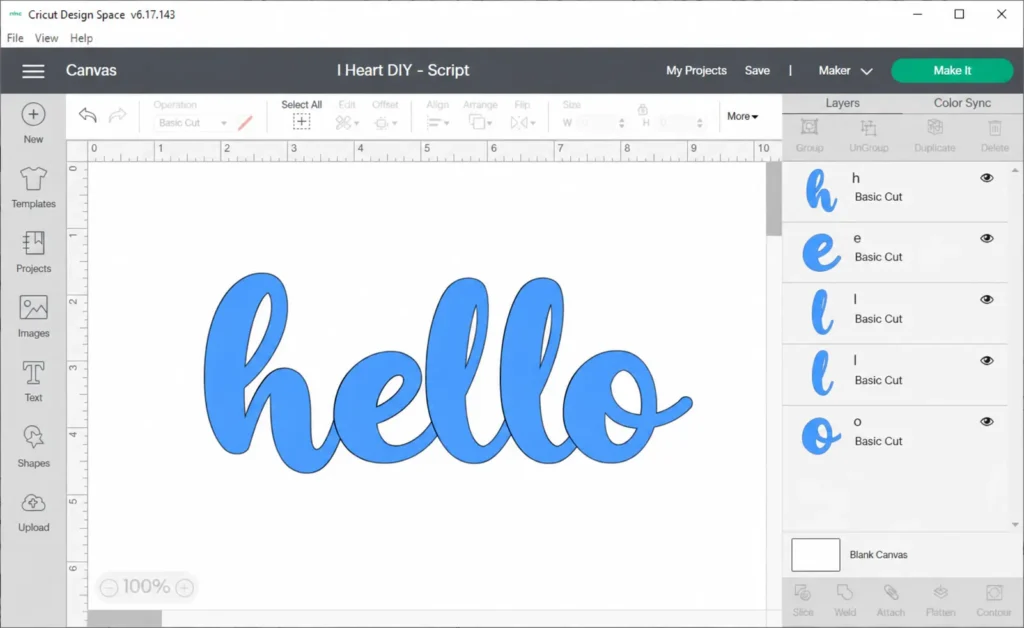
Check enclosed spaces in letters such as “a,” “e,” and “o.” If the overlap closes a small opening, Undo, enlarge the text, and adjust the letters before making the permanent join.
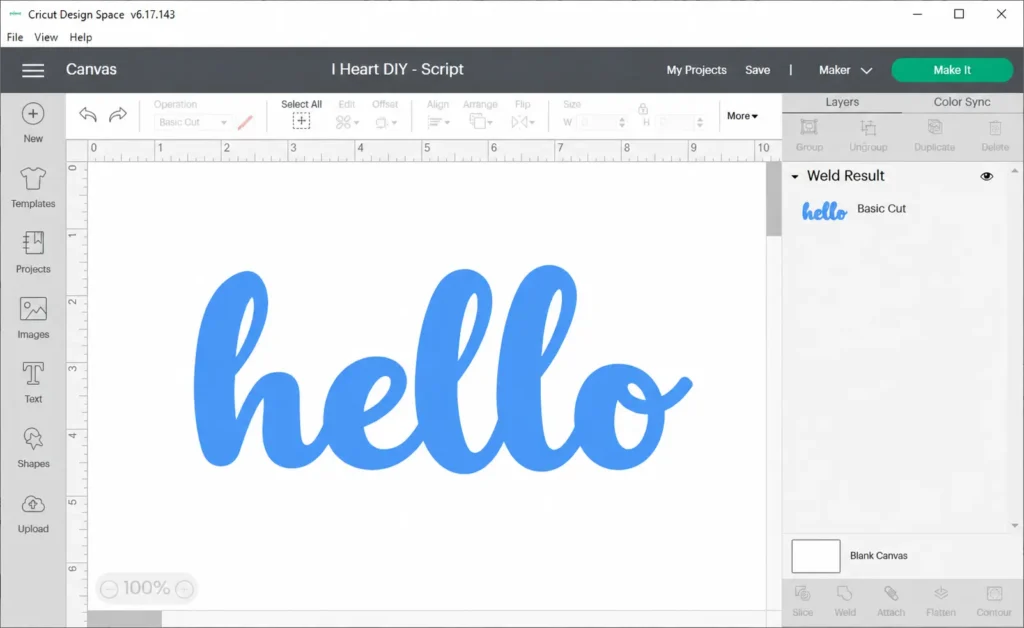
For many kerned fonts, Cricut says touching letters weld automatically on the project preview while the Canvas text remains editable. Check a font's behavior before welding a text layer unnecessarily.
If you are cutting the word from adhesive vinyl, weed a small test before committing to a large decal. A connected silhouette can still have strokes too thin to lift cleanly.
Weld, Unite, and Attach Are Different
Weld makes a permanent single shape. Choose it when the final joined outline is settled and you do not need to move or edit the component objects later.
Unite makes a joined cut shape while keeping the objects within a Combine group editable. It is a better working choice while you are still testing spacing or trying alternate layouts.
If you like the Unite result and want one final layer, Cricut's Merge Layers command makes that Combine result permanent. Save an editable copy first if you may need to revise it.
Attach keeps separate objects in the same arrangement when the design moves to the mat. It does not erase the cut line through an overlap or fuse touching letters into one silhouette.
Use Attach when placement is the main issue, such as keeping separate shapes aligned on the cutting mat. Use Weld or Unite when the cut paths themselves need to join.
Group helps you move objects together on the Canvas. It does not by itself promise that their mat positions or cut paths will become one shape.
Slice divides overlapping shapes and can create new pieces from their intersection. It solves a different problem from Weld, which removes internal lines while joining shapes.
The choice can be made with one question: should a line between these shapes still be cut? If the answer is no, a joining operation may be needed; if the answer is yes, preserve separate paths.
A Shape Project That Benefits From Weld
To make a scalloped tag, arrange several circles so they overlap the edge of a larger rectangle. Keep the circles close enough to create a continuous outer edge.
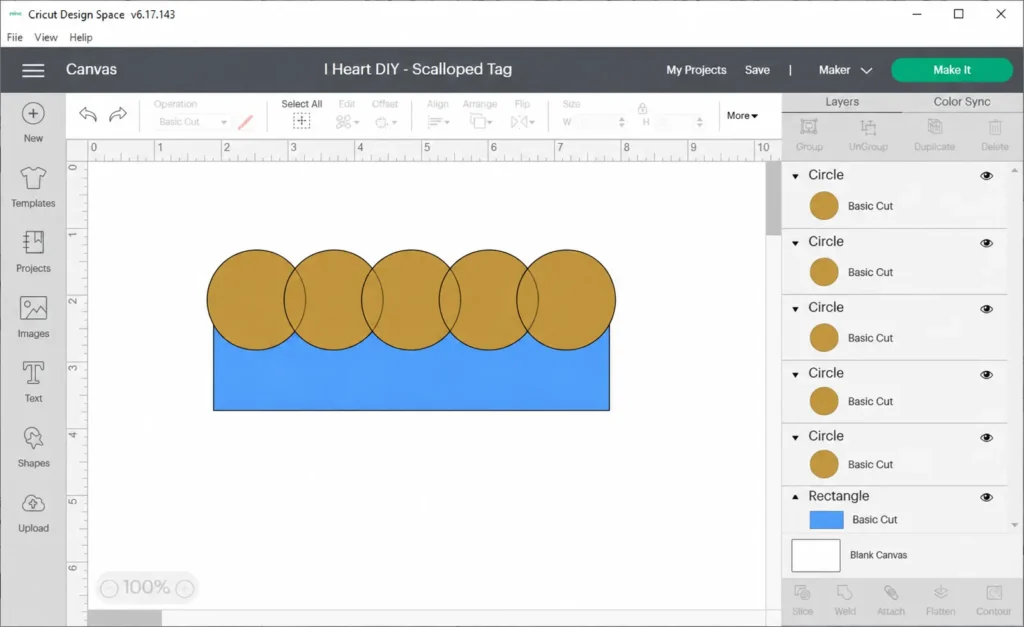
Select the rectangle and circles, then use Unite first. Move a circle if one scallop looks uneven; because the Combine group remains editable, you can refine the border before making it permanent.
When the outline is settled, duplicate the editable version and Weld the working copy if you need a single permanent layer. The cutter should follow the new outer edge instead of cutting each circle inside the tag.

Cut a small paper test to confirm that narrow joins survive removal from the mat. A technically joined shape can still be too delicate for the material you chose.
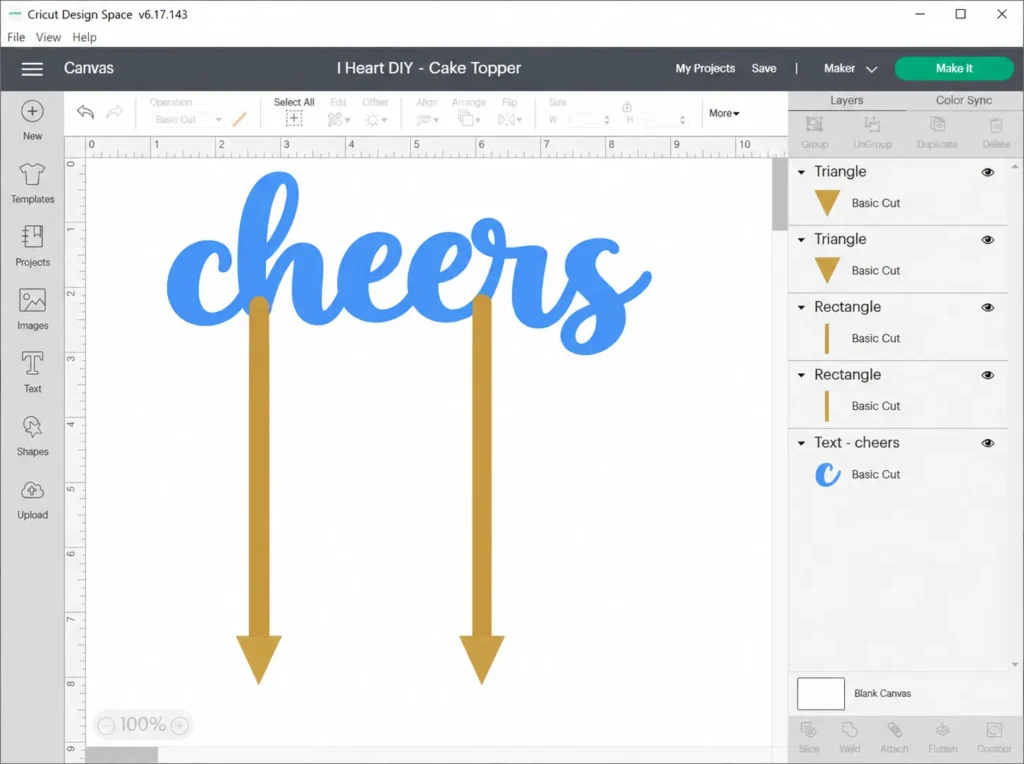
The same reasoning applies to a cake topper or a connected phrase: each decorative part must touch the supporting shape strongly enough to remain one physical piece after cutting.
Why Weld Is Gray or Unavailable
The most common cause is selecting only one layer. Choose two or more eligible objects and check that they are visible in the Layers panel.
A selected object may already be a flattened or printable layer that cannot participate in the intended cut-shape operation. Check each object's operation and return to editable cut shapes where possible.
Hidden layers will not behave like visible objects on the Canvas. Reveal the layers you actually want to join before selecting them.
If you are working with a Warp effect, Cricut says Weld is unavailable on warped objects. Its current help suggests Unite or another Combine operation for a similar cut result.
An older screenshot may put Weld in a different place. Confirm that you are opening Combine on desktop or the relevant menu on mobile before troubleshooting the selection itself.
If the option still does not appear, simplify the test: open a fresh project with two basic shapes. If that works, the issue lies in one of the original layers or operations.
Can You Undo a Weld?
You can use Undo while the action is still in the current project's undo history. Do that immediately when a join removes a needed cutout or closes a letter counter.
There is no general Unweld command that recreates all original objects after a saved and closed Weld result. A duplicate project or editable Unite version is your safest recovery path.
If you discover the problem later, rebuild the shape from the original design elements rather than trying to separate the welded outline with random cuts.


Troubleshoot the Cut Result
If a line still appears through an overlap, zoom in and confirm both objects were included in the Weld. Undo, reposition them so they actually cross, and weld again.
If the finished piece falls into separate islands, the objects were not physically connected even if they share one layer. Add a visible bridge or move the shapes closer before cutting.
For a thin bridge, look at the design at its actual cut size. A connection that looks sturdy while zoomed in can become fragile when reduced to a small topper or decal.
If a letter fills in, the overlap may be swallowing a small interior opening. Enlarge the word to inspect the joins, adjust spacing, then retry the operation.
If the result changes color, remember that a Weld creates one layer with one resulting color. Make a separate layer for a part that must cut from another material.
If you need to keep editing after joining, try Unite instead. It provides the joined outline while retaining the ability to move the pieces inside the Combine group.
If the shape looks right on the Canvas but wrong on the mat, check the Prepare preview and whether separate objects also need Attach for their placement. Joining a subset does not automatically lock every other piece in the design.
Put Weld to Work Deliberately
Build the design with editable objects, test the outline with Unite where useful, and save a version before using Weld. That short sequence gives you a clean cut without sacrificing an easy path back to revisions.
When you are ready for another Design Space tool, compare Weld with Flatten and Contour. Each changes a different part of the design-to-cut workflow.
What’s Next?
Pin this post: Save this tutorial to your Pinterest boards so that you can come back to it later.
Leave a comment: We love to hear your feedback. Tell me in the comments below!
Share on Instagram or Facebook: When you make this project, share it on social media and tag me @iheartdiybystacy. We love to see what you make!
Have questions? Join the Facebook Group!
We hope this article was useful for you! If you have any additional questions, feel free to join my Facebook Group. We created this group for you to share pictures, ask questions, and help each other out.
I hope this article was useful for you! If you have any additional questions, feel free to join my Facebook Group.
Join the group to share pictures, ask questions, and help each other out.

Have a question? Use the form above to submit your question or comment.
I love hearing from you and seeing what you made!