

A crochet bobble stitch adds a raised dot to an otherwise flat fabric. If you can make a chain, single crochet, and double crochet, you have the skills to try one.
This guide shows a five-double-crochet bobble, explains where the bump appears, and gives you a small swatch with a stitch count you can check after every row.
The instructions use US crochet terms. If you are still learning the basic motions, start with our beginner crochet practice square and come back when a double crochet feels familiar.
What makes a bobble?
In the version taught here, you begin five double crochets in one base stitch but leave the last loop of each one on the hook. One final yarn over closes all five together.
That group counts as one stitch in the row. It uses one base stitch, and you work into one top stitch when you return on the following row.
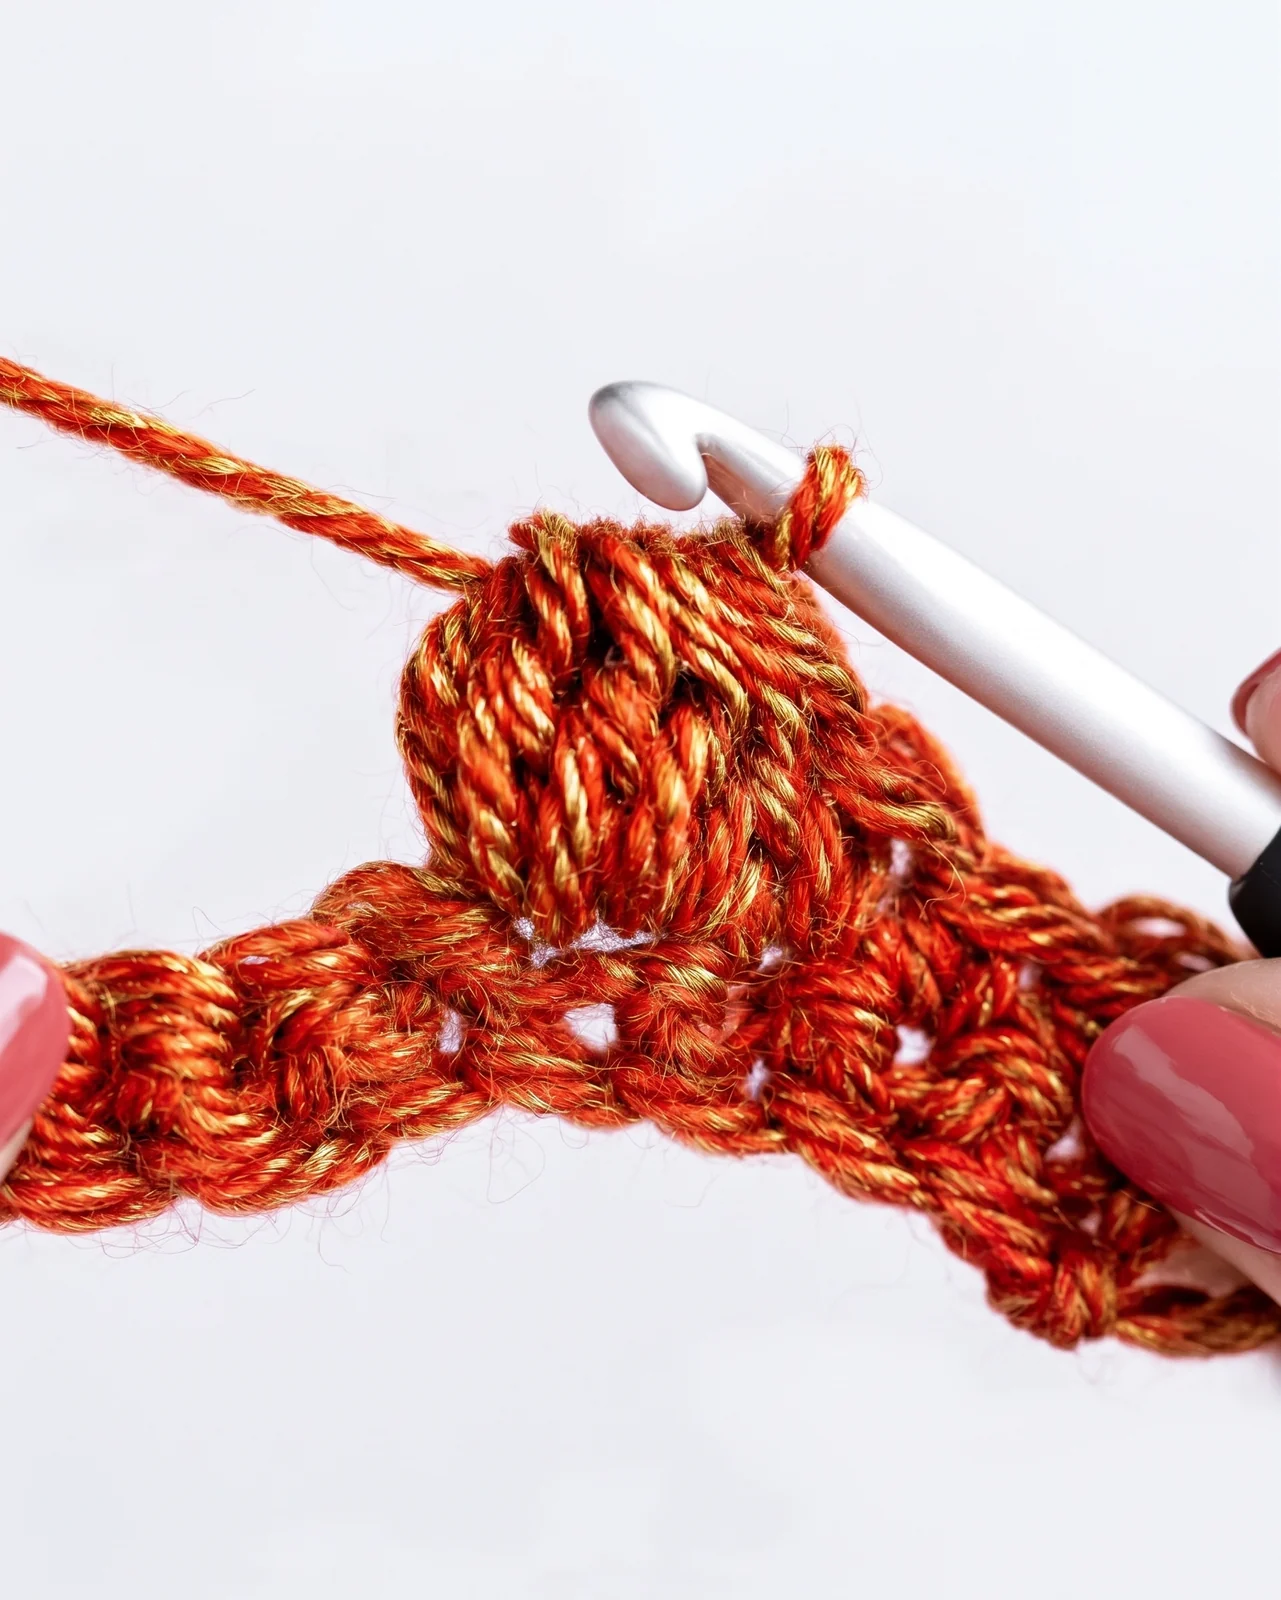
The bump tends to push away from the side facing you as you make it. Work the bobble on a wrong-side row when you want the raised texture on the right side of a flat swatch.
A single crochet immediately after the bobble helps define its edge. You can nudge the bump toward the right side with a fingertip before continuing.
The abbreviation bo is common, but pattern writers may define a different bobble. Read the special-stitch note in any pattern before assuming it uses five double crochets or a closing chain.
Gather yarn and check your terms
Choose a smooth, light-colored medium-weight yarn so you can see the loops on your hook. Yarn with a fuzzy halo hides the exact place where the next stitch belongs.
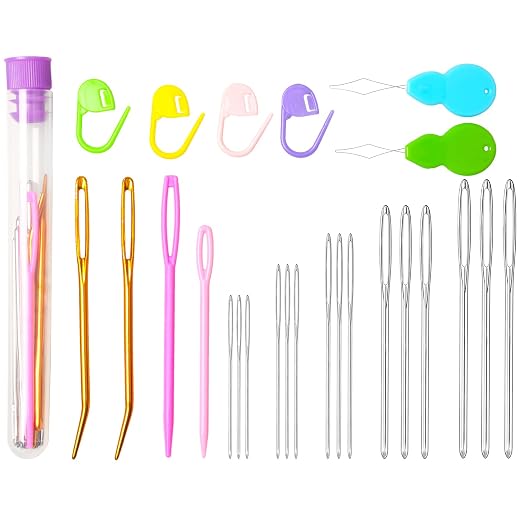
Use a crochet hook that suits the yarn label and feels comfortable in your hand. You will also need scissors and a yarn needle if you want to finish the sample.
For the practice swatch below, make 15 chains. That foundation produces 14 single crochet stitches when you begin in the second chain from the hook.
The turning chain at the start of each row is for height. In this particular swatch, it does not count as one of the 14 stitches.
US dc means double crochet and US sc means single crochet. UK patterns use some of those names differently, so check the terminology before following directions from another source. The Craft Yarn Council abbreviation list is a useful reference.
You may also see RS for right side, WS for wrong side, yo for yarn over, and st for stitch. Those labels describe the fabric and actions; they are not extra stitches.



See which side will show the texture
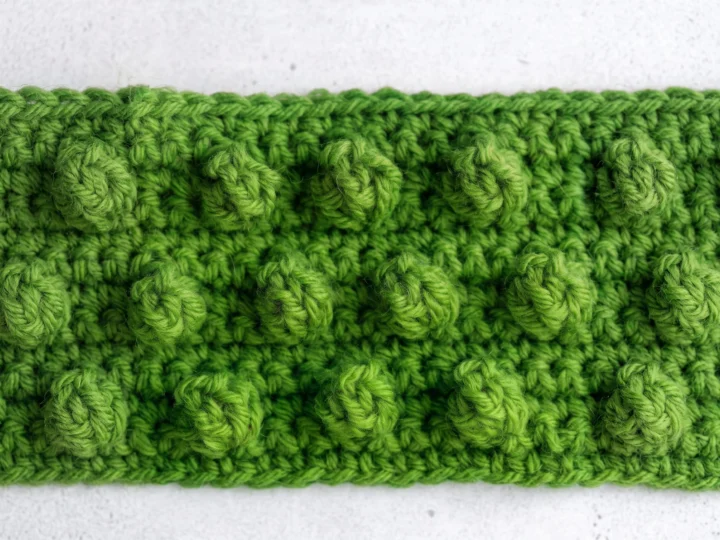
Lay a bobble sample flat and compare its two faces. One side shows rounded bumps; the other has flatter bars where the unfinished double crochets were worked together.
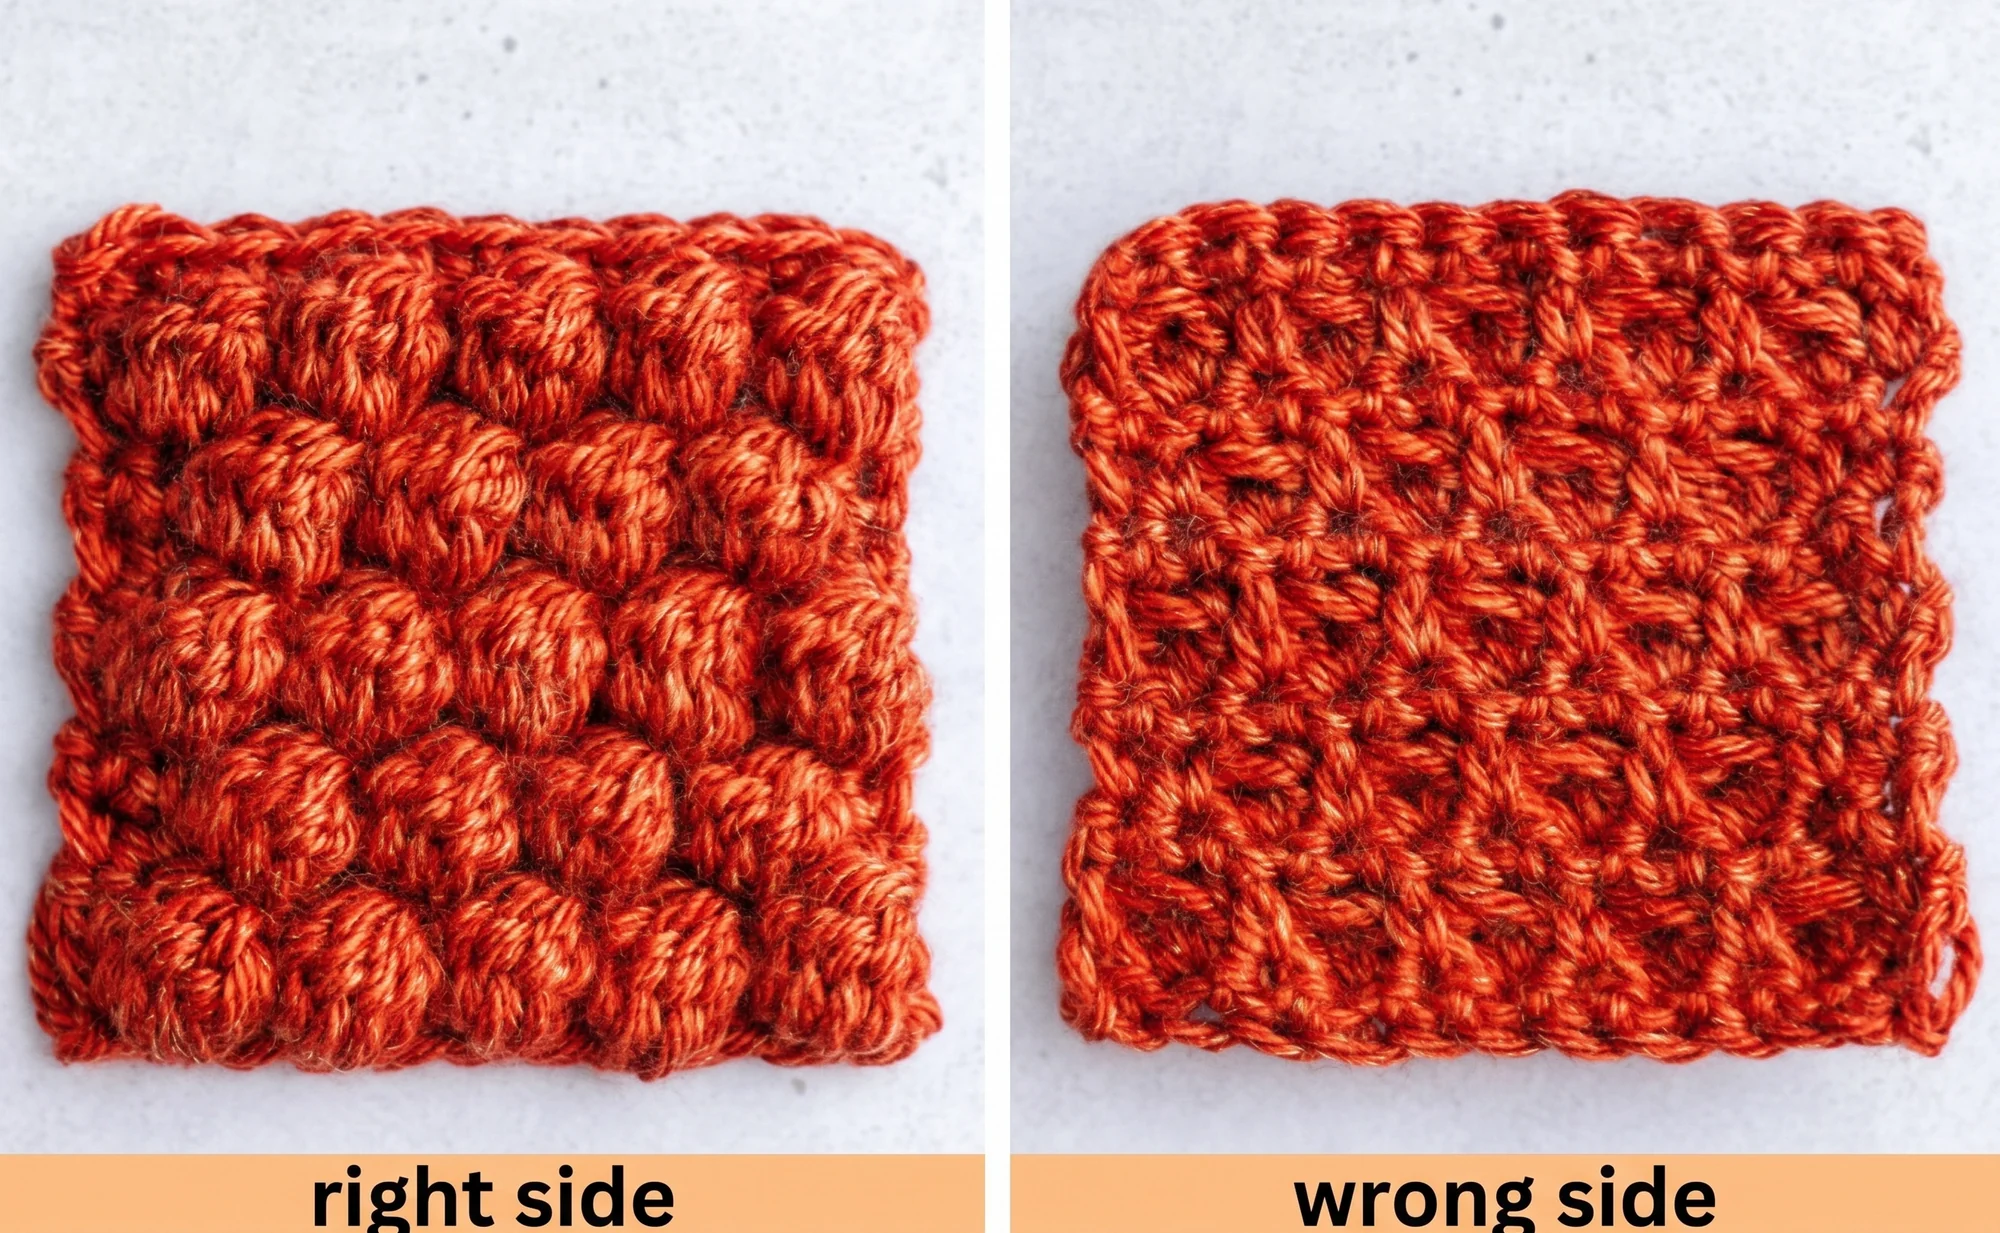
Decide which face is the front before you begin a project. For a flat piece that starts with a right-side foundation row, your first bobble row will usually be the row after you turn.
If a project is worked in rounds without turning, its visible side can differ from this swatch. Follow that pattern's direction for placing the bump instead of applying the flat-row rule automatically.
You do not have to put a bobble in every stitch. Plain stitches between bobbles keep the fabric easier to read and give each raised dot its own outline.
Mark the front of your practice swatch with a removable marker if turning rows makes the sides confusing. Move the marker only when you deliberately change which face is the right side.
Make one five-double-crochet bobble
Start with one loop on the hook and identify the base stitch where the bobble will sit. Every partial double crochet in this group goes into that same base stitch.
Step 1. Yarn over, insert the hook into the base stitch, yarn over again, and pull up a loop. You now have three loops on the hook.
Step 2. Yarn over and draw through the first two loops only. Stop with two loops on the hook instead of completing the double crochet.
Step 3. Repeat that partial double crochet in the same base stitch. You should have three loops on the hook after the second partial stitch.
Step 4. Continue until you have made five partial double crochets in that one base stitch. Count six loops: the original working loop plus one from each partial stitch.
Step 5. Yarn over and draw through all six loops. Slow down at the hook's throat if the bundle feels tight. One loop remains, and the bobble is closed.
Step 6. Work a single crochet in the next stitch specified by your row. That shorter neighbor helps the bobble stand proud of the fabric.
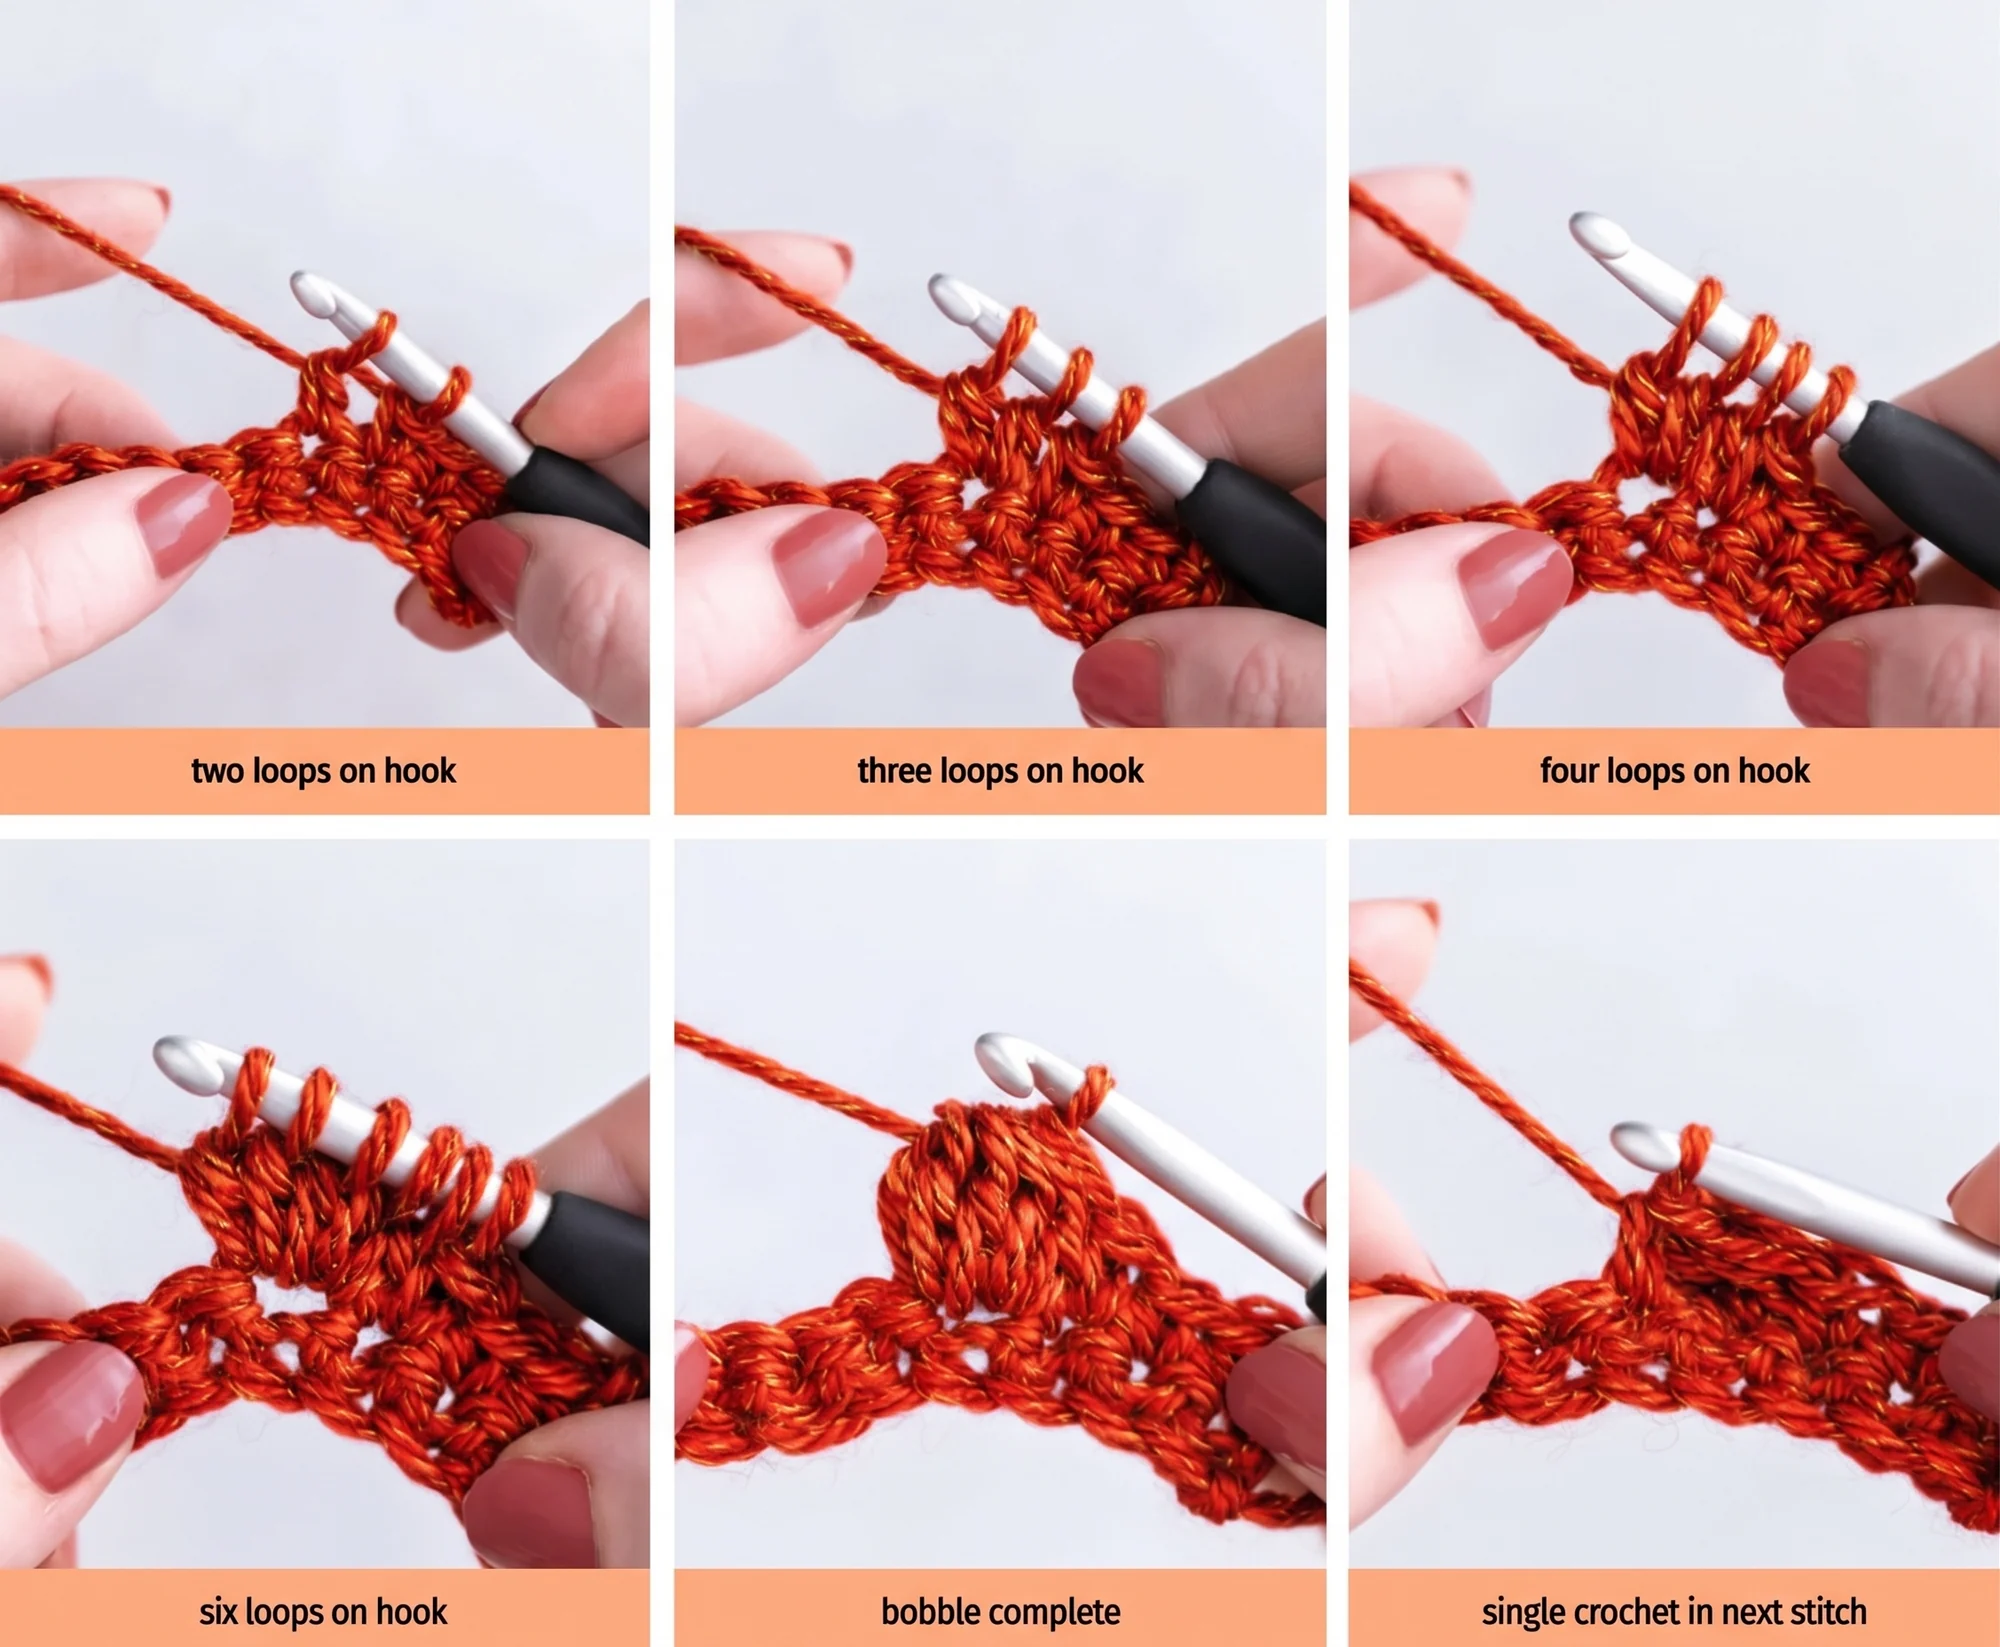
Some patterns add a chain after closing the bobble; others do not. This swatch skips the extra chain so that each bobble occupies one stitch in the 14-stitch row. Yarnspirations' five-double-crochet bobble lesson also notes that the securing chain is optional.
Before moving on, look at the top of the closed group. On the return row, work into the top of that one bobble stitch, just as you work into the top of its single crochet neighbors.
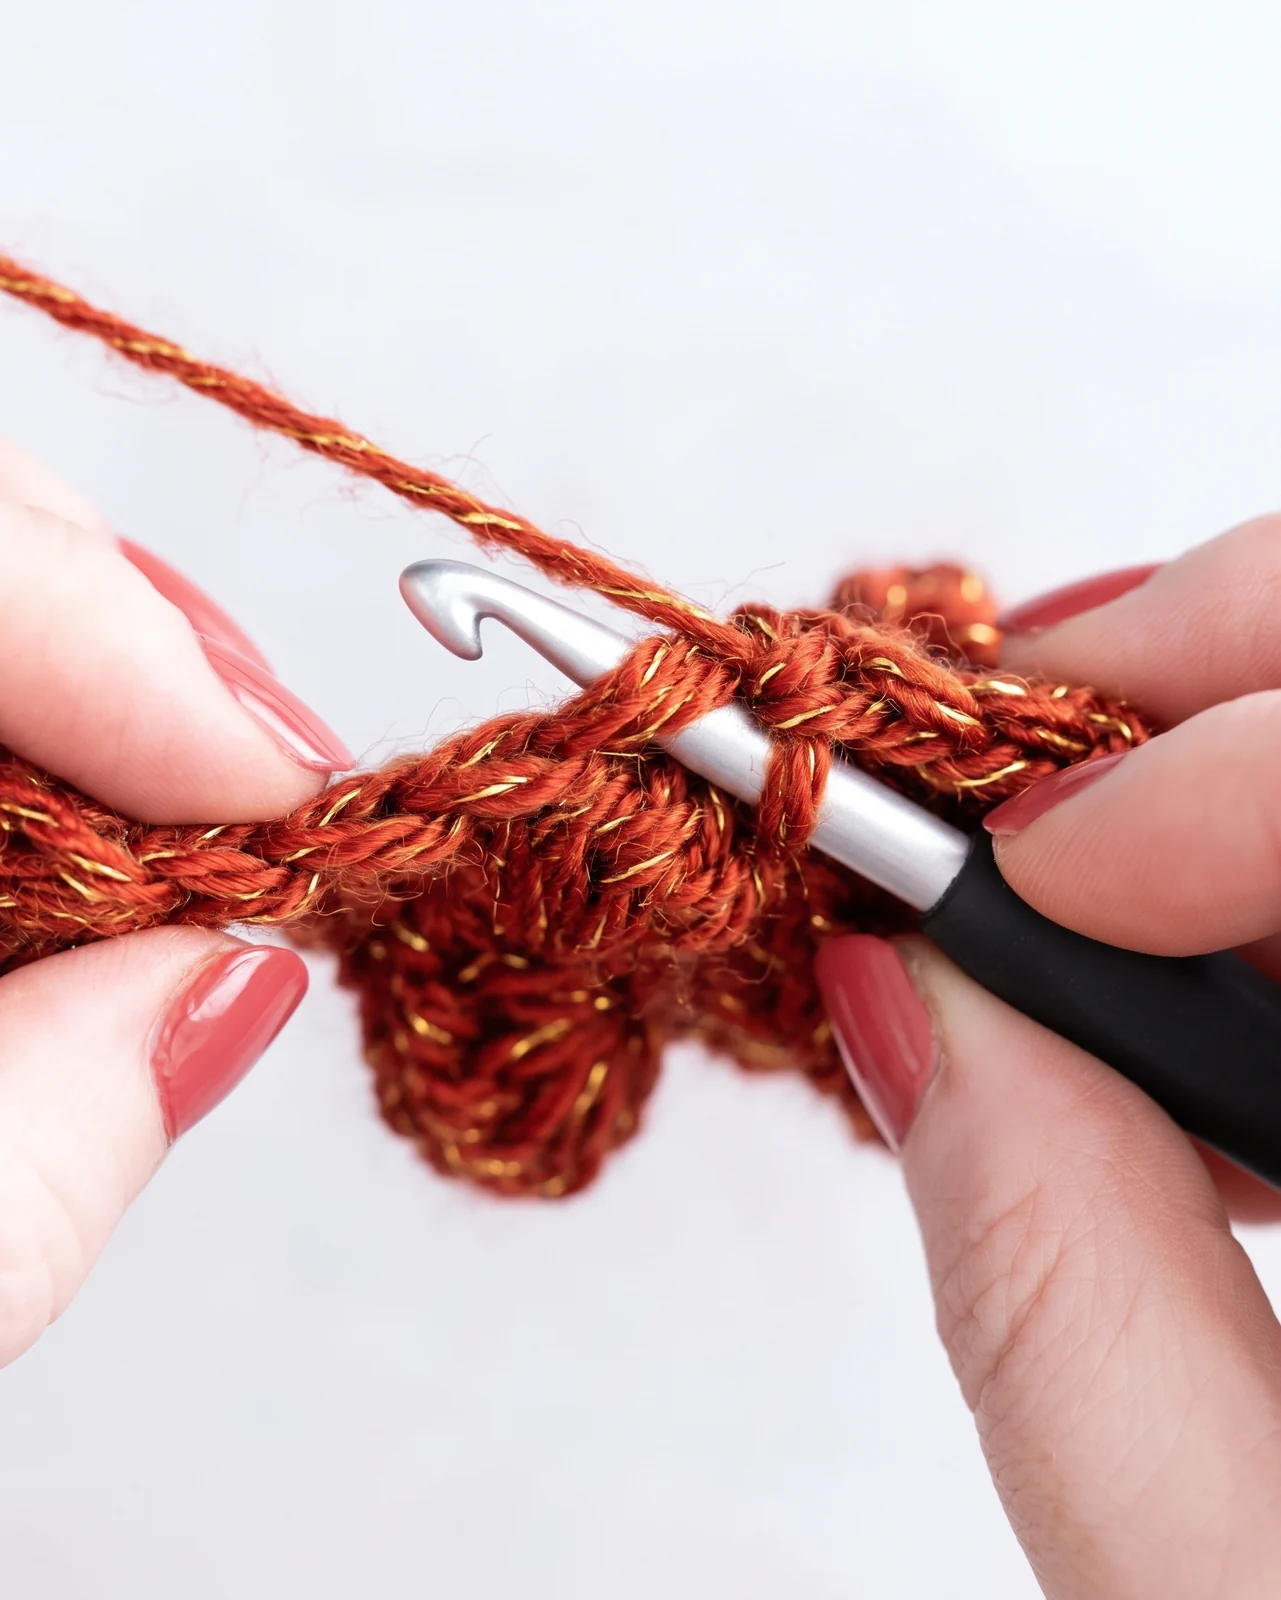
If the final yarn over will not pass smoothly through six loops, loosen the last partial double crochet slightly. Pulling the loops unusually tall is unnecessary; aim for enough room to move the hook without forcing it.


Practice with a counted swatch
Make 15 chains. Single crochet in the second chain from the hook and in every remaining chain. Count 14 single crochet stitches at the end of Row 1, then turn.
Treat Row 1 as the right side of this exercise. Your hook is now ready to work Row 2 on the wrong side, so its bobbles will push toward the front.
Row 2 (WS): Chain 1, single crochet in the first two stitches, then repeat bobble in the next stitch; single crochet in each of the next three stitches three times. Turn.
The row uses 2 single crochets plus three groups of 4 stitches: 2 + (3 × 4) = 14. The bobbles occupy stitch positions 3, 7, and 11 as you work across this row.
Row 3 (RS): Chain 1 and single crochet in each of the 14 stitches, including the stitch at the top of each bobble. Turn.
If you find only 13 stitches, check whether you skipped a bobble top or the last single crochet at the edge. If you find 15, check that you did not work into the turning chain.
Row 4 (WS): Chain 1, single crochet in the first four stitches, bobble in the next stitch, single crochet in the next three, bobble in the next stitch, then single crochet in the last five. Turn.
The two bobbles on Row 4 sit at positions 5 and 9, between the three bobbles from Row 2. This creates a simple offset without changing the width.
Row 5 (RS): Chain 1 and single crochet in every stitch across. Count 14 again. Repeat Rows 2–5 if you want a taller swatch.
When you have enough rows, cut the yarn with a tail long enough to weave in. Draw the tail through the final loop and secure both ends on the flatter side of the fabric.
On later repeats, the three-bobble row and the two-bobble row alternate. A plain single crochet row follows each bobble row, keeping the raised stitches on the same face.
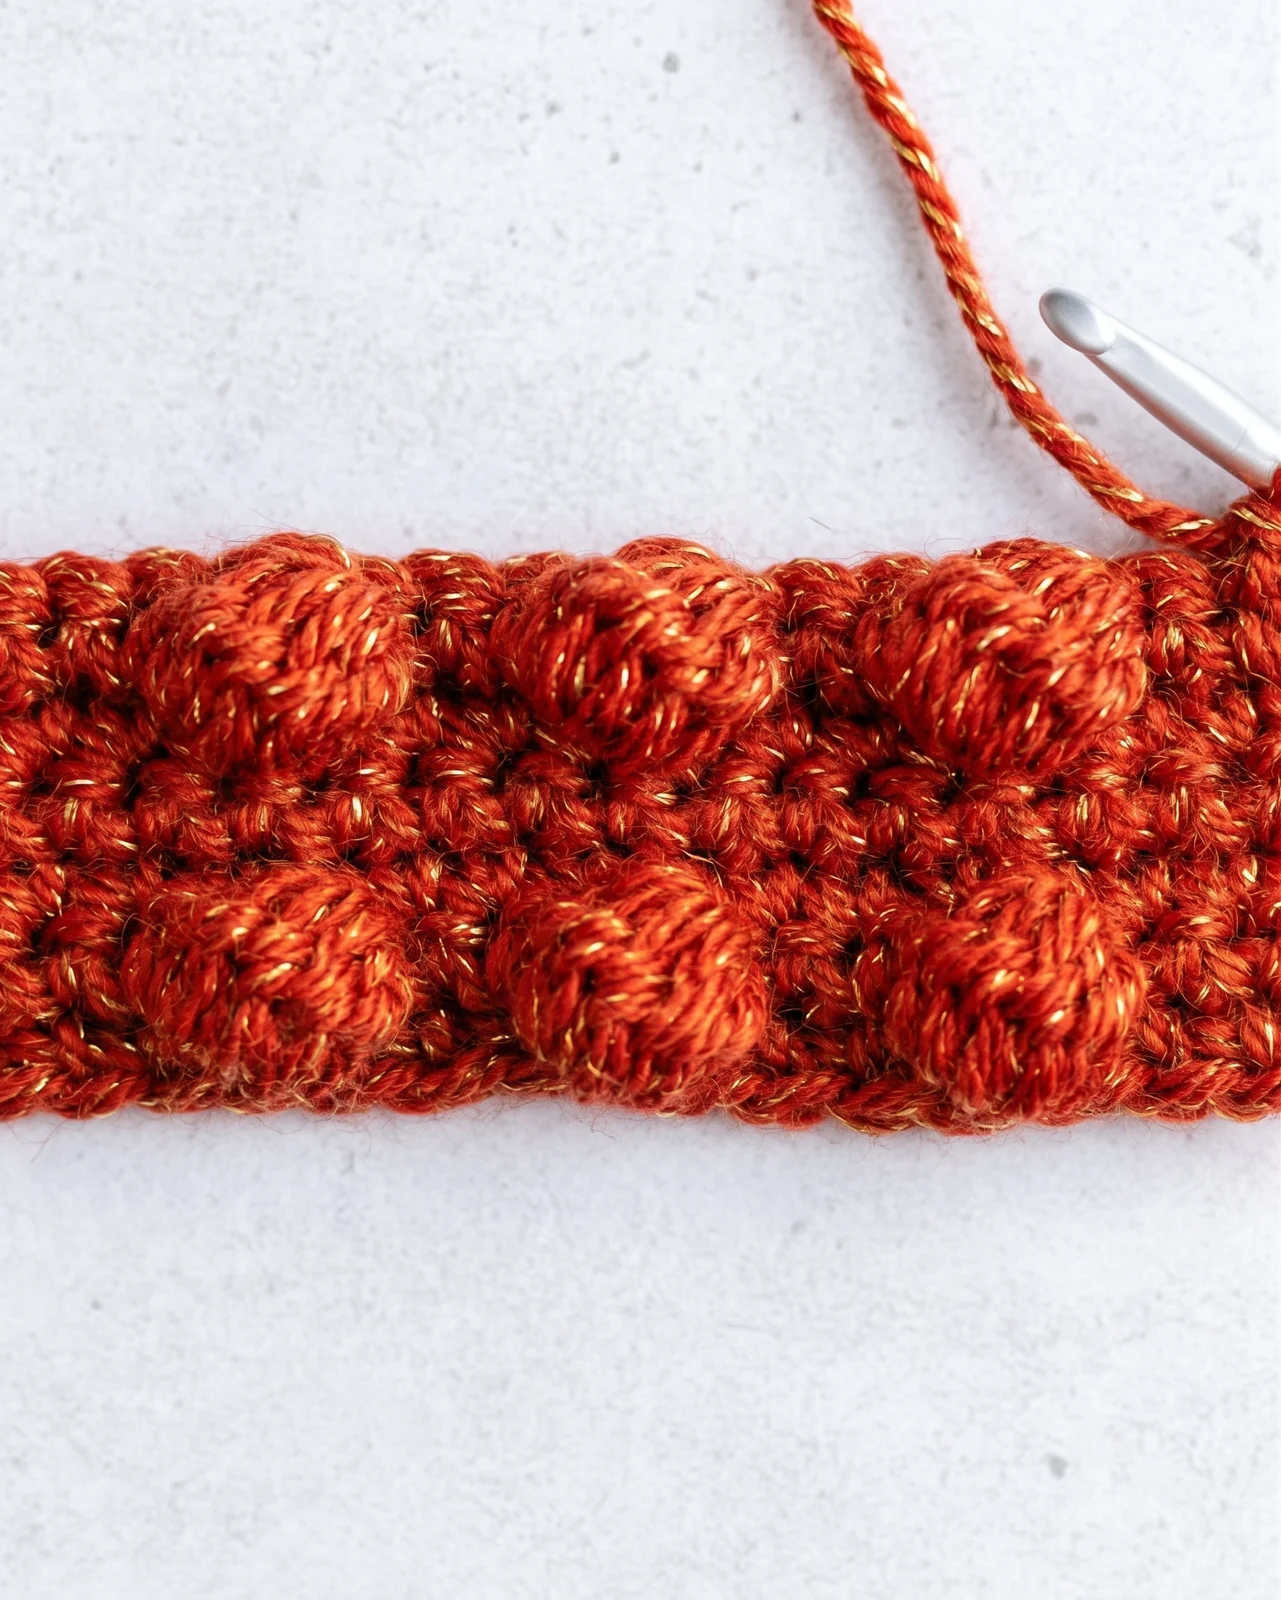
Check the first and last stitches of every row before turning. A marker in each edge stitch makes it easier to keep the sides straight while your attention is on the bobbles.
Adjust the look without losing your count
For smaller dots, use three or four partial double crochets in each bobble. The closing loop count changes accordingly: four loops for three partial double crochets, or five loops for four.
For taller texture, a pattern may build its bobble from partial treble crochets. If you need a refresher on the stitch itself, see our treble crochet tutorial.
You can also change the spacing. More single crochets between bobbles give a scattered texture; fewer create a dense surface that feels thicker in the hand.
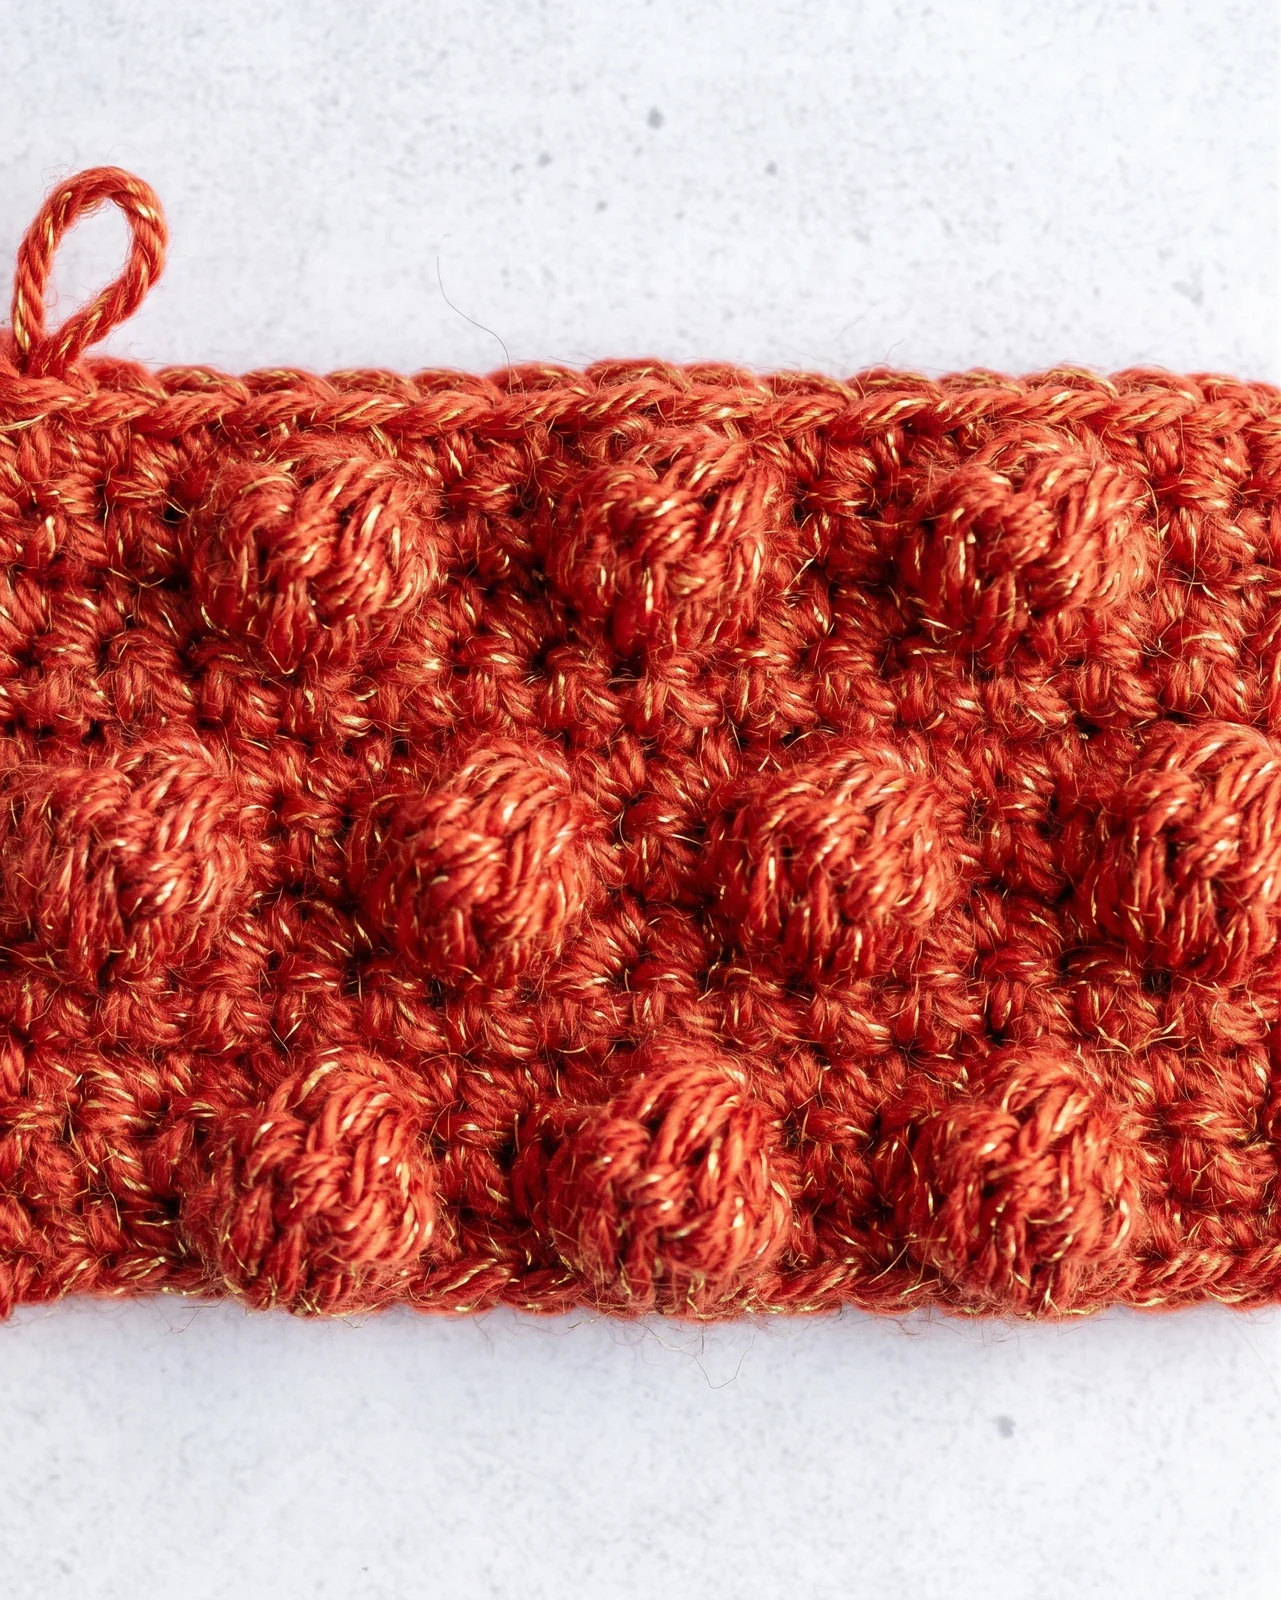
Changing the number or height of partial stitches may change the way a bobble sits and how much yarn a project uses. Make a small sample before changing a fitted pattern.
For a stripe of texture, keep bobbles to one or two rows and surround them with plain stitches. That gives a clear accent without requiring the whole fabric to be bumpy.
For a motif such as a flower center or animal detail, position one bobble where you want the raised point, then count the surrounding stitches carefully. The bobble itself still uses only one base stitch.


Fix common bobble problems
The bump faces the back. Check which side faced you while you made the bobble. On this flat swatch, the bobble rows are wrong-side rows and the raised dots appear on the right side.
The bump looks loose. Keep the partial double crochets similar in height, and close the group in one smooth draw. The following single crochet can help define its shape.
The closing pull feels difficult. Ease the working yarn slightly before the last yarn over. If the loops are crowded, move them onto the wider shaft of the hook before drawing through.
The swatch narrows. Count the 14 stitches after the next plain row. A bobble top or an edge stitch may be missing; return to the last row with the correct count before continuing.
The swatch widens. The turning chain does not count as a stitch here. Avoid placing an extra single crochet into it at the end of the row.
The dots do not line up. That may be expected: Row 4 deliberately offsets them. If you want vertical columns instead, place bobbles at the same stitch positions on each bobble row.
The fabric curls. Try a few more plain rows and lay the sample flat without stretching it. If the curling persists, make another small swatch with a more relaxed tension and compare the result.
The yarn splits. Work slowly enough to enter the complete top V of the next stitch. A smooth yarn makes the hook path easier to see while learning.
You lose track of five partial stitches. Count the loops just before closing: six for this five-double-crochet bobble. That quick check catches an unfinished group before it disappears into the fabric.
Where a bobble stitch works well
A few bobbles can add texture to a hat brim, the border of a blanket, or a decorative panel on a bag. Place them where the raised surface will be comfortable and useful.
On a baby item, consider whether projecting bumps suit the item's purpose and follow the pattern's safety guidance. A flat, washable swatch is a sensible way to judge the texture before making a full project.
Bobble rows can also interrupt a large field of single crochet. Use the swatch above to choose a spacing that looks balanced with your yarn rather than assuming one layout suits every weight.
When a pattern supplies its own bobble definition, use that version. Designers can vary the number of partial stitches, the stitch height, and whether a chain closes the group.
For a larger project, write down the stitch positions of your bobbles before you begin the next row. A short row note is more reliable than trying to judge the spacing by eye after you turn.
Bobble stitch questions
Does a bobble use more yarn than a plain stitch?
Usually, yes: several partial stitches are worked into one base stitch. The exact amount depends on yarn, hook, tension, and the bobble definition, so make a swatch if yardage is close.
Is a bobble the same as a popcorn stitch?
In the common constructions, a bobble closes several unfinished stitches together on the hook. A popcorn joins a group of completed stitches afterward. Always use the definition printed in your pattern.
Is a puff stitch different?
Many puff instructions use repeated yarn overs and pulled-up loops rather than partial double crochets. Names can vary among designers, so the written steps matter more than the label.
Can I work bobbles on both sides?
Yes, if a design intentionally puts bobbles on different rows or turns them toward different faces. This practice swatch keeps its bobbles on wrong-side rows to show all the bumps on one face.
What should I do after a bobble?
Follow the pattern's next stitch. In this swatch, make the indicated single crochet, then work into the bobble's single top stitch on the next row. Keep the row at 14 stitches.
Keep your first sample
The useful result is a swatch with raised dots on the side you chose and 14 stitches in every row. Small differences in dot shape are normal while you learn to handle the closing loops.
If your first attempt feels crowded, try the same steps with smooth yarn and a hook size recommended on its label. The loop count gives you a reliable checkpoint before each bobble closes.
Once the motions feel steady, vary one thing at a time: the bobble size, the space between dots, or the number of plain rows. Keep the 14-stitch exercise nearby as a reference for your next project.
What’s Next?
Pin this post: Save this tutorial to your Pinterest boards so that you can come back to it later.
Leave a comment: We love to hear your feedback. Tell me in the comments below!
Share on Instagram or Facebook: When you make this project, share it on social media and tag me @iheartdiybystacy. We love to see what you make!
Have questions? Join the Facebook Group!
We hope this article was useful for you! If you have any additional questions, feel free to join my Facebook Group. We created this group for you to share pictures, ask questions, and help each other out.
I hope this article was useful for you! If you have any additional questions, feel free to join my Facebook Group.
Join the group to share pictures, ask questions, and help each other out.
Have a question? Use the form above to submit your question or comment.
I love hearing from you and seeing what you made!